

OK. no more dancing around, time to add the gold legs. I started by engraving the cuts for the legs, first with a Lindsay Universal graver, followed by a Carl Bleile narrow graver, so the cuts are quite deep. The golden color of the legs is just the raw shibuichi base, no gold inlay yet.

Looking at the center leg (at 6 o’clock), I undercut the engraved groove with the small Ray Cover-style graver like a sharpened flat blade screwdriver. Just driving it right straight in perpendicular to the axis of each leg segment, with the graver tilted around 45 degrees. You must be careful not to damage the side nearest to your hand when you do this, so be conscious of the angle. You can also see the end of the gold wire I’ll use to inlay with.
If you’re wondering about the silver-colored leg, I previously inlaid that in .999 Fine silver, thinking to maybe save a little cost. I don’t like it, so I’ll remove it and use gold instead.

Here you can see the gold wire in the groove (at 3 o’clock), after hammering it in with a small brass punch in my Lindsay Airgraver. I followed up with the small steel punch, driving the gold further in, and working off the excess by hammering it into thin leaf.

Above, you can see all three of the right side legs inlaid with gold. I used a tiny burnisher to further thin the excess gold into leaf, and lightly scraping it away with the burnisher.

So far, I inlaid each leg separately, trying a few different techniques as I went. Above, I’m working the left side legs as an assembly line, in case there will be problems with the legs being so close. As it turns out, the assembly line method is the way to go.

And here are all the legs inlaid. Notice how the gold legs blend in a little with the background. This will be alleviated somewhat when I patina the pendant, but I need to use another technique to provide a little more definition as well.

Above, I used a really tiny Lindsay Universal graver that I normally use for cutting small shading lines, and have outlined the legs. I’m trying really hard to cut into the base metal (shibuichi), and not the gold. Notice the difference in definition between the two sides, remembering that these little outlines are almost invisible to the naked eye!
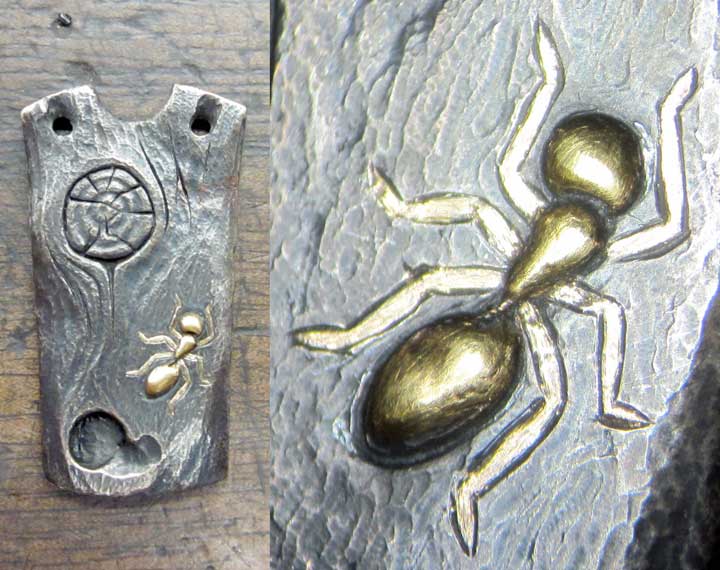
 And, finally, the front side of the pendant is finished! Now to add my signature to the back, texture the silver sides, and assemble it. I’ll do that tomorrow…