Check out Tom’s podcast interview with Kevin Barnett of Carbide3D – The Maker’s Garage! Hear Tom’s words of wisdom and deep artistic philosophy about CNC and engraving…amaze your friends! Mention that at any coffee shop
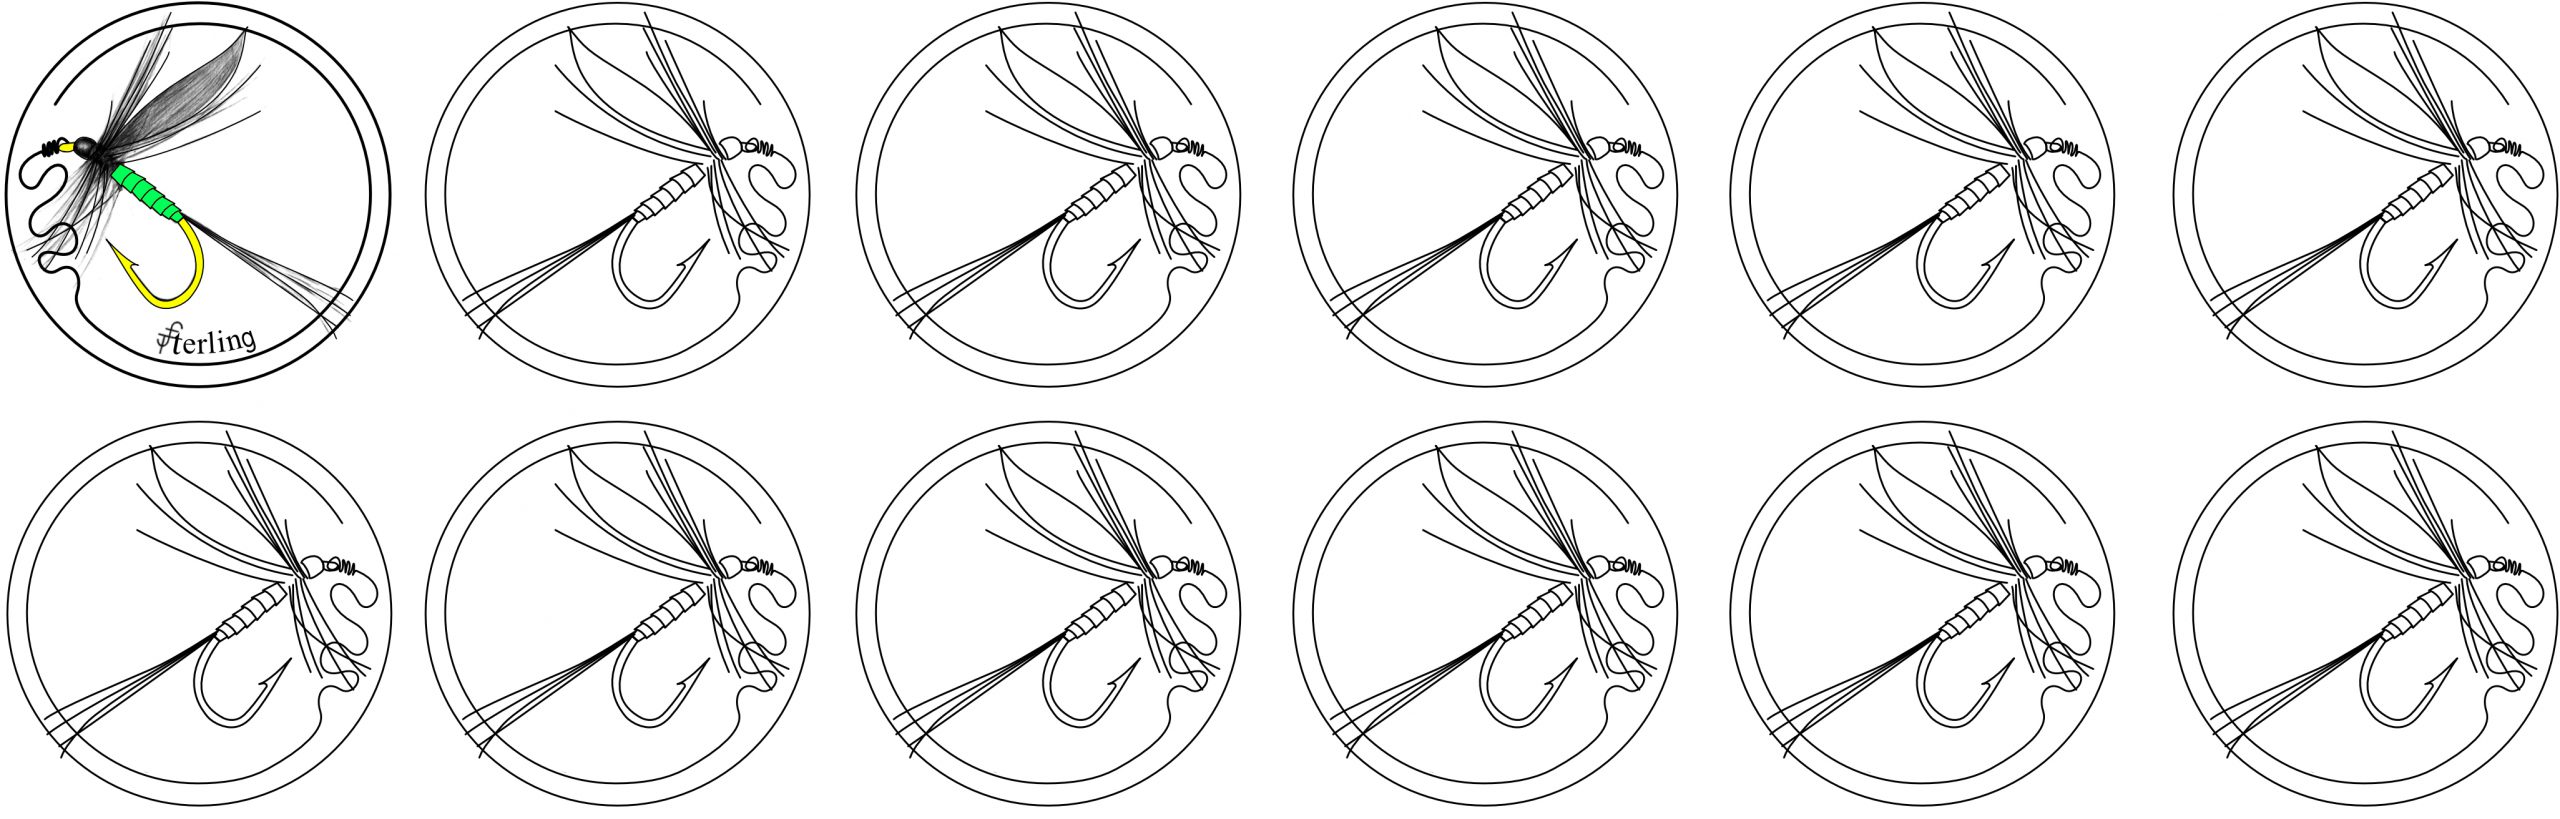
Check out Tom’s new eBook tutorial, Engraving a Classic Adams Trout Fly. If you’re one of the many engravers who love fly fishing, then this is for you! All for the princely sum of $2.99 (USDollars).
Engraving a Classic Adams Trout Fly is intended for experienced intermediate or advanced skill engravers. These instructions lead you step by step through creating your own hand engraved and gold inlaid Adams-style trout fly, a classic fly pattern that’s well known to every fly fishing enthusiast. Detailed illustrated instructions teach you to engrave a tiny beautiful and graceful Addams fly to really enhance your fly fishing art.
Nine pages and 33 illustrated individual steps of fun and beautiful tutorial will help you learn to quickly produce these tiny engraved flies. With a little practice , you’ll soon be ready to embellish your own original creations!
The sky’s the limit as you apply these simple techniques to create amazing eye-popping embellished designs. You’ll be able to use these same techniques to make many other kinds and styles of trout fishing flies. Ideal for a wide range of fly fishing related equipment, crafts and jewelry uses.
Author’s Note – This book is best viewed on electronic devices that support color. Many of the images and instruction figures and drawings may be more difficult to follow on devices that render images in grayscale or black and white.
Check out Tom’s new eBook tutorial, Making Gold Cherry Blossom Inlays for Engravers If, like me, you’re fascinated by hand crafts from the past, here’s how to create your own elegant inlaid precious metal cherry blossom works of art from Japanese art history. All for the princely sum of $2.99 (USDollars). Download for Amazon Kindle Here, $2.99 USD Download for Apple Books Here,$2.99 USD
Making Gold Cherry Blossom Inlays for Engravers is intended for experienced intermediate or advanced skill engravers. These instructions lead you step by step through creating your own hand engraved and inlaid gold cherry blossoms. Detailed illustrated instructions and materials source list teach you to make a hardened steel punch for preliminary shaping of inlaid cherry blossoms
, followed by adding hand engraved details for tiny, elegant cherry or plum blossoms to really enhance your art.
Forty pages of fun and beautiful tutorial will help you learn to create these tiny gold blossoms. With a little practice , you’ll be able to produce a finished blossom in about thirty minutes. Once you’ve mastered these simple techniques, you’ll be ready to embellish your own original creations!
The sky’s the limit as you apply these simple techniques to create amazing eye-popping embellished designs. Ideal for a wide range of reenacting, cosplay, crafts and jewelry uses.
Author’s Note – This book is best viewed on electronic devices that support color. Many of the images and instruction figures and drawings may be more difficult to follow on devices that render images in grayscale or black and white.
Check out Tom’s new eBook , Making Buckskin Pouches and Bags – Simplified Instructions If, like me, you’re fascinated by hand crafts from the past, here’s how to easily make your own buckskin pouches and bags that were EDC (everyday carry) works of art from past history. All for the princely sum of $3.99 (USDollars). Download for Amazon Kindle Here, $3.99 USD Download for Apple Books Here,$3.99 USD
Making Buckskin Pouches – Simplified Instructions leads you step by step through creating your own rustic leather pouches. Replete with seven different patterns, detailed illustrated instructions and minimal materials and tools source list, you’ll be able to make a number of inexpensive and attractive pouches.
81 pages of instruction, five fun and beautiful tutorials will help you quickly progress from simple no-sew pouches to larger, fully sewn bags. Once you’ve mastered these simple techniques
Celtic Line Drawing – Simplified Instructions leads you step by step into the fascinating world of creating Celtic knots. Replete with sample drawings, templates and illustrated instructions, this simple but powerful and flexible approach will have you creating intricate plaitwork designs on paper in just minutes.
231 pages of instruction, eight fun and beautiful tutorials will help you quickly progress from elegant plaitwork to more spectacular designs that utilize Cutwork, Circles, Spirals and your own original creations!
The sky’s the limit as you apply these simple principles to create amazing designs. Ideal for fine art
Author’s Note – This book is best viewed on electronic devices that support color. Many of the images and instruction figures and drawings may be more difficult to follow on devices that render images in grayscale or black and white. Apple iPad/iPhone/Mac users should download from the Apple link – Amazon Kindle Reader will not render this eBook correctly on Apple products. Apple downloads here: https://itunes.apple.com/us/book/celtic-line-drawing-simplified-instructions/id1453924361
Free Useful and Fun Downloads for non-Commercial use:
Above is a full page of Plaitwork and Cutwork Squares. Click on the image, and download to your computer. Be certain to choose the option to View Full Size. Print in Portrait mode.
Above is a full page of Cutwork Circles. Click on the image, and download to your computer. Be certain to choose the option to View Full Size. Print in Portrait mode.
Above is a full page of Cutwork Ovals. Click on the image, and download to your computer. Be certain to choose the option to View Full Size. Print in Portrait mode.
Above is a small size Plaitwork and Cutwork Square to Circle. Click on the image, and download to your computer. Be certain to choose the option to View Full Size.Print in Portrait mode.
Above is a larger size Plaitwork and Cutwork Square to Circle. Click on the image, and download to your computer. Be certain to choose the option to View Full Size.Print in Portrait mode.
Book of Kells Velociraptor Bookmarks by Tom Sterling Print in Landscape mode on cardstock
Try a fairly complicated Celtic Animorph – a Celtic Earwig (PNG format), grids, cuts and sample weave included. Click on the image, and download to your computer. Be certain to choose the option to View Full Size. Print in Portrait mode. Enjoy
Celtic Animorph – a Celtic Stag Beetle (JPEG format), grids, cuts and sample weave included. Click on the image, and download to your computer. Be certain to choose the option to View Full Size. Print in Portrait mode. Enjoy
Celtic Line Drawing – Simplified Instructions leads you step by step into the fascinating world of creating Celtic knots. Replete with sample drawings, templates and illustrated instructions
, this simple but powerful and flexible approach will have you creating intricate plaitwork designs on paper in just minutes.
231 pages of instruction, eight fun and beautiful tutorials will help you quickly progress from elegant plaitwork to more spectacular designs that utilize Cutwork, Circles, Spirals and your own original creations!
The sky’s the limit as you apply these simple principles to create amazing designs. Ideal for fine art, coloring books, mandalas, crafts, scrapbooking, journaling, woodburning, leather tooling or just amusing yourself with a pen and paper while waiting at the doctor’s office.
Author’s Note – This book is best viewed on electronic devices that support color. Many of the images and instruction figures and drawings may be more difficult to follow on devices that render images in grayscale or black and white. Apple iPad/iPhone/Mac users should download from the Apple link – Amazon Kindle Reader will not render this eBook correctly on Apple products. Apple downloads here: https://itunes.apple.com/us/book/celtic-line-drawing-simplified-instructions/id1453924361
Basic Plaitwork in Action – see the animated GIF Above!
Beginning with easy Plaitwork, you’ll learn a few simple rules that automatically produce complicated looking weaves, perfectly spaced and interwoven – IT’S EASY!
Next, we’ll add just a few more simple procedures and advance to Celtic Cutwork. Here’s where the real fun begins
From Cutwork, we’ll dive into Celtic Circles. My favorites! Beyond elegance…yet still deceptively simple. There’s no stopping you now!
And finally, my newest discovery, Celtic Square to Circles! Still the same simple rules, and combining Plaitwork, Cutwork and Circles together. Visually stunning, yet the complicated weaves, spacing and layout are all AUTOMATIC!
CNC milling the “Nightmare Frog Pocket Fetish” in tellurium copper. I fought with computer modeling this monster all weekend!
Here’s what the CNC was milling beneath the coolant bath. The “Nightmare Frog Pocket Fetish” in tellurium copper. This side needs gold eyes and some screws. After that, something needs to be engraved on the back. That’s a quarter next to it…
Here’s the backside of the “Nightmare Frog Pocket Fetish” in tellurium copper. This side is being hand engraved. You can see it from the design transfer stage to the completed 24 karat gold gear inlay.
Halfway finished removing background on the hand engraved rear side of the “Nightmare Frog Pocket Fetish.” Tellurium copper
With texturing and shading on the hand engraved portion of the “Nightmare Frog Pocket Fetish” I’m going to call this side finished. Now to finish the CNC frog side…
Back to the CNC side of the “Nightmare Frog Pocket Fetish” in tellurium copper. Inlaying 24 karat gold in the eyes.
Texturing the background in the “Nightmare Frog Pocket Fetish” in tellurium copper. Difficult to get the tiny carbide bur down into the tight spots. Have to be very careful not to let it get out of control!
With the addition of a small leather wallet , the “Nightmare Frog Pocket Fetish” is finished. A little more than 2 inches tall, in 1/4 inch thick tellurium copper and 24 karat gold.
Starting a frog skeleton dogtag project on a Grade 1 titanium Boker-brand blank. I begin by cutting the outlines, then inlaying the 24 karat pure gold.
Removing the background on the titanium frog skeleton dogtag. A pretty big job…
Here’s how you carve a medium-relief fly on the titanium frog skeleton dogtag. Still need to add detail to the wings…
Sculpting the frog on the titanium frog skeleton dogtag. Almost there! The titanium frog skeleton dogtag is finished!
I’m baaaaack! Starting a Japanese-style koi engraving on a sweet little WESN folding knife. The Grade 5 titanium (6Al4V) scale is pretty tough stuff, but this little neck knife is so nice I’ll suffer through!
Adding 24 karat gold inlays and removing the background on the Grade 5 titanium WESN Knife
Sculpting the “splash” on the Grade 5 titanium WESN Knife. 1st deepening the cuts next to the fish
Beginning a tellurium copper pocket fetish with the previous crab theme. However, I first have to cut the design on the back side, because if I cut the front side first, I’ll never get the piece square and flat in the vise. Got to think ahead with CNC, ‘cause the computer certainly won’t!
There has been some concern from my readers about tellurium in this alloy. Tellurium is only present in tiny amounts in the alloy and the only hazard listed in the MSDS is dust inhalation. Folks are probably thinking of beryllium copper, which does have significant health risks. Also, don’t forget that copper is a heavy metal, too. There’s no extra hazard in just handling tellurium copper (aka copper 145). Here’s a link to the MSDS: http://www1.mscdirect.com/…/MSDS0…/40714214-20120815.PDF
Try it, you’ll like it. Carves, mills and engraves really well. My only complaint is the thinnest I’ve been able to find is 1/4 inch thick. I have rolled it through my rolling mill to thin it successfully, but going from quarter inch to thinner is a lot of work!
Here’s the front side of the tellurium copper crab pocket fetish. This is about halfway through the CNC roughing pass with a 1/8 inch carbide square end mill.
Saving the tellurium copper crab pocket fetish… Side B (the octopus) milled correctly, but about 2/3rds through the CNC milling process of the crab the machine stalled (maybe a power transient?) before the finishing pass to refine the details. While the result is pretty cool, it isn’t what I had in mind, and it’s even missing the third leg on the left side. Not to worry, I’ll be using hand engraving techniques to save the 4 hours of milling and days of computer modeling. With a square graver, tiny carbide ball burrs and flat nosed punch I’ll be engraving and carving the details the CNC missed.
Saving the tellurium copper crab pocket fetish… With a square graver and tiny carbide ball burrs I’m hand engraving and carving the details the CNC missed.
Saving the tellurium copper crab pocket fetish… The lonely crab needs some silver barnacles. I melt a ball on the end of a silver wire and use a tiny homemade blacksmith’s nail header to create fat rivets. Here I’ve used punches to shape the barnacles. Still need to detail the barnacles…
Saving the tellurium copper crab pocket fetish… The lonely crab needs some silver barnacles. I melt a ball on the end of a silver wire and use a tiny homemade blacksmith’s nail header to create fat rivets. Here I’ve used punches to shape the barnacles. Still need to detail the barnacles…
The tellurium copper crab pocket fetish is finished…all it needs now is a tiny leather wallet to protect it in your pocket. Thanks for looking!


