
Originally produced for the Bladesmith’s Forum, August 2012: http://www.bladesmithsforum.com/index.php?showtopic=24166
I’ve been asked to create a tutorial on simple hammer and chisel engraving, and I’ve chosen to do one oriented towards knifemakers. But, let’s get a few things straight up front, so no one has any illusions. This tutorial WILL NOT make you an engraver. It is ONLY intended to give you the tiniest sip from the engraving fire hose, and allow you to determine if you have any interest in engraving. It is designed to give you a brief survey without making you a pauper or forcing you to sell your firstborn. You must understand that engraving is difficult at best and it has a LONG AND STEEP learning curve.
I’ve chosen the easiest and cheapest way for you to create and sharpen a successful graver, but the system is not free. There are many, many ways to make a workable graver IF YOU KNOW HOW, or have an experienced engraver at your side to teach you. If you choose to do anything other than what I am presenting here, then YOU ARE ON YOUR OWN! I have neither the time nor the inclination to answer a hundred questions about why the graver you cobbled together won’t work. Don’t even bother to post your question here. In fact, if you have a question about sharpening your graver, I won’t bother to help unless you post a picture of your sharpening setup! On this one point it’s my way or the highway. Period.
If that’s understood, then let’s get started. If money is a problem and you are REALLY keen on trying engraving, then hammer and chisel is a fairly inexpensive way to give it a try. The only problem with H and C is the LONG learning curve to get acceptable results in any kind of complex engraving.
However, that said, there are some excellent shortcuts available today that will definitely help. The engraving world is full of grey beard engraver’s horror stories of their apprenticeships; “I wasn’t allowed to do anything during the first (fill in the blank with a number) years except learn to hand sharpen a basic graver. I didn’t engrave anything for the first 23 years, and they wouldn’t let me touch a gun for another 35 years” yada yada yada.
I believe that sharpening a graver and getting repeatable results is by far the most important, basic thing to learn, and there are some excellent sharpening devices available now that weren’t available just a few years ago. They make sharpening a piece of cake.
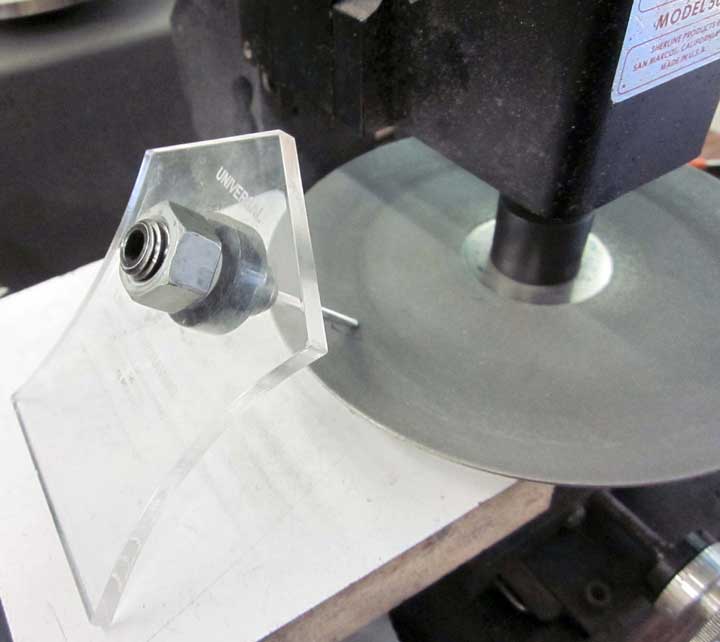
Here’s what you want to start with – Lindsay Graver Sharpening System: http://airgraver.com/sharpening.htm A note here: I am not employed by Lindsay Engraving, nor do I receive any sort of benefit from Lindsay Engraving. These are just plain brilliantly foolproof tools and fixtures.
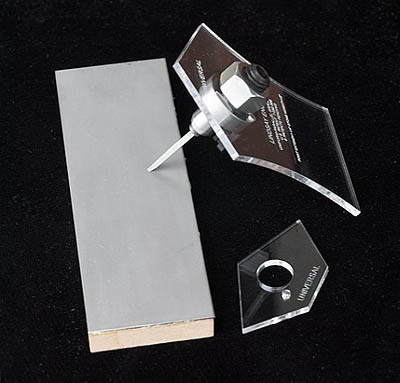
Above is the Universal 116 degree fixture, shown here with a diamond bench stone for hand sharpening. There are quite a few additional templates (the clear plastic parts above) available to make and sharpen other types of gravers, most of them under $25. You only buy the metal graver holder once.
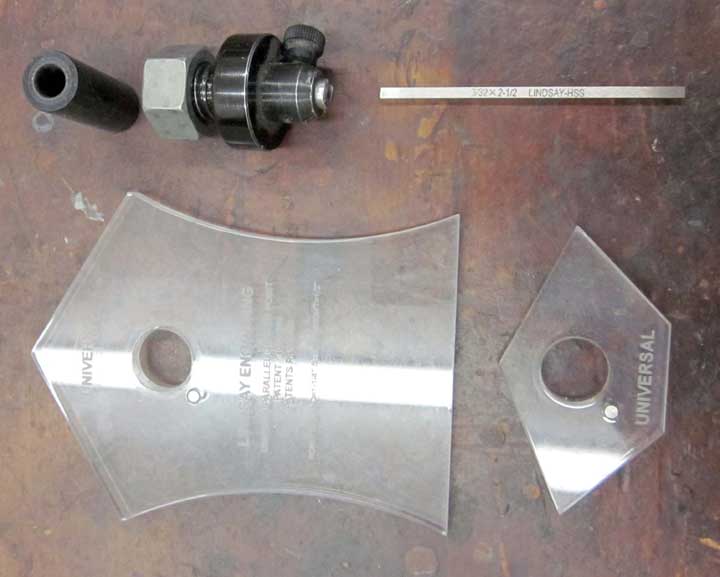 Above is my Lindsay Universal sharpener, shown disassembled. If you do find you wish to continue in engraving, this sharpening system will be of daily use to you.
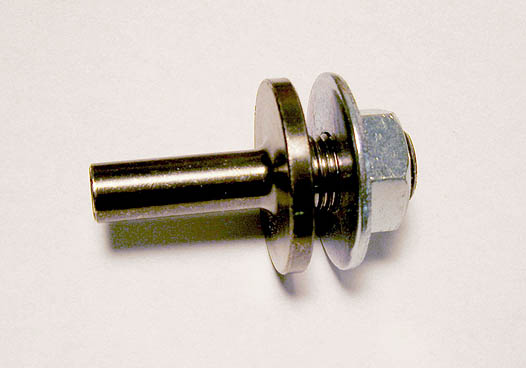 If you have a drillpress, shown above is the Lap Mandrel Adapter for converting a drillpress to a power hone (about halfway down the page): http://airgraver.com…AVER SHARPENING

Above is one of the Lindsay Templates in use with the converted drill press mandrel and diamond lap.
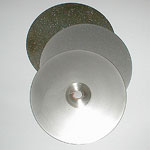
You’ll also need a diamond lap with the mandrel, I’d recommend the 600 grit to start with (same page).

For the chisel part, Lindsay also sells one here (Stainless Chisel that holds 3/32″ square gravers for hammer/chisel engraving): http://airgraver.com…al Graver Tools


Or, you can make your own with a piece of mild steel rod. Above is the one I made and occasionally use. Drill a 1/8 inch hole in the end, with an allen screw drilled and tapped crosswise to retain the 3/32 inch square graver. Round the end that you hammer on, and chamfer the end with the graver so you don’t mar your engraving. Don’t forget to grind or file a flat side down the length so it won’t roll off your bench and land on the point of the graver (absolutely guaranteed otherwise!).
You’ll also need an engraver’s hammer, or at least a small ball peen.
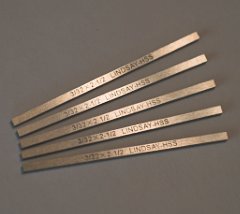
And, finally, you’ll need some graver blanks (start out with the inexpensive HSS gravers, about halfway down the page): http://airgraver.com…al Graver Tools
You can begin engraving on a piece of mild steel, brass or copper hot glued to a heavy, flat block of wood (say about 12″ x 12″ and two inches thick). If that doesn’t dampen your enthusiasm, then purchase or begin assembling a pitch bowl. After that, an engraver’s vise, and then the sky is the limit.
An optivisor will be helpful. I use a stereo microscope for almost all of my work, but I’m getting a little long in the tooth and my eyes aren’t what they once were…
Don’t skimp on the sharpening fixture and either the diamond bench stones or the drillpress setup. You WILL break MANY graver tips. Trying to hand sharpen without these aids can be done, but will be VERY, VERY FRUSTRATING! I don’t personally know any engraver who hand sharpens gravers today.
One other thing. I’ve noticed that all professional engraving tools involve prices measured in hundreds. Very little engraving equipment is available that is priced under a hundred bucks, and most things are many hundreds. Just so you know! You’re about to start out on a path of many very bad habits, more expensive than smoking and at least as addictive. But, engraving won’t kill you. Engraving might cause your significant other to kill you, however….
If you check out this thread on the Engraving Forum (http://www.engraving…ight=networking), you can probably find an engraver near you to go visit. Most engravers are like the bladesmiths and blacksmiths on this forum – friendly and helpful. A test drive and a little face time will go a long way towards answering your questions and encouraging you, and will shorten the learning curve dramatically. Good luck!
Below is the minimum you need to buy for the drill press version, you can easily make graver holders and make do with a small hammer:
Sharpening Fixture without stones
(comes with Universal 116 degree V template) $89.00
600 grit Diamond lap $25.00
Lap Mandrel Adapter for converting a
drill press to a power hone $19.50
High Speed Steel gravers (pack of 6) $30.00 Total (not including shipping) $163.50
And below is the minimum you’ll need with the bench stone version (you can rough out the graver blank with a regular bench grinder, and just refine the cutting end by hand). I REALLY recommend the drill press route…
Sharpening Fixture without stones
(comes with Universal 116 degree V template) $89.00
Bench stone 600 diamond grit $39.00
High Speed Steel gravers (pack of 6) $30.00
Total (not including shipping) $158.00
And let me repeat the one piece of wisdom you need to understand – It is the business end of the graver (the cutting point/face and heels) that will determine if you make a success of this. Without the ability to properly create, sharpen and RE-SHARPEN a graver, nothing else will matter and this will simply be an exercise in FRUSTRATION! Been there, done that, and I have a few dozen t-shirts…
If you find you don’t like engraving, you can probably recover at least some of your money by selling the stuff you bought on either the Engraver’s Cafe or the Engraving Forum.
And, finally, visit an engraver! Join the two engraving forums (they’re free, just like this one) and ask if there are any engravers in your area willing to let you visit.
Sorry to turn this into a lecture, but this is the key to success in engraving. Best of luck!
To answer a previously asked question, why do you need High Speed Steel (HSS) gravers? When using power sharpeners to shape gravers, HSS won’t be damaged by heat build up like simple carbon steels will. Also, HSS, carbide, Carbalt™, M42 (and a GRS brand carbide whose name escapes me at the moment) provide more reliable and better hardness than a hit-or-miss simple carbon steel home hardening/tempering routine. Since you are a bladesmith, think of the tiny point of a graver as a very high performance knife that must be sharp, stay sharp, function absolutely predictably, fail as seldom as possible and be quick to get back into the fight if it does fail.
Also, different alloy gravers provide better, smoother cuts on different kinds of metals. For instance, carbide alloy gravers cut silver and copper smoother and with a better finish than steel gravers, so the hardness of the workpiece isn’t the only issue.
Most professional and serious hobby engravers use power sharpeners – time is money and enjoyment.
In engraving, having reliable and repeatable hardness and sharpened cutting points means fewer slips and fewer broken tips which lead to slips, fewer slips mean fewer ruined engravings or mistakes to fix.
10 or 20 or 40 hours (or MANY more hours) into a complex engraving full of gold inlay (at $1600 per ounce), then having your poorly-sharpened homemade POS graver tip break and slip and ruin the work? All just to avoid buying a $6 HSS graver blank? It’s bad enough using properly made and sharpened gravers. Believe me when I say you will need as many factors working in your favor as you can get. Engraving isn’t an art where you can just toss it back into the forge and fix a missed hit or straighten it and try the bend again.
The benefit of HSS isn’t so much in the using, it’s in the sharpening and not ruining the temper due to heat build-up from a rotating diamond disk. The point of a graver is a tiny thing, it doesn’t take much heat to ruin the temper. It is not a cold chisel. Plus, HSS comes ready to use – you don’t do any heat treatment. Hence the diamond stones or laps.
There are lots of ways to make and sharpen a graver. Some of the best engravers could sharpen a nail on the sidewalk and create a masterpiece. What I have tried to do here is show the simplest, most inexpensive but also foolproof method of doing the one thing in engraving you MUST do well to be successful. If you feel you simply have to strike out on your own to rediscover fire and reinvent the wheel, knock yourself out. Please do it somewhere else. I prefer to engrave rather than do research and development.
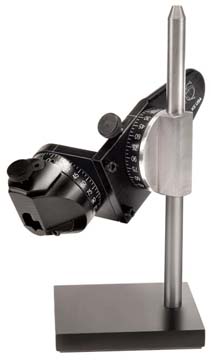
I’ll mention one other method of sharpening that will work reliably for you. GRS sells the GRS Dual Angle Sharpening Fixture (see above).
http://www.grstools.com/tool-sharpening/power-hone/sharpening-fixtures.html

And, above, is my Hamler Fixture (no longer commercially available). Both of these are well made, adjustable sharpening systems that will produce reliable results. If you wish to use one of these devices, here is a link to instructions on how to grind the Lindsay Graver Point geometry (see bottom of Web page): http://airgraver.com/engraving_graver.htm You’ll have to agree to a patent license agreement, but it is free.
I’m not going to spend lots of time describing the use of the Lindsay Sharpening System. The Lindsay tool web site has an excellent tutorial for that, as well as an excellent video.
Here’s the link: http://www.engravingschool.com/private/Lindsay%20Sharpener.htm

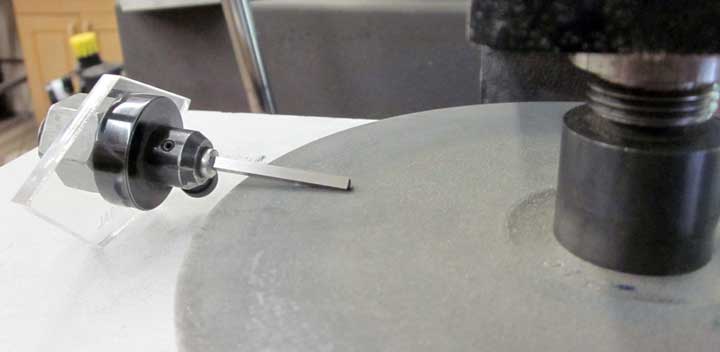
Here’s one of my sharpening setups in my little Sherline mill, about the same as the Lindsay lap mandrel in a drill press. I use a small slitting saw holder for my diamond laps. The surface the Lindsay template rests on needs to be 1/2 an inch below the top surface of the diamond lap. I have to use a piece of wood to provide enough clearance for the bottom of the slitting saw holder.
Above is the smaller of the two Universal templates in use to grind the basic top and bottom facets on the graver.
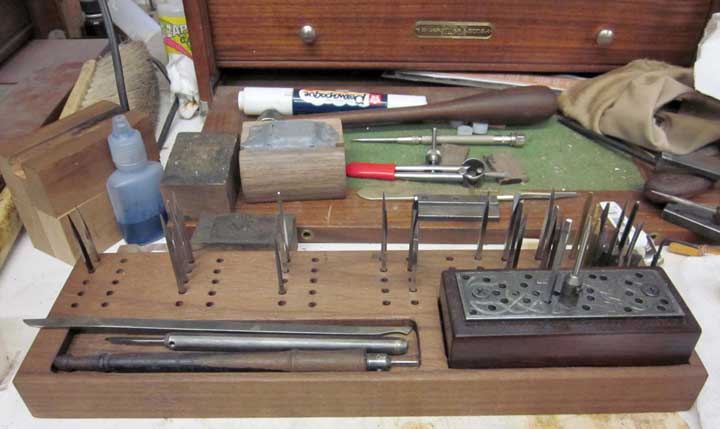
Above is my graver storage rack. These are all different shapes and sizes of the gravers I use pretty much daily. Most of them I make and sharpen with the Lindsay Sharpening System templates.
Above, the larger template grinds the 45 degree face of the graver.

And here, I’m putting in one of the heels. For the heels of my gravers, I don’t have the mill switched on. I just move the diamond lap by hand a few inches. You can see the dark line behind the business end of the graver – that’s as far as I had to move it to put in the almost microscopic heels. Don’t let this fool you, however. If sharpening is the most important thing you must learn, then grinding the heels is the most important part of sharpening. Without these two heels, your graver will be impossible to control.
The basic rule of thumb for heels is that long heels are for long cuts that are straight or gently curving. Short heels are for the tight turns. A hint here: The most difficult cut in engraving is a straight line. Don’t skimp on practicing straight lines.

The next item you’ll need is a system to hold your work. Above is a large wooden pitch block (I’m guessing about 12 inches square) with pitch built up on top. This one is used by Ford Hallam, who carves/chisels exceptional Japanese-style metalwork. This block may well have hollows cut in it and lead poured in to increase it’s weight.
You would do well to check out what he and other talented metalworkers do on: http://followingtheironbrush.org
If you don’t have easy access to engraver’s or chasers’s pitch (http://www.northwestpitchworks.com), don’t fret. Quietly snagging your better half’s hot glue gun will do in a pinch. When finished engraving I’m told wetting the metal and glue joint with alcohol and waiting a few moments, the workpiece can be popped out of the glue. A note here: I haven’t tried this. I’m not brave enough to steal my better half’s hot glue gun.
The most important part here is to find a large, heavy, stable something or other to glue your workpiece to. This object needs to be able to be easily turned, however. You can only engrave a short portion of a curve with hammer and chisel before you must stop and reposition the work by turning the block.
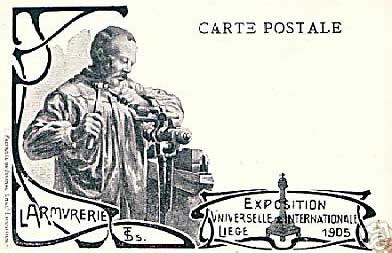
Above is an image of a European engraver using a tall leg vise. In this case, rather than moving the workpiece, the engraver will walk around the vise as needed. Of course, it should go without saying you would need easy access to all sides of the vise, something not available in my studio.
Another thought is if you have a large, common bench vise that has the feature where you can loosen a screw and get the vise to turn horizontally.
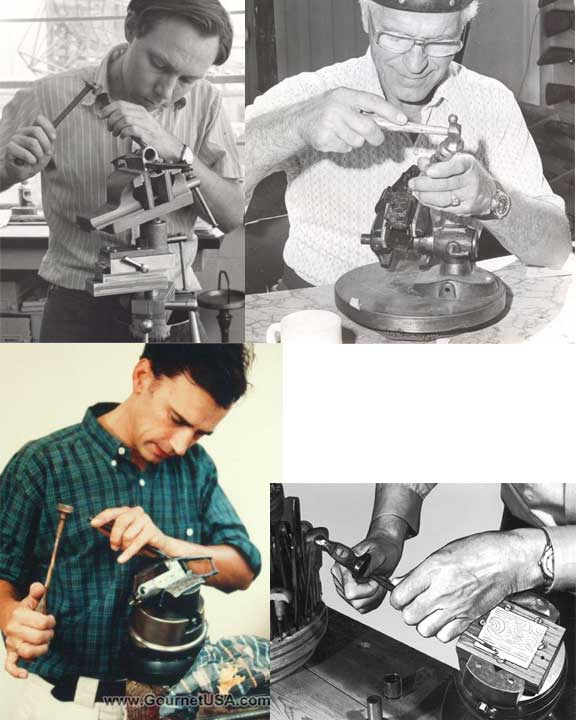 Above is an image of several engravers using hammer and chisel, and some of their holding methods.

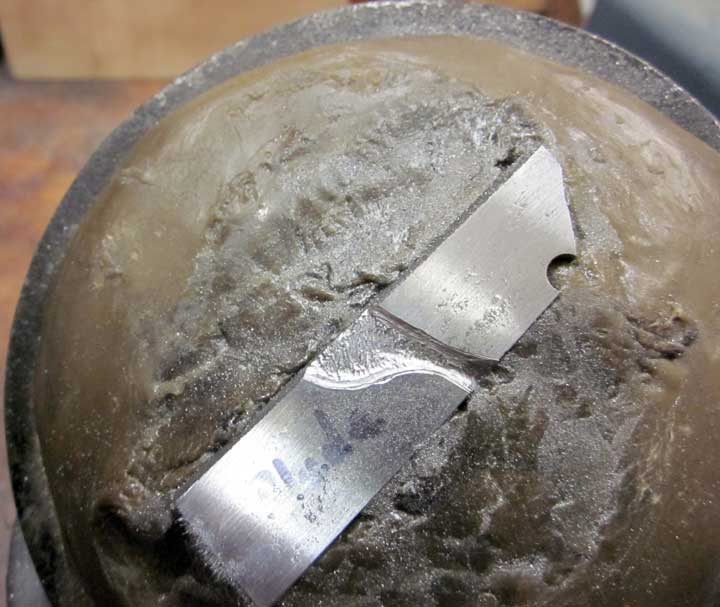
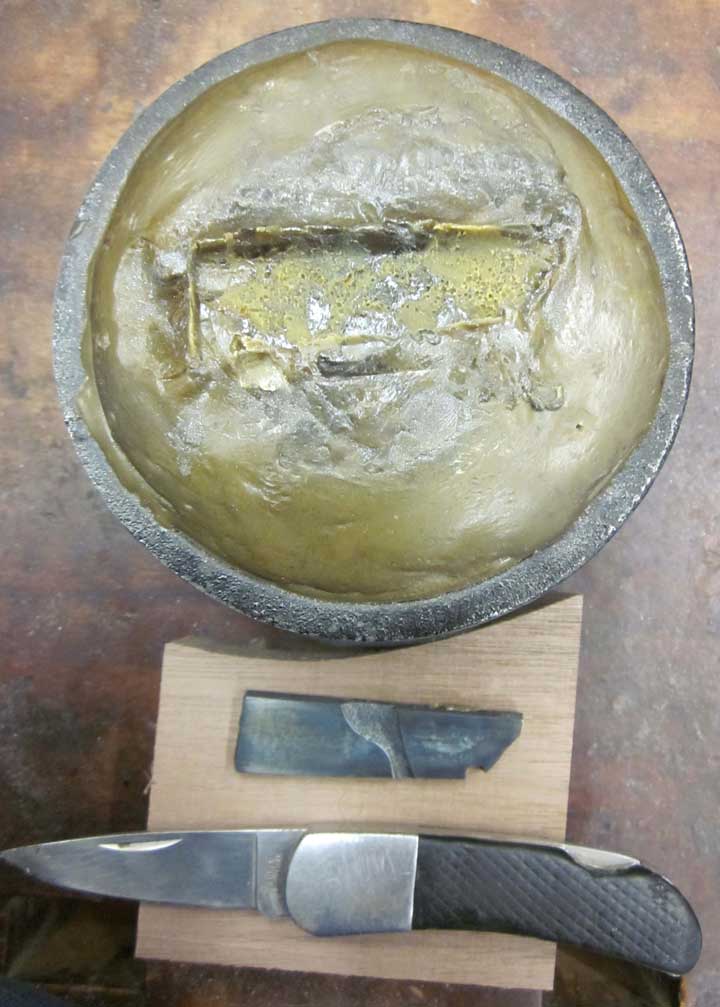
Above is my engraver’s pitch bowl and the engraving items we’ll begin with. this little cast iron bowl rests in a rubber doughnut, and is 2/3 filled with lead, then with pitch. I use a small torch with a soft flame (close off the air holes) to warm the pitch, then set in the metal workpiece. You need to warm the metal workpiece as well to get the pitch to stick well. I reverse the procedure to get it out when finished.
PS – a heat gun on low power really works well for this.
Also note the engraver’s hammer at the bottom of the picture. These are fairly small , light hammers, but with wide faces. They are designed to have wide faces so you can hit the back of a narrow graver while not looking at it. A small ballpeen hammer will work well enough for you to try this, but an engraver’s hammer will be lot more enjoyable if you intend to keep engraving.
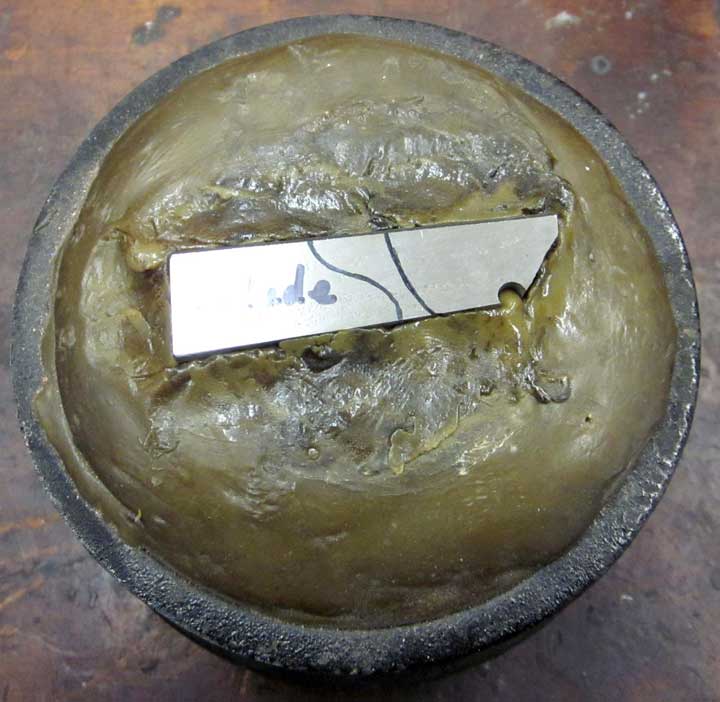
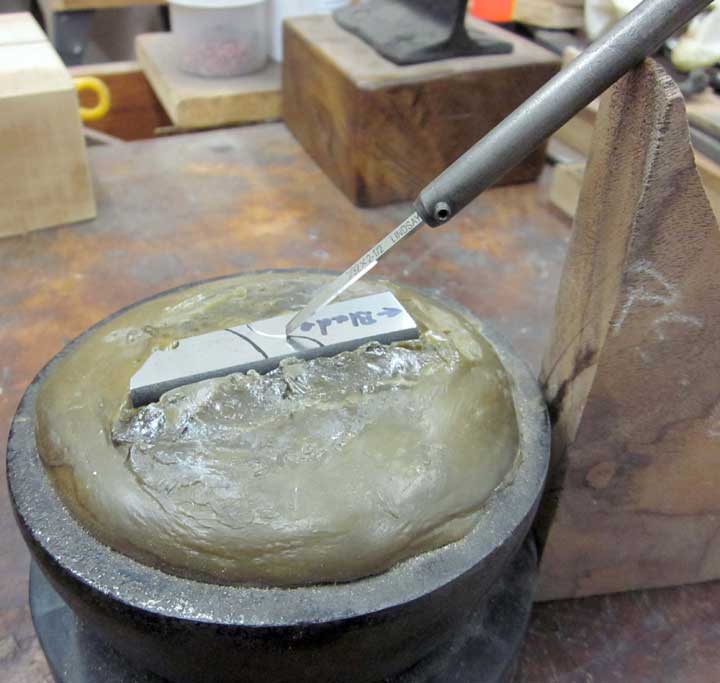
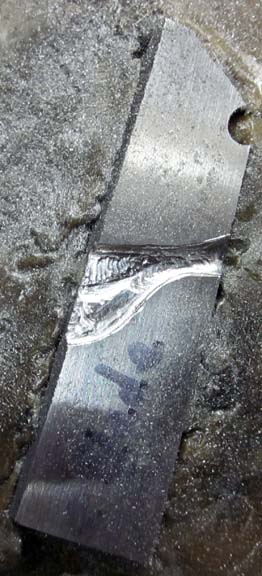
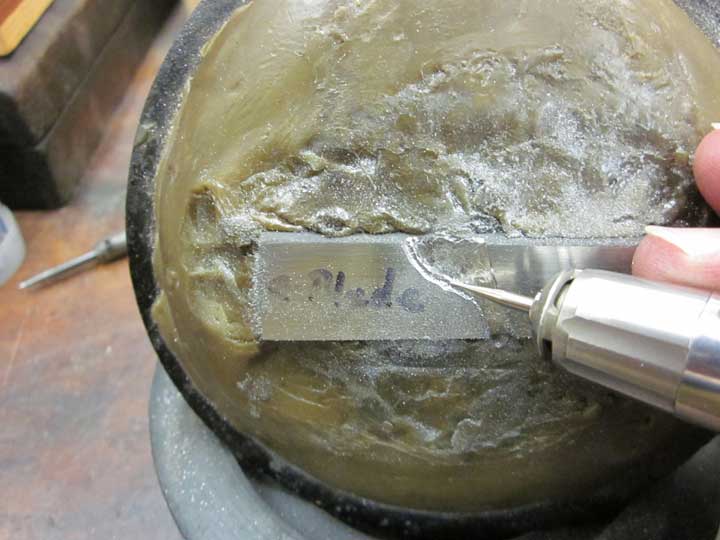
Above is my chunk of 3/16 inch thick 5160 steel knife simulation installed in the pitch. Since this tutorial is for knifemakers, we’re going to use knife steel and not pussy foot around with soft metals like copper, brass or nickel silver. You can figure those out on your own, we’re going to jump right into the deep end. I use a cold ball peen hammer to push the warm pitch around with. The pitch doesn’t stick well to cold metal, as long as it has enough mass to resist being warmed by the pitch. Note how I’ve piled the pitch up around the edges of the metal. That will provide a mechanical method to grip the metal as well as sticking to the pitch. I’m a “belt and suspenders” kind of guy. I don’t want an unpleasant surprise here – I need all the factors working for me, not against me.
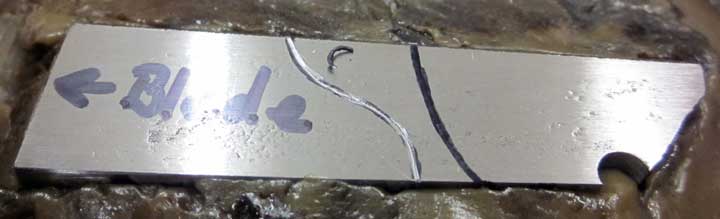
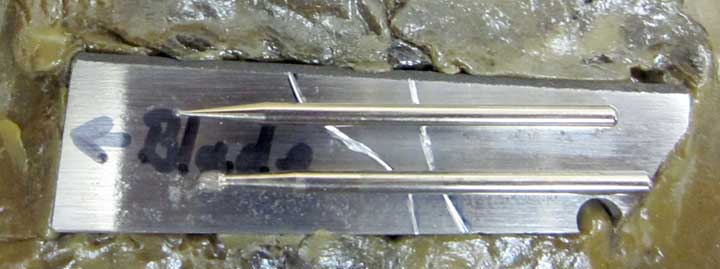
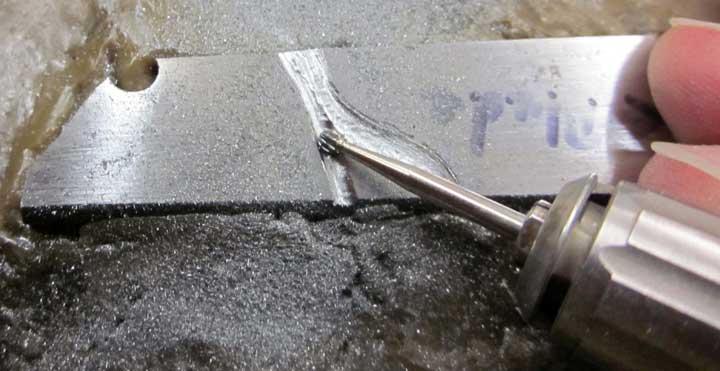
You can see the design I’ve drawn on the metal with a fine tip Sharpie permanent marker. For our first engraving exercise we’re going to make an attractive transition between the blade and handle of our knife. Imagine the blade to the left, and the handle to the right (I’ve written “blade” on the metal, with an arrow – we’re going to be turning this thing around and around……). Safety Note: If this were a real knife, be sure and tape the blade so you don’t cut yourself! Oh, yes, before I forget. We must engrave and carve this transition BEFORE we harden the blade. Don’t try to engrave hardened or tempered steel. Annealed or normalized steel, yes. Hardened or tempered, no.
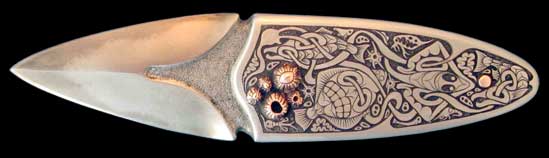
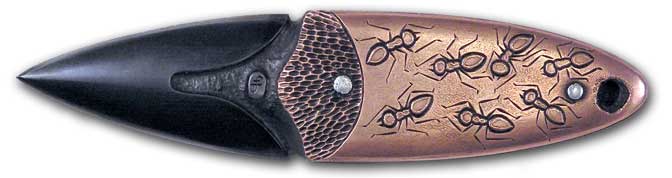
Above are a couple of examples of this kind of transition between the blade and the handle. Ours is only going to be half of the above, as for a single edged knife rather than these double edged examples. Notice the texture inside the engraved areas of the transition. We’ll be doing that as well, and checking out an alternative texture method as well.

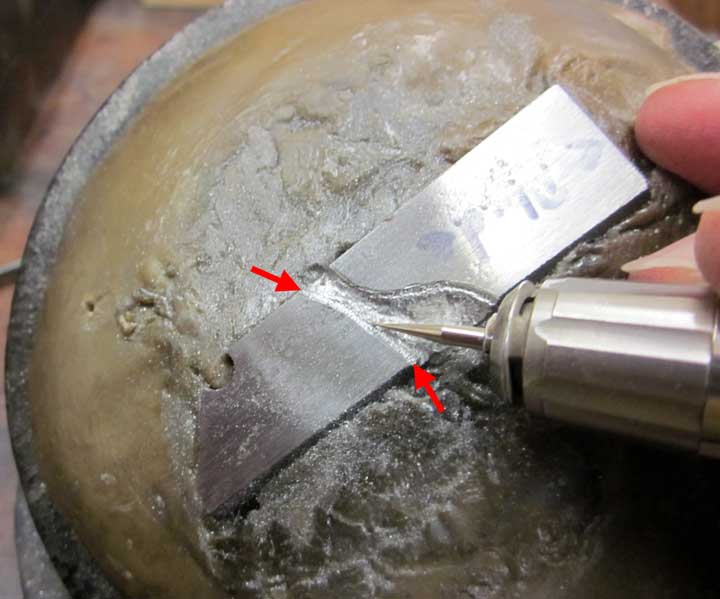
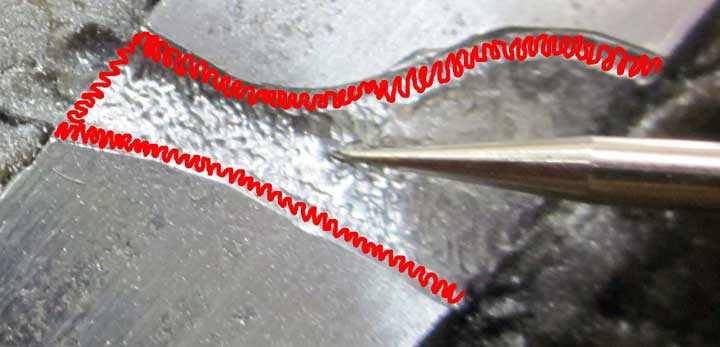
Well, it’s finally time to make our first cut. Notice the little curl of metal from the cut ahead of the graver tip.

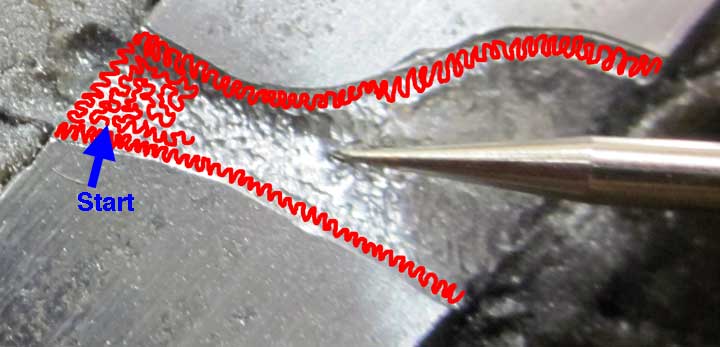
We’re going to begin the cut somewhere in the center of the broad curve of the blade side outline (red arrow). It’s much easier to start a cut in a gently curving arc than in a tight curve, because we’re going to have to turn the work around and cut the other way, joining the two cuts unnoticeably in the middle. This little rule of thumb doesn’t work as well for a straight line. It’s really easy for the viewer to notice a slight kink in a straight line. Try to start a straight line at the end and cut all the way to the other end. Note, however, that these are NOT hard and fast rules. They are largely dependent on the design, and sometimes you WILL BE FORCED to violate the rules just because Mother Nature is an uncaring bitch.
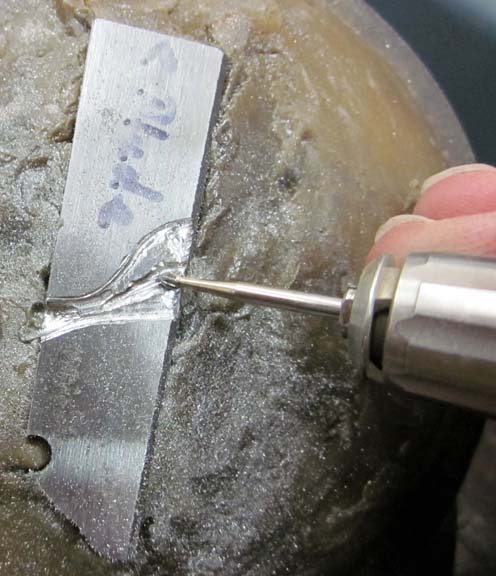
On this little knife (simulator, about three inches long, if I hadn’t mentioned it before) we start in the center because it’s much easier to cut TO the edge of the metal than FROM the edge. If the center of your design isn’t as good a place to start, then start a short distance from the edge, then come back and complete the cut back out to the edge.
To start the cut, you will first have to get the point of the graver to stick in the metal. You can get this to happen either by putting extra pressure on the graver tip from above, or angling the graver higher. You’ll have to do a little experimentation here to figure it out, that’s why we’re not practicing on a real knife. Then begin tapping the back of the graver holder with the hammer. These are firm taps, not hammer blows. You’re not forging here, bladesmith.

Once the graver has cut to the appropriate depth (experiment here, I can’t explain how deep), begin to drop the angle of the graver lower, tapping and guiding the graver ahead all the while. Follow the line, of course. When you begin to contort your body too much, stop, remover the graver from the cut, and reposition the pitch bowl or other holder to a more comfortable angle. Insert the graver back in the cut, you should be able to gently reposition it into the same place with a little finesse, and begin cutting again. Lather rinse, repeat as necessary. Simple.
The general idea here is to cut a smooth line, without any jagged edges or kinks, at a constant depth and width. In decorative engraving you can tilt the graver to make wider and narrower cuts for artistic effect, but here we only want a consistent width and depth. Of course, since this kind of graver is a “V” shape, it’s actually the depth of the cut that determines the width. If you are porpoising up and down in the cut, the width of your line will vary as well. I’ve heard under proper conditions the human eye can see things as small as one ten thousandth of an inch. That’s far smaller than your wandering and wavering line, so people will spot the problem right away. All I can say is practice, practice, practice, and then practice some more.
Now, I have to admit, I never use hammer and chisel in my engraving, as you can probably see from the view of my unskilled cut above. I have a Lindsay Palm Control pneumatic powered engraver. A month’s experience using it is probably the equivalent of several year’s experience with hammer and chisel. So, if you find you enjoy engraving, I would move Earth and Sky to buy one of the new pneumatic systems, and continue learning with them. I suspect what we are doing with hammer and chisel is going to go the way of the dinosaurs. And for you die hard H&C engravers out there, that’s my opinion and I’m not interested in debating you. If you feel some nobility in doing it the “purist” way, have at it, but when you use your bandsaw, drillpress, angle grinder and UPS delivers your supplies to your doorstep with a truck instead of a donkey, I have to question your sense of purity.
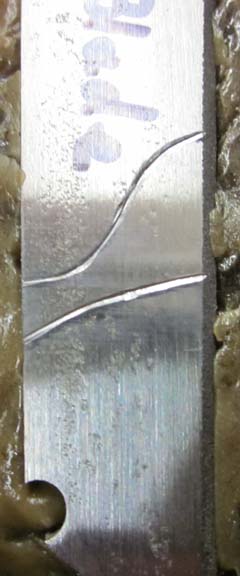
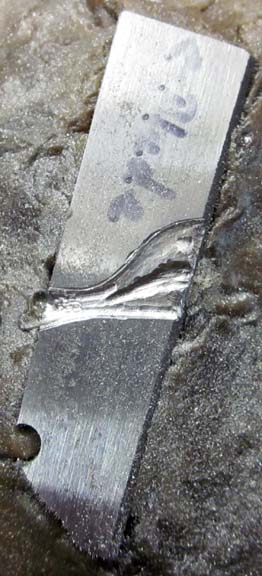
Above, I’ve deliberately made a common mistake (having made it previously in the first cut). I cut too shallow starting at the red arrow on the right, causing my line to be too narrow. You can correct this type of bad cut simply by going back and cutting deeper, paying more attention this time.
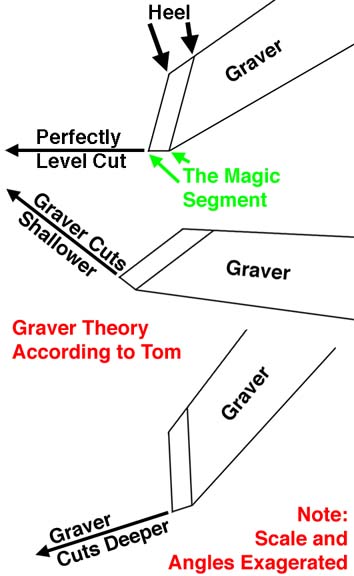
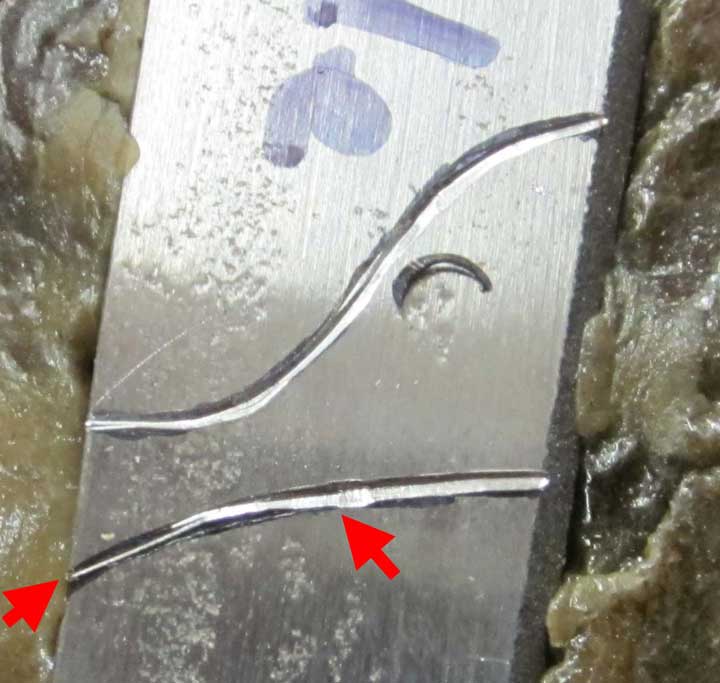
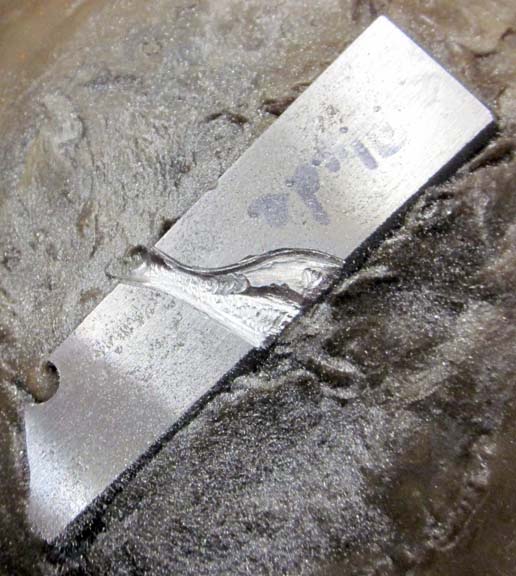
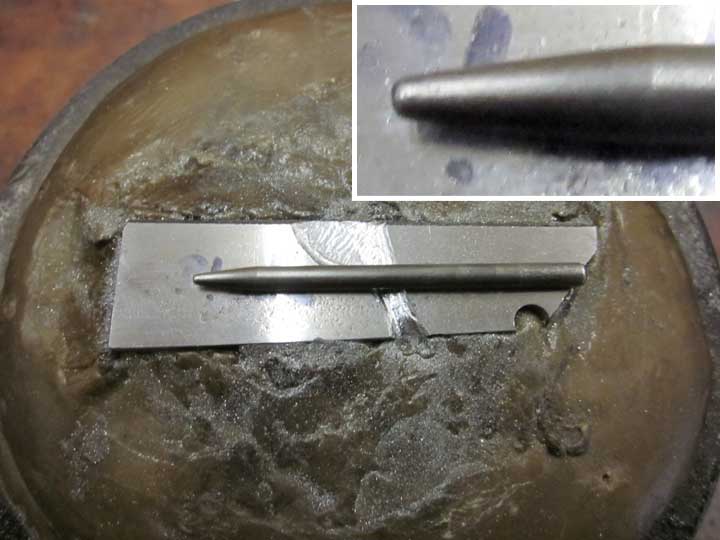
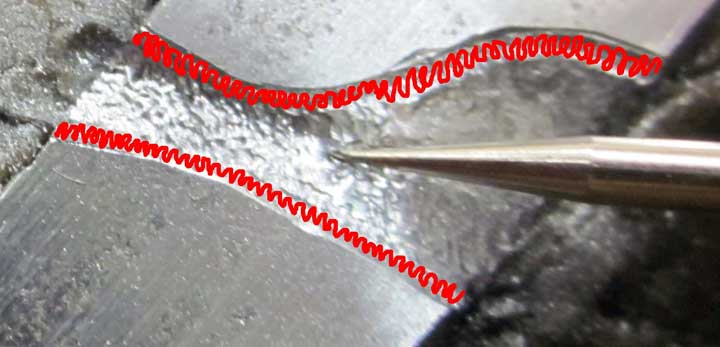
Here’s my theory of how gravers operate. The heel is the big deal here, especially the tiny straight line segment just behind the point. That’s where the two heels converge at the bottom, leaving a tiny straight line, at an angle to the length of the graver. That’s the “Magic Segment” in between the green arrows in the image above. An extension of this little line is the line the graver wants to travel along. The little spot right behind the line is the fulcrum this lever rests on. If we tilt the graver tip up while it is in the metal, pivoting on that fulcrum, the graver will start up, and if we go far enough the graver will come out of the metal. If we tilt it down, the graver will dive deeper. Deeper to a point, that is, until the graver is buried so deep you can’t hit it hard enough to make it go deeper, or something breaks. The angle between this magic segment and the long axis of the graver is called the lift or heel angle, and if we keep the graver at that angle while in the metal, the graver should go straight and level, and make a constant width line.
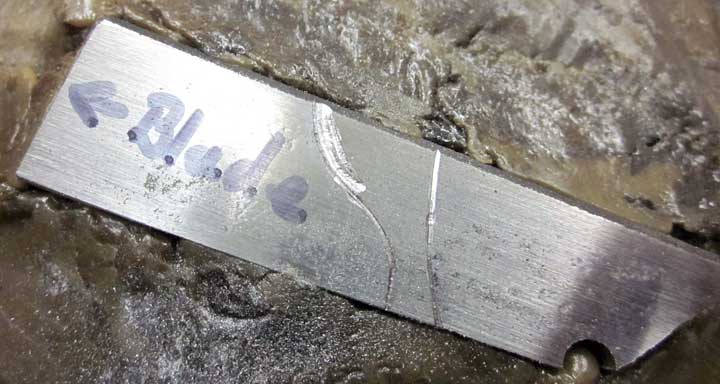
So, that’s it. Above are my two not-so-well H&C engraved lines.
Now I’m going to carve out the interior steel, between the lines with carbide burs in my NSK Electer grinder. A Dremel will work fine as well, although a slower flexshaft machine like a Foredom won’t work quite as well. You can see the two sizes of burs I’ll use above.
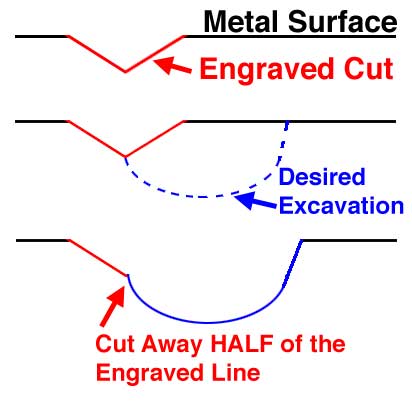
I’m going to VERY carefully carve away HALF of the two lines we so painstakingly cut. I’m not going to touch the outside part of the line, leaving us a very smooth engraved edge on the area we are going to excavate and then texture. You cannot make as smooth an outline using burs as you can with the graver. Trust me on this…
You can order these carbide burs at: http://www.lascodiamond.com/products/stndcbhp.htm I have no business interest or relationship with this distributor, either.
I use sizes #1/4 (5 thousandths of an inch bur diameter, the smallest available), #2 (10 thousandths bur diameter), #5 (16 thousandths bur diameter) and #8 (23 thousandths bur diameter, the largest of this style available). The ones you see above are the #8 and #1/4. I only use round carbide burrs.
If you have a good relationship with your dentist, he/she might give you some used ones.
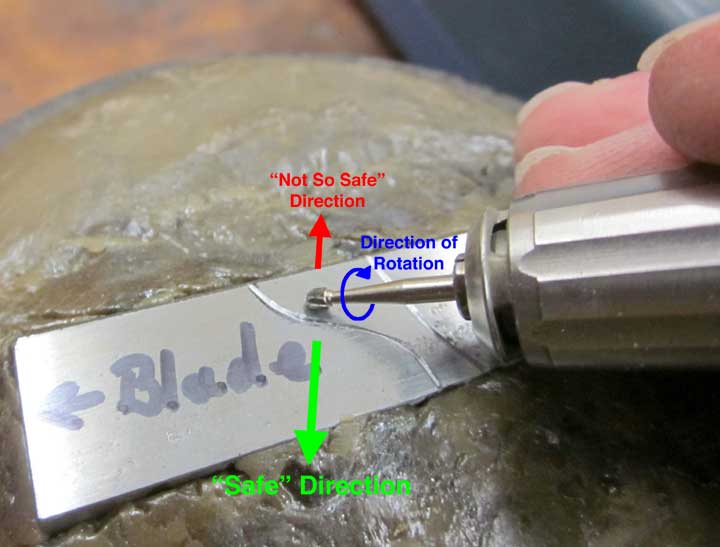
A word about using powered grinders here. There is a “safe” direction and a “not so safe” direction. I’m speaking about “safe” direction in relation to damaging your work, not your personal safety. You’re wearing a dust mask and eye protection, right? In the image above, the “safe” direction is to the left, and the “not so safe” direction is to the right. Carbide burs like these only cut in a clockwise direction, as viewed by the operator. Think of it like the powered wheels of you car – when you step on the accelerator, your wheels turn in the forward direction, gain traction and the car begins to move. The carbide bur works the same way. In the image above, the bur wants to move to the right, away from the “safe” direction. If you lose control of the bur should it suddenly gain unexpected traction, the damage will occur to the right, not the left. So, when we are carving very close to a line we don’t want to damage, the “safe” way to approach the line is to keep it to the left side of the bur ( as shown above). In the above image, I will be carving up to the left hand line. When it is time to work on the right hand line, I will reverse the pitch bowl, keeping the line I want to preserve to the left of the bur. Be especially careful when approaching the edge of the metal; if the bur goes over the edge, you WILL experience a sudden huge gain in traction, and you WILL lose control. The bur will damage the edge and also whatever is over the edge. Approach edges or anywhere else the bur might gain additional traction from the “safe” direction.
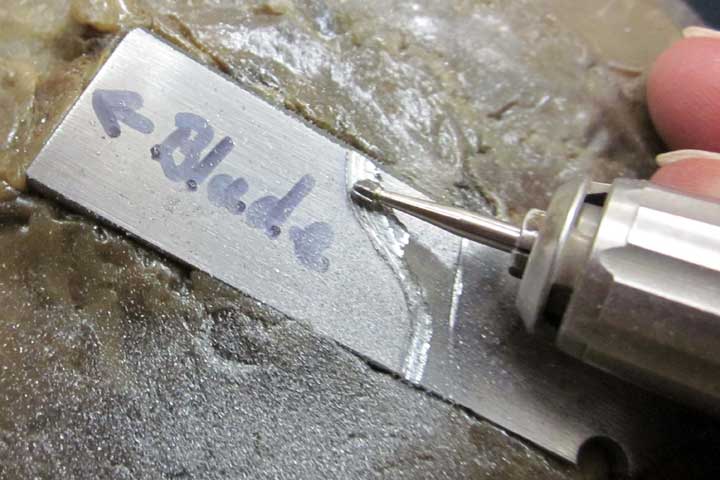
Above is the first part of the grinding. Note I haven’t removed the outside of the engraved line, and I’m left with a nice smooth looking edge.
More grinding, moving out more into the center.
Here I’m working on the other line. Notice I’ve rotated the pitch bowl 180 degrees so I can approach the other line from the “safe” direction.
The first pass removing the interior is done and I’m now starting to deepen the center. So far, the grinding operation has probably taken about five minutes.
The center area deepened.
Working out from the center. I’m trying to keep things relatively smooth, and a nice transition from deep to shallow on the edge.
I’ve turned the pitch bowl around again, and I’m deepening towards the blade side.
And here’s the cavity completely excavated. Now I need to do something about the tool marks left inside the cavity.
Here’s the alternative method I mentioned before. I have a hardened punch with a shallow curved face. I hardened this punch by quenching it in beeswax, I haven’t tempered it, and so far it hasn’t let me down by shattering. I suspect the beeswax quench is gentle enough that the punch doesn’t get completely glass hard and shatter when used. Knock on wood…
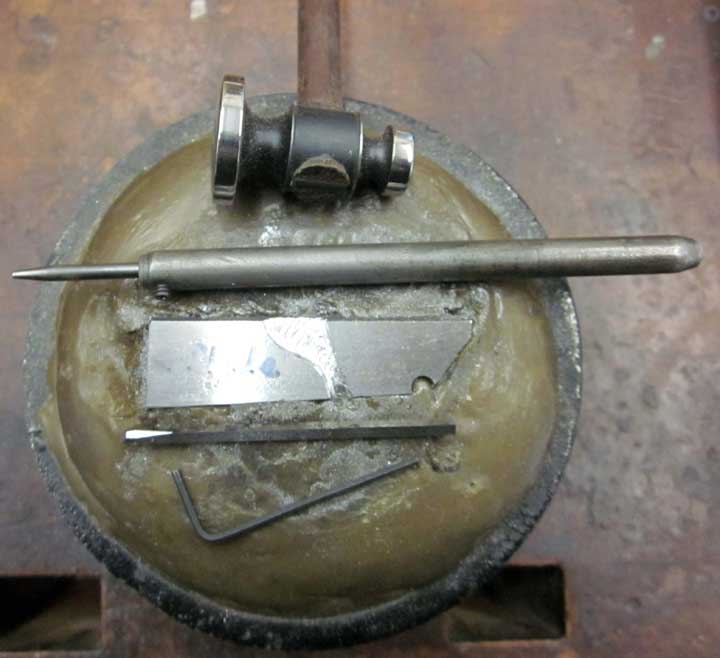
Above, I’ve installed the punch (it’s made from 1/8 inch diameter music wire available from most hobby shops and hardware stores) in my graver holder. If you recall we made the graver holder by drilling a 1/8 inch hole in the end. Did you know that a 3/32 inch square graver is 1/8 inch from corner to corner? See, sometimes things do work out…
Now, hold the punch firmly against the metal in the cavity, use firm taps with the hammer and begin smoothing out the tool marks left by the carbide bur. With a little practice, you can get pretty fast at this operation, but don’t get too far ahead of yourself, bounce the punch out of the cavity and mar the uncarved part of the blade.
You can play around with different curves on the punch, and textures from very smooth and polished to much more textured faces. You can texture the face by tapping it onto your diamond lap (use the very inside edge of the lap for this, you can’t reach there with your graver during sharpening), or by tapping onto various grits of sandpaper, or files.
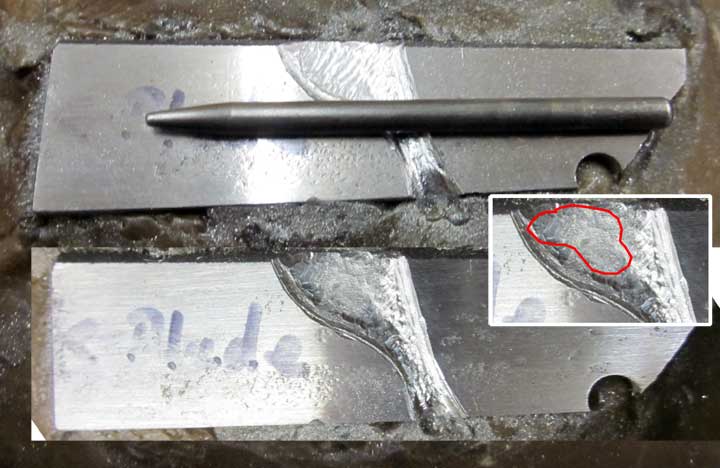
Here you can see the area I completed (outlined in red). Much smoother and more attractive than the tool marks from the carbide bur.

Here’s the method I use most often – I just like it better. I’ll use my smallest carbide bur to make a “scribble” texture. The same rules apply here concerning “safe” directions.
This tiny bur has less danger of developing sudden, overwhelming traction, but it can happen, so be careful.
I begin the texture by making small “scribbles” up and down along the line on the left. I’m still not touching the engraved outside part of the line, just coming close to it. Notice I’m following the “safe” direction rule. Begin this process just like you learned to color in kindergarten – carefully outline inside the lines first, then proceed to color the larger interior. Of course if we were able to color inside the lines back then, we probably wouldn’t be bladesmiths now………..
Once I’ve completed outlining the blade side, I’ll do the other side, turning the pitch bowl around for proper “safe” direction…
Once I’ve completed outlining the blade side, I’ll do the other side, turning the pitch bowl around for proper “safe” direction…
Starting to fill the interior by outlining the lower metal edge (keep in mind the “safe” direction to approach the edge).
Then begin filling in the interior. If you follow the scribbly lines you will see that I’m deliberately wandering around, trying to keep any hint of a pattern out of the process. If, for instance, I started around the edges and then went into a decreasing spiral inside, this would leave a noticeable pattern and a less pleasant appearance. Instead, think of a drunken man staggering home aimlessly from a bar a 2 AM.
Lather, rinse, repeat until you’ve filled the entire excavation.
Here’s what the finished result should look like.
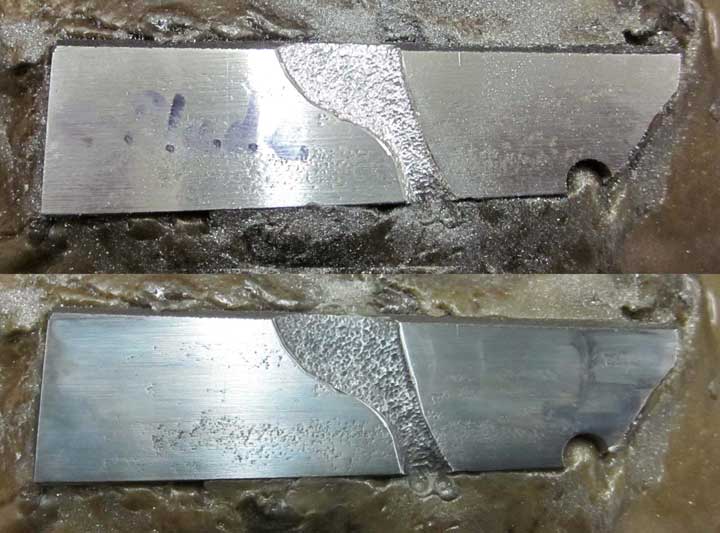
Above is the finished result in bare metal (top) and cold blued (bottom).

And how it looks from a short distance away.
To remove the metal from the pitch, I heat the metal up with a small flame (or heat gun) and when the pitch is soft, I jam my cruddy bench knife into the pitch below the edge of the metal and gently pry the metal up. Watch it, don’t scratch the metal (use a piece of wood if it’s something easily scratched), and the metal will be HOT.
I use my cruddy not-so-sharp bench knife or a sharp wooden edge to scrape off the large globs of pitch, followed by lacquer thinner or mineral spirits to clean off the rest.
May you find as much joy as I have in this long but rewarding path. It’s not a career, it’s a way of life. Your imagination is your only limit.

Here’s a simple pattern to practice your engraving with, a skull with lots of curves, and a Running Wheat Border. It’s designed to go on a 1 3/8 inch by 1 inch piece of metal. If you print it out using a laser printer, or copy it on a copier that uses toner, you can place it face down on a piece of clean metal and transfer it by pressing a paper towel dampened (ONLY slightly damp) with either lacquer thinner, acetone or fingernail polish remover. Use a scribe to draw in anything that didn’t transfer. It may take several tries to get this right…

And here is what you should be working towards. No, I didn’t cut this with hammer and chisel. I used my pneumatic engraver. Yes, I know I’m cheating. But, I’m the teacher, and I’m allowed.
Congratulations, your feet are now set on the path towards becoming an engraver. Of course, we’ve only cut a few lines, but with practice, you’ll realize that a complex engraving is simply a collection of engraved lines. As far as knifemaking is concerned, some immediately useful engraving are things like what we’ve just done here with decorative transition. I also engrave my signature/maker’s mark on almost every knife I make, whether it’s a fancy engraved one or not. Have a look at the Running Wheat Border – it looks great circling a guard, or along the edges of an exposed full tang. Here’s a link to an excellent tutorial for cutting the Running Wheat Border at the Engraver’s Cafe: http://www.igraver.com/runningwheat/
Some Resources you might find useful:
Engraving Forums: http://www.engravingforum.com http://www.engraverscafe.com
Tom’s Web Site: http://www.sterlingsculptures.com/
Tom’s BladeGallery Page: http://www.bladegallery.com/shopdisplayproducts.asp?id=721
Best source of metal carving info on the Internet: http://followingtheironbrush.org/
High quality carving (some metalwork): http://www.thecarvingpath.net/
Outstanding Metalwork artist Ford Hallam: http://fordhallam.com/
Outstanding Metalwork artist Jim Kelso: http://www.jimkelso.com/
Lindsay Graver Sharpening Templates and Diamond Wheels: http://airgraver.com/sharpening.htm
Lap Mandrel Adapter for converting a drill press to a power hone: http://airgraver.com/Hand_Engraving_Tools_Overview.htm
Carbide Carving Burrs: http://www.lascodiamond.com/products/stndcbhp.htm
How To Carve Steel – Wormy Wood: http://forums.dfoggknives.com/index.php?showtopic=12650&st=0&p=114619&fromsearch=1&#entry11461
Kanazuchi Hammer making tutorial: http://www.thecarvingpath.net/forum/index.php?showtopic=915
Kanazuchi Hammer Handle tutorial: http://www.thecarvingpath.net/forum/index.php?showtopic=920
How to Make a Pitch Bowl Support Ring or Doughnut
http://followingtheironbrush.org/viewtopic.php?f=31&t=369&p=11805
Thrift store pitch bowls and Rokusho pots: http://followingtheironbrush.org/viewtopic.php?f=31&t=1107
Excellent tutorials on inlay, patination, Japanese art alloys, file and stone finishing: http://www.jimkelso.com/tutorialshub.htm
“Shirley Temple” Scrapers for Contemporary Engravers: http://followingtheironbrush.org/viewtopic.php?f=9&t=1472
Simple Engraving for Knifemakers: An Addendum
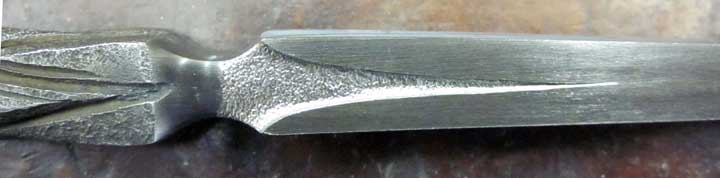
Here’s a little more practical example of simple engraving on an actual knife. This is an integral misericorde/poniard kind of dagger thingy I’m working on, 15 inches overall length of forged square cross section 1045 steel bar, with hand filed finish on the pommel and blade.

As in the example above, I’ve engraved two lines on each face of the diamond cross section blade. The white stuff you see on the blade is white permanent marker. This stuff dulls the shine on steel, can be drawn on with a pencil, and helps me see my laser printer transfers better. I’ve used 4 laser printer transfers here, one for each of the four faces so they all will look exactly the same.
By the way, I’m doing the engraving, carving and texturing of the blade portion BEFORE heat treating the blade. Even though for this kind of dagger I’ll only be hardening about two thirds of the blade, the rapid cooling during the quench close to the engraved/carved area will still affect the hardness somewhat. I don’t have a requirement to make things harder than they need to be…

Above, I’ve used one of my medium sized carbide round burs to carefully carve down into the inner part of the engraved lines, paying attention to cutting in the “safe” direction and not touching the outside parts of the engraved line.

Above I used a larger carbide bur to carve away the rest of the inside, and faired the carving out down to the bottom of the hollow ricasso separating the handle from the blade.

Another view of the carving process.
Above, I’ve used my smallest carbide bur to “scribble” texture the carved out parts. I’ve stopped about halfway because I’m going to carve something on the four little flutes to the left of the hollow ricasso, and I’ll finish the texturing later.

Above is the finished texturing in raw steel color.

And here is the finished version after a little cold gun blue, looking more like it will when finished after heat treating.
While it is beyond the scope of this tutorial, I decided to give you a look at a little more advanced engraving and carving. This is one of the things that you can be working towards after learning the basics. I’m not using the simple hammer and chisel graver we used in the tutorial, I’m using my pneumatic Lindsay Airgraver and stereo microscope for all of this engraving. Of course, with diligence and careful work, hammer and chisel engraving can accomplish the same thing.

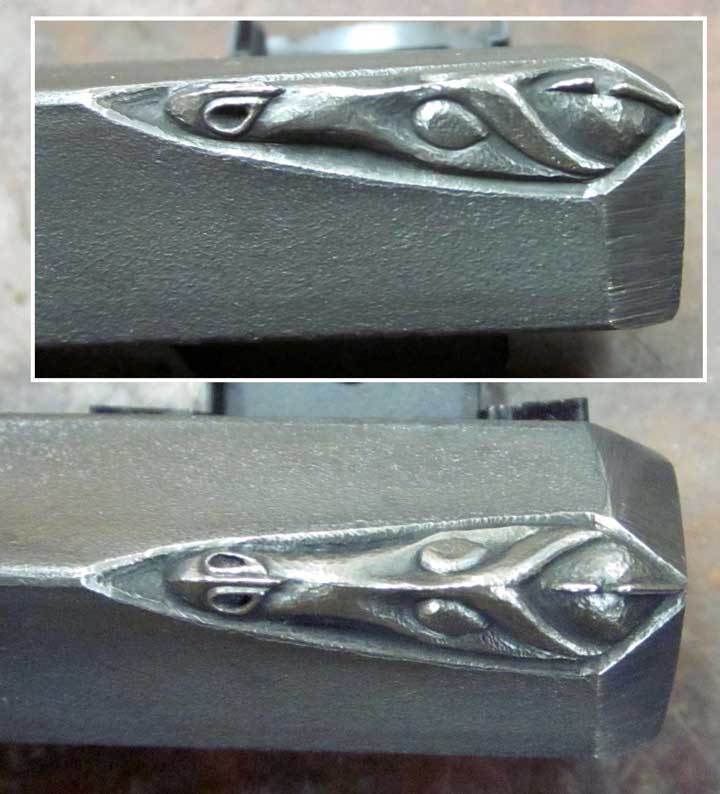
Above is an image of the forward end of the dagger handle and a scrap piece of the 1045 square steel bar. I’m going to carve a dragon head on each of the four little triangular pieces at the forward end of the handle, and since I’m not entirely confident of the outcome, I’m going to do a practice piece on the scrap rather than my hard won dagger. I have already done the heat treatment on the dagger, but I think the handle is far enough away from the hardened area to not cause problems.
I’ve carefully measured the triangles of the handle and marked the scrap bar to reproduce a similar area and volume, and marked it out with a sharp pencil. Incidentally, the length of this area is one inch, so a pretty small carving will result.

Above, I’ve deeply engraved the penciled lines on the scrap bar, to closely resemble the matching area on the dagger handle. It has taken several passes with the graver to get this deep.

Above, I’ve drawn in a simple dragon’s head with pencil, working hard not to overly complicate things. Under the stereo microscope, it’s very easy to put too much detail that will be too small to see with the naked eye.

Above, I’ve carefully engraved all the lines

And here’s a side view.

Above is a view through the microscope. I’ve begun carving away the area in front of the eyes, and the rear skull areas. I’m using my smallest round ball carbide bur. I’ve also removed the excess metal in front of the snout. I’ll eventually use a “scribble” texture there, most likely.
 Above a side view under the microscope. More carving, and I’ve excavated the nostrils. The carving process really is a continual refinement of the form, carving a little on one side, then turning and repositioning the metal in the vise to carve the corresponding part on the other side, just to keep things as symmetrical as I can. The old joke about carving an elephant really is what’s happening here – I’m simply taking away anything that doesn’t look like a dragon’s head.
You can see that the carving is making my carefully engraved lines vanish somewhat. It is especially noticeable around the eyes, which I’ve left standing proud of the surface. I will eventually go back in with a very small graver and re-cut all of the lines.

Above, the carving using the carbide burs is finished.

Above is a view through the microscope. You can still see the tool marks from the tiny carving bur. Next I’ll use a hardened steel punch in my Airgraver to cold forge (in engraving, also sometimes called sculpting or planishing) those away.

And, above, is the finished carving after forging/sculpting/planishing in raw steel color.
And, finally, finished with cold gun blue, directly from the punch.
 And, above, after bluing and burnishing with a little 4/0 steel wool. I like a little sheen, but not a bright polish. A little note here, steel wool will burnish steel without removing the patina, but in my experience will remove patina on non-ferrous alloys of copper, silver, gold, shibuichi, and nickel.

Above is the beginning of a practice helmeted viking to go on the rear ends of the dagger handle, again penciled in over white permanent marker.

Above are the engraved lines to replicate the shape on the handle.

Unlike the dragon head which was quite angular, the viking head needs a nice smooth, rounded area carved with carbide burs.


In the above two images you can see my paper laser transfer and the viking head after engraving in the lines. Again, since this carving is 5/8 of an inch long, I’ve kept everything pretty basic and simple.

Above an image through the microscope, cold gun blued to provide a better photograph. I’ve been carving the top of the head with the small carbide bur.

More carving, excavating the face, mouth area and eyes.

And the carving with the bur is completed.

Above, I’ve been working on the left side of the head (the right side of your screen) with the punch in the Lindsay Airgraver. You can see the dramatic difference between the smoother punched surface and the tool marks on the other side left by the burs.

And, above, the same with the cold gun blue for better visualization.

Above, the finished head. I’ve also gone back and re-cut all the lines to clean them up. I think this will work fine on the dagger. Only four more viking heads and four more dragon heads to carve. Sigh………