
Adding Elements to Carvings: Ladybugs
While a lot of my carvings are one piece, with the possible exception of eyes, I sometimes need to add additional elements to carvings. In this case we’ll examine my method for making ladybugs, although these principles will obviously be of use for other subjects as well. Since these additions will stand proud from the surface and be exposed to wear and damage, I’m quite concerned with making them very sturdy, especially their attachment to the surface. I don’t need the pain or enmity of clients because of items being broken off or damaged on an expensive piece of work.
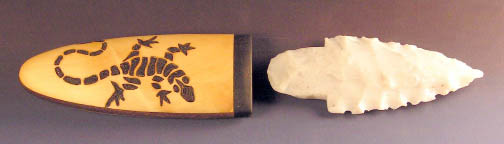

Here is a small stone-bladed knife with a pyrographed lizard on one side. I often like to portray natural subjects in their natural adversary predator/prey relationship. In this case, the lizard will be hunting a group of insects (ladybugs). In the past I’ve used other bugs like ants, beetles or spiders.. I’ve chosen to represent the lizard in a rather stylized manner, and the ladybugs in a more realistic setting. I often like this juxtaposition of artistic styles in one piece. It seems to add a certain tension. Above are the stone blade and the handle blank (yellow – English boxwood, center core – black walnut and black guard – ziricote). I’ll be adding ladybugs, coloring them and adding dark pegs for their spots. The pegs will also do double duty by providing added strength in attaching the ladybugs to the surface of the carving.

I’ve chosen to use moose antler to construct the ladybug’s bodies out of. There’s a little method to my madness here. The hard outer surface of the antler is quite resistant to damage and wear, is porous enough to take stain fairly well and is pretty white so it won’t interfere with the colors I’ll be using. Above are the beginning stages of ladybugs. At the bottom of the image is a small block of raw antler, the hard outer layer. I sanded the base flat and used gap-filling cyanoacrylate glue (“super” glue) to attach a block to a piece of 3/16 inch dowel straight from the hardware store (top of the image). I sanded the end flat to obtain a good fit for a strong glue joint. In the center is a roughed-out ladybug I sanded to shape using a disc sander. You could carve it as well using a rotary grinder and various burrs. One of the major problems I’ve often faced in netsuke carving is holding and manipulating small pieces. If I hold such things in my fingers I either end up getting blood on them, or they go flying into the far corners of the studio and bury themselves in a pile of sawdust, never to be seen again. A temporary gluing to a sacrificial holding device solves a lot of the problems.
A wood like boxwood could just as easily be used, however in this case I would bleach it’s normally yellow color to white, since I’ll be coloring the ladybugs red and the boxwood’s yellow cast would change the red to an orange. I’m sensitive to this, since the general perception of the public to ladybug color is “red,” although I’ve never seen a red ladybug in real life or in a photo, only orange ones and yellow ones. Trust me on this, I’m speaking from experience. I could have sold this ojime a dozen times over, except I portrayed the ladybugs in an accurate orange color, and got lots of comments that the color should be red. Live and learn – client perception is often more important then biological accuracy. Go figure.


Here are shaped and polished ladybug blanks. I’ve concentrated on getting the overall shape correct and have sanded and polished the surfaces while they’re on the dowels since once they’re glued in place, getting polishing buffs into the nooks and crannies will be difficult (top in the image). I’m not going to worry too much about making a bug an entomologist could differentiate down to the species level. My ladybugs are going to be relatively simple, and I’ll just strive to obtain the “essence” of ladybug. Once the bug blank is ready to take off, I use a small diameter burr to carve away the dowel just below the bug’s base, leaving a small peg (bottom of the image). I can then break or twist the bug off the dowel. Next, using a sharp knife, I trim away any remaining dowel and glue, being certain to scrape away all of the glue. Cyanoacrylate glue is convenient since it sets fast, especially using a glue accelerator, but his type of glue doesn’t have good strength characteristics. I’ll be gluing the bugs on with slow setting epoxy for strength and any remaining cyanoacrylate glue on their bases will interfere with a good epoxy bond, weakening the work.

In this image, I’ve carved away an area where I’ll be burning a bark texture down into the handle blank. The center area I’ll carve flat and smooth to match the flat bases of the ladybugs to ensure a strong glue joint. I’ll be placing a group of five on this side, with one on the lizard side.

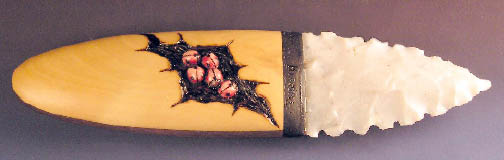
Here’s the bark burned in. I’ve burned the edges using a fairly high temperature, really burning deeply for texture. The center I’ve burned at a much loser temperature, looking only for color and not texture, again for a good glue joint.


I’ve glued the bug blanks on using a slow setting epoxy. I don’t like the five minute epoxies because I feel they don’t provide as strong a glue joint as a slow setting type. Another problem common to netsuke carving is holding small elements in place while the glue sets. Here I’ve used cellophane tape. I also often use small spring clamps, rubber bands, string or thread, or whatever I can cobble together. This sometimes requires a bit of creative thinking.


Here are the blanks glued in place. I’ve waited about four hours since gluing. The slow setting epoxy isn’t completely cured yet, but I’ll be going back in with small sharp scrapers and removing the excess glue around the outside of the bug blanks. I often find this is the best time since the epoxy is still slightly soft and tacky and is more easily removed without damaging the surface below. However, you do run the risk of weakening the bond. I’m satisfied with taking the risk in this case, since I’ll be pegging the ladybugs into the wood to aid the epoxy.

Above, I’ve drawn in the basic shape of the ladybug’s head with a pencil, as well as the dividing line between the wings. I have a number of ladybug photos for reference to get the proportions correct.


Using my tiniest burr, I’ve carved grooves where the pencil lines were, and about the depth of the diameter of the burr. I’m really just looking for a hint here, since the bugs are quite tiny.


While I still have my tiniest burr chucked up, I’ve carved/drilled three holes in each of the ladybugs. One is just behind the meeting place of the head groove and the wing dividing line. These are the starts of the peg holes. I carve/drill holes with the next size burr and enlarged each hole successively until I reach the desired hole size. I like to use successive sized burrs for accuracy, since I find it too easy to wander if I use the final burr without resorting to the smaller pilot holes. I’ve chosen to show only three spots since any more will be ridiculously fiddly and onerous to do, and won’t really add anything to the carving.
I’m ready now to begin making the pegs that will both hold the ladybugs in place mechanically and provide the dark spots.

Above is the setup I use with the bandsaw to cut the small pieces of dark wood I’ll make the pegs out of. The peg wood is the dark piece in the center. On the left is a small piece of scrap wood to guide the peg with. On the right is another scrap that I’ve cut a notch in to push with. These keep my fingers away from the blade. Cutting small pieces like this is very dangerous without such guiding and pushing sticks, since your fingers would be just millimeters away from the blade! Since the pegs are so small, they often become jammed behind the blade or fall into the throat opening. If this happens, shut the saw off and let the blade stop moving before attempting to extract the peg. Let’s not lose any fingers or friendships over this!

Here are the cutout blocks for the pegs. We have six ladybugs with three spots (pegs) each, so we’ll need a grand total of 18. I’ve cut a few more since I invariably mess at least one up, although my waste pieces are getting fewer. Each of the pegs above is between one and one and one half inches in length, and maybe three sixteenth inches wide.


I use a Sherline metal cutting lathe for making the small tapered pegs we need. I simply place each approximately square peg in a three jawed chuck and turn them round. The tiny Sherline lathe is absolutely perfect for this operation, and chews through wood like it was butter. here’s alink to the Sherline Web site: http://www.sherline.com/


For turning tapered pegs, I simply rotate the Sherline headstock a few degrees clockwise. This is a feature that seems unique to the Sherline lathe. See the blue arrow above and note the small angle the headstock makes with the base (near the arrow).

I turn the square pegs round, leaving the tapered peg fairly thick, as above.

At this point, I reduce the thickness of the peg in small steps, as above. Since the pegs we need are much smaller than a pencil lead, I have to approach the turning like this. As the peg becomes very thin, the wood will flex away from the cutting tool and not be cut. Steps like above leave the wood thick enough not to flex very much.

I adjust the crossfeed with the cutting tool at the very tip of the stepped peg until I’m cutting almost a sharp point on the peg. Now as I cut the peg towards the headstock, the thick steps will keep the very thin peg fro flexing away from the cutting tool. When the peg is complete, I make a shallow cut into the peg’s base (see the inset picture above). This will allow me to snap the peg off without damaging the very thin wood.

Above are all of the pegs I’ve turned. The entire group took about 45 minutes.

Here I’m gluing the pegs in place. I’ve carefully searched through the pegs to find six of the longest and thinnest ones to glue into the hole that continues through the bug and into the wood. Some of the pegs aren’t thin enough for that critical position, and will be used in the other spots. I use slow setting epoxy here for strength, using a small diameter wire to make sure the glue gets all the way to the bottom of the mechanical holding peg hole, and smear additional glue on the surface of the pegs to ensure a strong bond.

Now that the epoxy has cured, above are examples of the three stages handling the long pegs. The long peg is untouched, and I’ve used a small burr to cut the center peg near the bug’s surface, leaving a little above. Be careful here not to let the burr get out of control here, or you’ll scar the bug’s surface. The spot on the right has been carefully cut down to the surface, using the same small ball burr and a long, thin flame shaped diamond burr sander.


Above are the completed spots.

Here are the ladybugs on the back side. I carefully fit the important mechanical holding pegs first, then added the rest. I’ve managed to get all but one peg into the holes, and can’t quite mange that one since the other pegs are blocking it. This is fairly unusual since this stage usually takes about three gluing sessions. This forest of pegs has an interesting look all it’s own, so I’ll remember this for a future project. I’m all set to log and clearcut this forest!

Here are the completed spots, ready to be stained.

At this stage I’ve painted all the antler ladybugs white vinegar (the cooking kind from the grocery store) to etch the surface to allow better stain penetration. Just paint it on the antler (works for ivory as well) and let it dry – not getting any on bare wood, of course. You’ll notice an immediate dulling of the polished surface. I’ve also been very careful to remove any excess glue, since a glue coating won’t allow the stain to penetrate, leaving white, unstained places. Following the vinegar treatment, I used a fine tipped dip pen and sumi ink to line around the head and the wing dividing line. I inked them after the vinegar to avoid dissolving the ink and making a runny mess. The vinegar seems to dissolve the ink, but the dye won’t.

Here’s my dye setup. I use little medicine cups with a knife tip’s worth of dye and a few drops of distilled water. I wouldn’t use tap water since you may get some unpredictable and unwanted adverse reactions. If you have trouble getting the dye liquid to wet the surface, try adding a little TSP (Trisodium Phosphate). We’re making less than half a milliliter of dye, so don’t go crazy. With the amounts of powder the dye comes in, at this rate one container of powdered dye will last a lifetime.
Add dye if you want more saturated color, distilled water if it’s too concentrated. I like to have a scrap of the same material I’m carving to test the dye on. You never know what’s going to happen until you test. Even the same types of material from different sources can vary markedly. When all is satisfactory, I use a tiny paint brush to apply the dye with. The one I like best is a 2/0 sable.

Above I’ve painted one coat of dark colored dye on the ladybug heads. My dye palette consists of Dark Brown, Scarlet, Lemon Yellow and Sky Blue Procion dye. These four colors, when mixed in differing proportions give me every color I want. I mixed the dark color here from the brown, scarlet and blue, equal amounts of each, yielding a sort of eggplant color. It will take several coats to make the heads really dark.

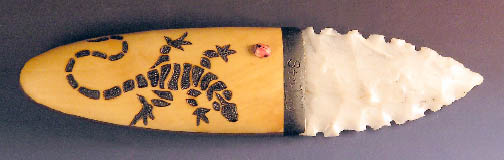
Here’s the front side ladybug, with both dark head color and red. I show this side because it is a special case. The back grouping of ladybugs is surrounded by dark burned wood, so any overflow of dye won’t really hurt anything. The front side, however, is a different matter. This ladybug is surrounded by light colored wood. Here an overflow could make a real mess. Be careful and apply dye sparingly, sneaking up to the edges.

The back group with a single coat of dye.

The color won’t ever be really strong on this kind of dense antler (or ivory) but I don’t really want a highly saturated color anyway. I prefer things to remain a little muted, subtle and (hopefully) elegant. The problem to watch out for here is small areas of glue on the surface of the antler, as you can see in the yellow circles above. I missed that area in the cleanup. Just take a small scraper and remove the glue along with a little surface area, then reapply more dye. That should fix the problem.
Here’s the finished knife, with a coat of a Danish oil finish applied (mostly linseed oil).
It was so neat the way you showed step by step the way you showed your technique when creating this artwork. Really cool
Thanks, Crickett. Glad you enjoyed it.
Tom