
What Do I Need To Start Engraving? I don’t know how many times I’ve been asked this question. Enough, I’d guess, that it has spurred me to add this page about such things to my blog.
#1 – Commitment: The number one thing you need is COMMITMENT. Successful engraving is an expensive and long term undertaking. Not to put too fine a point on it, if you’re the kind of person who collects hobbies by reading one Instructable and watching two YouTube vids thinking you can be successful, then please move on. Don’t waste your time nor mine. Engraving isn’t for you. Fine engraving is an extreme skill. It doesn’t come easily – and that means a lot of failures and a lot of practice.
#2 – Take a beginning engraving class. Do this before you buy ANY engraving tools. Believe me, you will literally save thousands of dollars and enormous amounts of your lifespan, to say nothing about limiting stress and increasing your chances for success by many orders of magnitude. I’ve tried coaching several people long distance over the Internet, and each of them ran out and purchased large quantities of engraving equipment before ever making their first cuts. In each case, after many months of working on their own, they’ve managed to advance to where they would have been on the first afternoon of a beginner’s class. Each refused to take a class, and several have since sold their equipment. At the very least, a beginner’s class would have told them they weren’t really interested in engraving. At best, they would have returned home light years ahead of where they are now. Also, they would have tried all the various brands of pneumatic engravers, microscopes and turntables, and sharpening equipment, and have a much better idea of what to buy.
A large number of engraving classes can be found here: http://www.engravingclasses.com
I personally took classes from Ray Cover, and endorse him wholeheartedly: http://learningtoengrave.com
I‘ve heard good things about Mike Dubber‘s instruction, and have met him personally and he is a fine gentleman: http://www.firearmsengraving.com
Likewise, Sam Alfano is a generous and outstanding engraver, and also a fine gentleman: http://www.masterengraver.com/classes.shtml
One of the main manufacturers of pneumatic engraving equipment, GRS has a large teaching facility that provides first class instruction from many highly qualified engravers, in Emporia KS: http://www.grstc.com
#3 – Study up on what engraving is (and is not…). The best way to do that is begin lurking at the three engraving forums, links below. Ask questions, engravers are a very welcoming bunch (if, perhaps, a little opinionated).
http://www.engraverscafe.com
http://www.engravingforum.com
http://www.engraversstudio.com
Lastly, of course, you’ll need equipment. I recommend pneumatic power assist engraving only. Some engravers recommend learning to push engrave, and hammer and chisel before moving to power assisted engraving. I completely disagree. This is the same thing as insisting your 16 year old daughter must learn to use a typewriter before you’ll allow her access to a computer, or she has to learn to drive a horse and buggy before you’ll allow her to enroll in Driver’s Education. My daughter has never seen a typewriter in real life, and I seriously doubt she’ll ever need to drive a horse and buggy. The finest engraving in history is being done today with pneumatic powered airgravers, so why tie both of your hands behind your back? Incidentally, I’m not going to debate you about this. You’re entitled to your opinion, but this is my Web page, and my opinion. If you don’t like my opinion, please feel free to purchase your own Web page and post your own opinion. You won’t receive any flak from me. If you have an insatiable need to try hammer and chisel, here’s a little tutorial I produced for Bladesmith’s Forum as a relatively inexpensive way to give it a try: Simple Engraving for Knifemakers, so knock yourself out. By the way, of the several bladesmiths that apparently tried this, none seem to have continued on with engraving.
My equipment: I use a Lindsay Palm Control Classic Airgraver, and a Lindsay Nitro G20 Airgraver for my engraving (see images below).


Click to enlarge
The Palm Control is a remarkable piece of equipment. There is a small piston in the barrel of the Airgraver that provides cutting power, and is driven by air. The mushroom handle is actually the controller for the air; the harder you push on it, the more power it delivers, in a very natural feeling manner. Most of my cutting is with this device. I use the more powerful Nitro G20 when I need to cut really deeply, and for precious metal inlays, sculpting and stippling. The Nitro is controlled by a foot pedal, and I find it much easier on my hand to use it for sculpting and stippling, by holding it like a pencil and controlling the power with my foot. Of course, the Palm Control can also do all of these things, but you must keep your finger on top of the mushroom handle to control the power, and that turned out to be painful to my hand.
You’ll need a source of compressed air, a compressor is probably your best bet.
A word about the other brands of pneumatic airgravers. GRS (http://www.grstools.com) has several models available, but what I hear is a GraverMax system is your best bet for serious engraving. All GRS systems are foot controlled, but they also have a system upgrade called AirTact that allows certain of their handpieces to be touch sensitive somewhat like the Lindsay Palm Control – I would definitely recommend you include that option. I’ve seen GRS equipment in action, but have never actually used one personally. However, lots of excellent work is being done by GRS systems, so GRS is an excellent option if that is your preference. Many of the beginner classes (except those by GRS) are equipped with most popular brands, so you can try out each to see which works best for your own preferences.
Enset is a newcomer to the field. I’ve only seen it in action in videos, but I’m intrigued by Enset’s ability to deliver a single blow at a time for sculpting, so definitely check it out at: http://www.engraver.com
When you compare prices on all of these various options, be certain that you compare apples to apples. For instance, GRS prices are listed on a modular basis, where you must choose among different options, so be certain you add up the prices for all the required pieces. While some Lindsay equipment may initially seem more expensive, when you include all the GRS pieces you’ll need to accomplish the same thing (especially the AirTact module), the price differences shrink dramatically.
Sharpening Equipment: There are some excellent shortcuts available today that will definitely help. The engraving world is full of grey beard engraver’s horror stories of their apprenticeships; “I wasn’t allowed to do anything during the first 20 years except learn to hand sharpen a basic graver. I didn’t engrave anything for the first 23 years, and they wouldn’t let me touch a gun for another 35 years” yada yada yada.
I believe that sharpening a graver and getting repeatable results is by far the most important, basic thing to learn, and there are some excellent sharpening devices available now that weren’t available just a few years ago. They make sharpening a piece of cake.
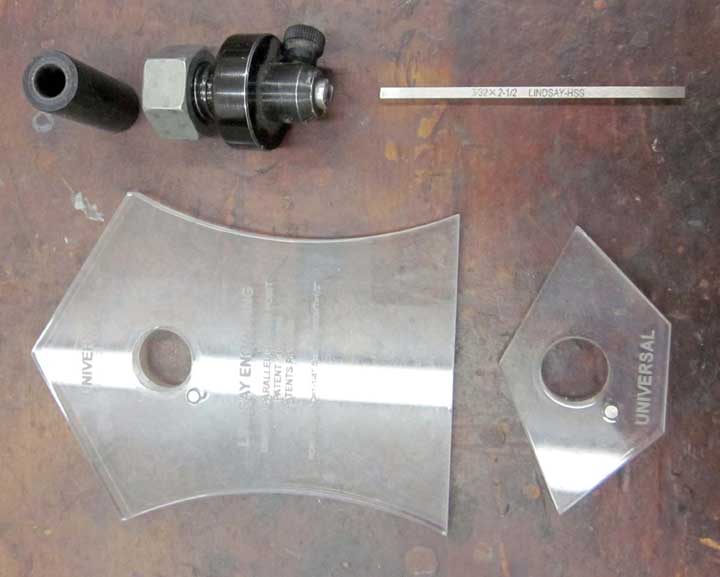
Here’s what you want to start with – Lindsay Graver Sharpening System: http://airgraver.com/sharpening.htm A note here: I am not employed by Lindsay Engraving, nor do I receive any sort of benefit from Lindsay Engraving. These are just plain brilliantly foolproof tools and fixtures.

Above is the Universal 116 degree fixture, shown here with a diamond bench stone for hand sharpening. There are quite a few additional templates (the clear plastic parts above) available to make and sharpen other types of gravers, most of them under $25. You only buy the metal graver holder once.
Above is my Lindsay Universal sharpener, shown disassembled. If you do find you wish to continue in engraving, this sharpening system will be of daily use to you.
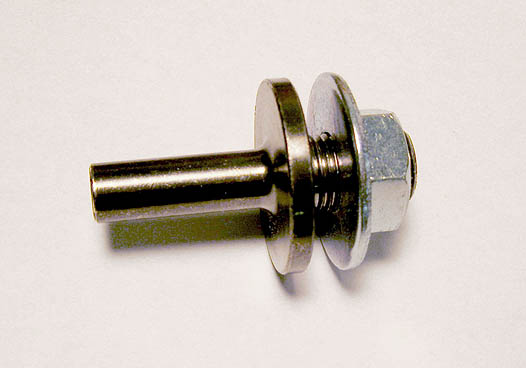
If you have a drillpress, shown above is the Lap Mandrel Adapter for converting a drillpress to a power hone (about halfway down the page): http://airgraver.com/sharpening.htm

Above is one of the Lindsay Templates in use with the converted drill press mandrel and diamond lap.
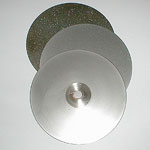
You’ll also need a diamond lap with the mandrel, I’d recommend the 600 grit to start with (same page).
Of course, you’ll need something to sharpen. I use Lindsay graver blanks, in High Speed Steel (HSS), M-42 (a higher grade of HSS) and Carbalt™ (a special carbide). Beginners really would do better to stick with HSS – it’s much cheaper and forgiving. M-42 and Carbalt™ are both considerably more expensive, and the Carbalt™ is quite brittle. You’re going to break a LOT of graver points, so get good at sharpening, and get used to it. You can find the Lindsay graver blanks here: http://www.airgraver.com/graver-blanks.htm
The above are the absolute minimum bits of equipment you’ll need to get started. Other equipment can be improvised. You’ll need something heavy to fasten a practice plate to. It will need a flat bottom so it will be steady, but not so heavy it can’t be moved and turned on your work surface. A heavy piece of wood or metal will be fine to start with. Snag your better half’s hot glue gun to glue a piece of copper or mild steel onto the heavy thing, and you’re good to go. A little alcohol will free the practice plate from the hot glue when you’re done engraving it.
If you’re like me and old and busted, you’ll definitely need some sort of magnification. I use a Meiji EMZ-5 Stereo microscope and a Lindsay turntable, but at the very least you’ll need an Optivisor brand magnifier. Try to get the version with glass lenses, and don’t bother with other brands.
Now, since you’ve probably ignored me and purchased the equipment already, play with it for a day for two and get your ass scheduled for a Beginning Engraving class. Listen and heed this advice! And have a great time engraving!