
Continuing on with the miseretto by grinding and filing.

Above, I have begun grinding the flats on the blade. It will be a thick diamond cross section, since the misericordia and stilettos were originally designed as a stabbing weapons rather than a cutting-type of knives. I’m just going to establish the basic shape with the belt grinder, and then refine the shape more gently with files. This works best for me, since my grinding skills are limited, and my favorite 36 grit belt makes for quick work, but it will ruin the shape just as quickly…
 Above, with the magic of computer image editing and after the rough grinding the blade diamond cross section, are two views of the miseretto, one with the pattern rubber cemented on. Right now, it looks more like a screwdriver rather than a sleek, graceful dagger…
 Here, I’ve taken the miseretto to the angle grinder, and carefully roughed in the blade profile. Finally it’s starting to look like a dagger!

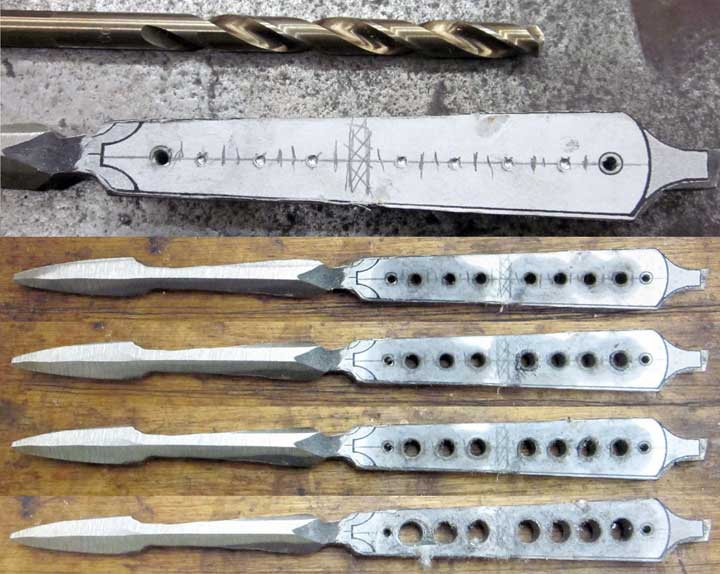
The steel I’m using is pretty thick (3/16 of an inch), and since I’m also going to add shibuichi scales, this will end up a pretty beefy dagger. I’ll attenuate this problem a bit by removing metal from the inside of the handle. I begin by carving a dimple where I want each hole – I prefer to carve these with a small carbide burr, rather than using a center punch. Then, on to drilling holes – but, since this is a high carbon steel, I can’t just grab a drill bit and begin drilling. This steel will work harden quite easily, and if I start with a 1/4 inch drill bit, I can probably make it about halfway through the steel thickness before the drill bit will locally harden the metal, stall, overheat, and dull itself into complete uselessness. So, instead, I’ll “sneak up” on it. I start with a 1/8 inch diameter drill bit – this size seems to drill through most anything. Once the 1/8 inch holes are done, I’ll re-drill then with a bit 1/16 inch larger, and keep switching up to larger bits until I reach the target size, in the case, 1/4 inch diameter. Above, you can see the step by step results.
 I can remove a little more weight by cutting out the web in between the holes with a jeweler’s saw, so I carved locating dimples and drilled extra holes to shorten the path the saw has to take. I won’t saw the web out yet – I try to operate in what I call “graceful degradation mode.” This is a risk-reduction strategy I’ve used most of my life, and it works out really well for me. Since I still need to refine the shape of the blade, a critical part of the operation that I can still screw up, I’ll wait on the sawing effort until I’m sure the blade is going to be successful. I drilled the holes before the blade became sharp, however, since should there be a mishap during drilling, a sharp, whirling blade is more dangerous than a whirling dull one…risk reduction in action.
 Above, after the first round of draw filing with a coarse file. I’ll do all four sides, then switch to finer cut files.

After several rounds of careful draw filing with a medium cut bastard file.

 Above are top, bottom and side views of the blade finished with a worn out fine cut file
 And here, after cutting out the webs with the jeweler’s saw. At this point, I’ll probably live with the blade for a day or two, thinking my options before making the decisions I have yet to make…