

Creating Side A of the William Henry Rainforest Knife
Here’s the drawing of my design. The folks at William Henry Studios wanted something with a rainforest theme. Unfortunately for them, my background as a microbiologist keeps creeping out, so a lot of my work focuses on the largely unseen drama that takes place in the hidden recesses of the world…

A William Henry Studio knife handle scale. I thought some of you might like to see the beginning – above is how the scale comes to me, beautifully machined and polished.

I feel a little badly, but the first thing I do is to destroy that lovely finish by stoning it, to eliminate glare under the microscope (center image). It’s not too much of a tragedy, because none of the surface you see will survive to the end.

And above, the ugly dude in the photo is my deer antler burnisher for transferring the pattern, which you can see on the steel knife scale.

I got the outlines cut in the @williamhenry_studio Rainforest knife scale today. Believe it or not, this is about 4 hours of cutting…


In this sequence of images I’m working on a small maquette to see how the lichen on the William Henry Studio Rainforest Knife might turn out. I’ve engraved
, carved and punch sculpted the lichen, and that’s 18 karat green gold overlaid on the edges. I’m pleased with the lichen, but the gold edges might just be a bit much. So much of this style of engraving is trying to balance the detail and look/feel of each individual element with the overall impression…we’ll see…

A little more “adjustment” to the lichen, and a bit of overlay experimentation on a small maquette of the gecko. Seems that style of gold inlay isn’t going to work…my neighbor said it looks like the lizard has a walking harness on – so nope, nope, nope! I’ll use a less definite style of gold inlay for the stripes of the gecko. All my questions are now answered, so on to the actual work on the knife scales themselves.

Above, I’m actually operating on the knife itself, beginning to remove the background, and starting to detail the wood and bark as I go. Another big part of engraving and sculpting such a complicated design is the ordinal process – which parts you do before the other parts. Get the order wrong, and you can easily paint yourself into a corner…


More bark and wood detail, and lots more background removal. In general, I outline the design elements with gravers, and use carbide burs to carve away the background. Then, more detail with gravers, then burs, then lather, rinse, repeat…

Here I’m beginning to sculpt the gecko. I start by trimming the top edges of the lizard outlines with a tiny flat graver.

Above, you can see the facets left by the flat graver. Something with this level of depth I’ll generally make two passes with he flat graver. The first pass will be at 45 degrees from horizontal, than another pass at less than 45 degrees along the top edge of the previous facet.

Here, I’ve begun working with a small punch to smooth the graver cuts. You can see the pebbly texture along the bottom side of the gecko’s head. I really like how this texture gives you a “scaly” feel, so I’ll probably go with it…

And here’s the first round of rough sculpting finished. I’m really just trying to round things over in a general sense. I’ll go back later after the gold inlays are in and “adjust” anything that needs it.


Today felt like a wasp day on the Rainforest knife. At the left, I’ve removed the background and begun detailing the wasp with a small flat graver. On the right, I’ve started using flat graver and sculpting punch at the head, rounding things more gracefully. Features like legs are still a little too coarse, even though the entire wasp is only about half an inch long (12 mm).


More refinements with flat graver, sculpting punch and really tiny carbide burs. Suffice it to say a whole lot of finicky work with a tiny flat graver, then punch sculpting. It’s just about ready for the gold inlays…

Above, I’m working on the leaf and centipede, rounding the centipede with a flat graver

A lot of work on the dead leaf with small carbide burs, making it look, well, wrinkled and dead…

A more detailed image os the leaf. It’s also a good example of the order of things – I inlaid the centipede’s antennae early on in the process, because they are a flush inlay, with the top of the gold at the original surface of the steel knife handle scale. That way I don’t need to try a leave a reserved area for later inlay. This is strictly a value judgement…

Lastly , both leaf and centipede smoothed and sculpted with a tiny punch.

Above, I’m beginning to inlay rose gold in he centipede legs. Here, I’ve undercut V-graver cuts in the legs using a small flat graver (see the blue arrows). Hopefully the red gold will flow into these undercuts, trapping the gold into place.

Above, I’m punching in rose gold wire into the previously prepared undercuts. Rose gold is a real pain in the derriere – it work hardens instantly, so if your inlay technique is poor, the inlay will fail!

Once the gold is in place, punches, scrapers, gravers, burs are all pressed into service to shape and smooth the rose gold legs. Here, you can see the finished legs in the front half of the centipede.


The centipede legs are finally all inlaid in rose gold. It shouldn’t, but I’m always surprised – that’s a lot of legs…

Since I’m inlaying gold, I thought I might as well continue on with the wasp. Above, I’ve used a V-graver and carbide bur to excavate the pockets which will receive the gold.

Here, I’ve used 28 gauge rose gold wire to set into the first pocket. It’s pretty narrow, so only required two widths of wire. While the supplier of the gold claims it to be rose gold, I’m just not seeing the red in it, but it is a beautiful “peachy” color, so I’m going to call it peach gold. Among engravers, rose gold has a love/hate reputation – it is notorious for work hardening instantly, so lots of engravers shy away from it. This particular brand isn’t too terrible, but as it isn’t really red colored, it’s not really a solution for the red colored gold problem…

Above, I’ve set in all of the gold in the wasp’s abdomen. On a whim, I’ve added 24 karat yellow gold in the last pocket. I kind of like that… I’ve hammered all of the gold into place, filling all the undercuts, then used a tiny scraper to remove the excess. You can see all the scrapings around the edges.


Above are two images of the completed inlays, scraped, burnished, stoned flat, and a slight polish. I’ve also stippled the non-gold areas of the wasp so as to appear darker.

Lots of finicky detail work in the wasp. This image has a little temporary black Sharpie™ Permanent Marker inking just to see how it will look.


Above, I’ve finished sculpting the lizard, and added her gold eyes using a gold overlay technique.

Now to add the gecko’s gold stripes. Above, I’ve excavated the stripe areas, and undercut the edges.

Here I’ve not only undercut the edges of the pocket on the gecko’s head, but also raised a forest of tiny hooks on the bottom of the pocket. All of these will trap the gold permanently into place, and you can see me adding the first piece of 24 karat gold wire.

Above, all the wires in and hammered into place.

Here, I’ve used a V-graver to begin removing the waste material in the gecko body stripes. I’ll use a carbide bur and tiny grinder to remove the rest of the waste.

Above, I’m adding 24 karat gold to the gecko back. there’s still more to go in the tail stripe…

After looking at the wasp for a while, I decided it needed a tiny bit of gold inlaid in between the eyes – quality control is a never-ending process…

Above, the gecko is fully inlaid, with another dark stripe added. Also beginning the final steps on the front bolster with a bit of lichen. Not long left on this side…beginning to seem like forever!

The bolster needs a tiny gold spider. The legs are simple single wire inlays, but the body is actually several balls of 24 karat gold I melted on the ends of the gold wire. I hammered several of them together into a mass which extends above the surface, then used a body-shaped punch to do the initial shaping. A little trimming and gentle punch sculpting made everything nice and smooth.

A little texturing around the spider.


The above three images are of the finished Side A of the Rainforest knife! Now on to Side B, with poison dart frogs…
Creating Side B of the William Henry Rainforest Knife

Above, I’ve transferred my design onto Side B and cut them with a V-graver.

I’m not certain whether my idea for a small puddle with tadpoles in it will work so here’s a small experimental maquette for the poison dart frog tadpoles. Looks good to me, so on with the actual knife.

Above I’ve begun the background removal process. I’m mostly using carbide burs for this.

More refinement of the background. l’ve also inlaid green gold in the centipede antennae.

Above is the tiny earwig I added to the bare area on the front bolster, with inlaid gold details.

More progress – check out the earwig on the front bolster area.

Here you can see the earwig and the liverwort plant I added.

Above, the poison dart frog tadpoles in their tiny puddle.

The tadpoles and earwig are finished.

Here I’m finishing up the dead leaves. The blue arrows show me shaping the area between the ribs with a carbide bur.

Above, the blue and red arrows show where I’ve used a punch to soften the texture left by the carbide bur – blue is after the punch and red is before.


The two images above show the leaves in all of their deceased glory…

Here I’m adding in some grass in the in-between spaces. I’ve done a kind of interweaving to add a little interest. I first outlined them with a V-graver, and then removed the background with the tiny carbide bur in the image. That particular bur is 0.4 millimeters in diameter.

Above, I’m cleaning up the edges between the background and the grass leaves with a tiny flay graver (right hand side) and carving the top surface of the grass with a tiny round graver (left hand side).

Above you can see the three areas where I added the grass tufts.

Now it’s time to begin sculpting the tiny poison dart frog. Above, I’ve used a tiny flat graver to begin carving back the sharp edges of the frog. My first cut is about 45 degrees from vertical around the edges, followed by another time around at a more shallow angle (about 20 degrees). You can see the facets left behind by flat gravers. This sets the stage for the punch sculpting to follow.

Above is the poison dart frog after the punch sculpting. I really like the attractive texture the punch leaves behind – just like a frog’s pebbly-textured skin.

The home stretch – here’s the poison dart frog fully sculpted and ready for the gold inlay. You can also see where I’ve added a small gold inlay to the largest of the tadpoles.

I’ve excavated the areas for the gold and have the first gold wire in place.

Above, all the wires in place, and ready to be hammered permanently into place.

Here, all the gold has been inlaid and smoothed. A little quality control, followed by a good inking, and Side B will be finished.

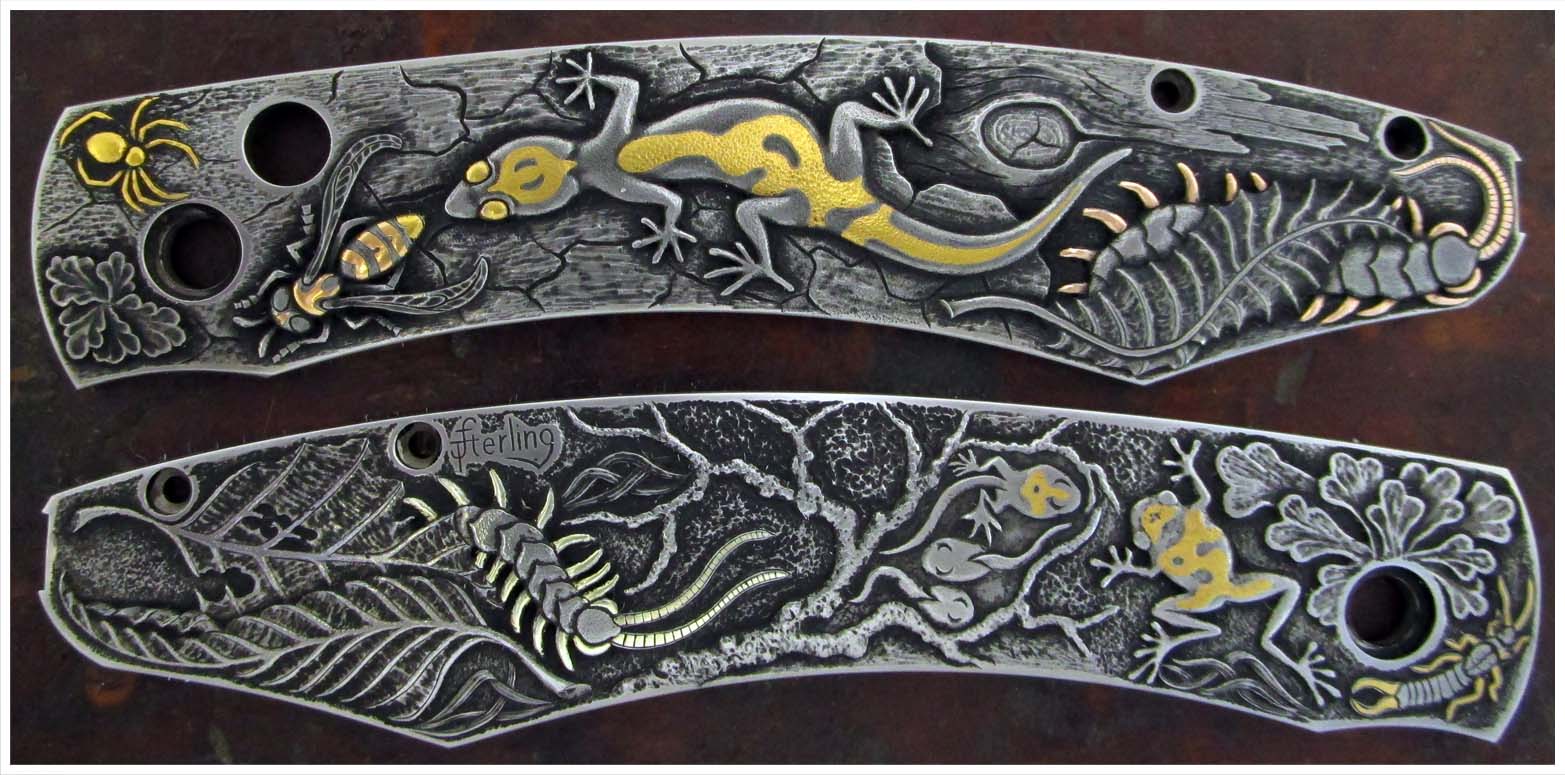
Above, both sides finished, and ready to go to the good folks at William Henry Studios for assembly, and their new home.
Thanks for Looking!
Tom Sterling
http://www.facebook.com/TomSterlingHandEngraving#
http://instagram.com/tom_sterling_hand_engraving