
Now to inlay a gold ant into shibuichi – just to make sure I can do it, and work out any difficulties before risking my miseretto canvas…
 Here I’m test fitting two Argentium™ silver jump rings to the pendant. I know just from experience that these tiny jump rings aren’t going to work well as the pendant is right now, because of the thickness of the shibuichi/silver sheet.

You can see above that the jump rings can’t be closed without distorting them. This image is a computer composite of the front and back images. Note the jump ring on the back (silver) side of the image (on the right) – it can’t be closed without jamming the top and bottom parts of the pendant together, and I want them to swing freely. To address this, I will trim the square edges of the holes, rounding them to make a little more room.

Above, I’m using a Sharpie™ permanent marker to mark where I need to remove metal (front and back sides).

Above, I’ve carved away the top edges of the dangly part of the pendant, and the bottom edges of the holes in the top piece using a small carbide burr. I’ve done this for both the front and back. At the top of the image are two cross sectional drawings of the hole, before and after. On the right, you can see both top and bottom portions of the pendant assembled with jump rings. The jump rings fit perfectly!

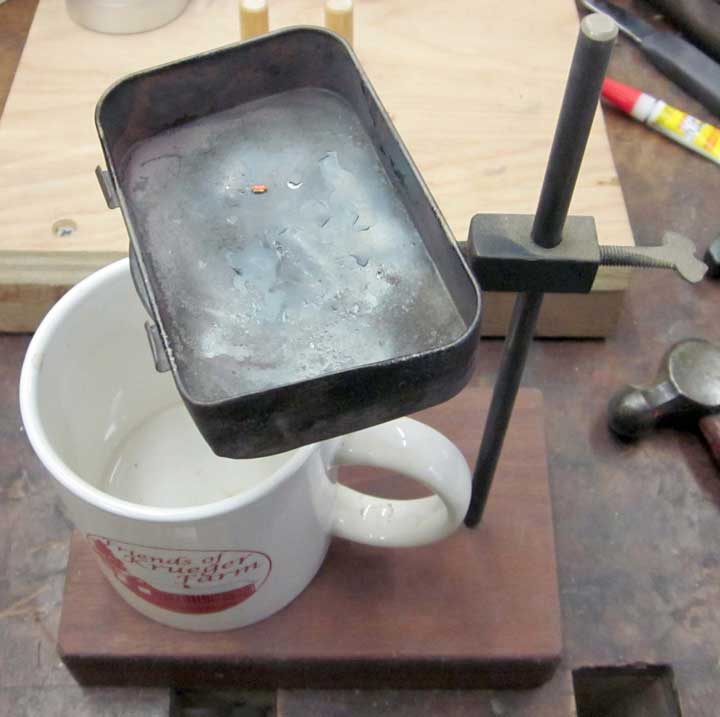
Above, I’ve used a little pitch to stick the lower (dangly) part of the pendant to a sacrificial block of hardwood. I’ll mount the hardwood block in my engraver’s vise for a solid, vibration free platform to engrave on.

Here, I’ve transferred my design onto the pendant, ready to start engraving.

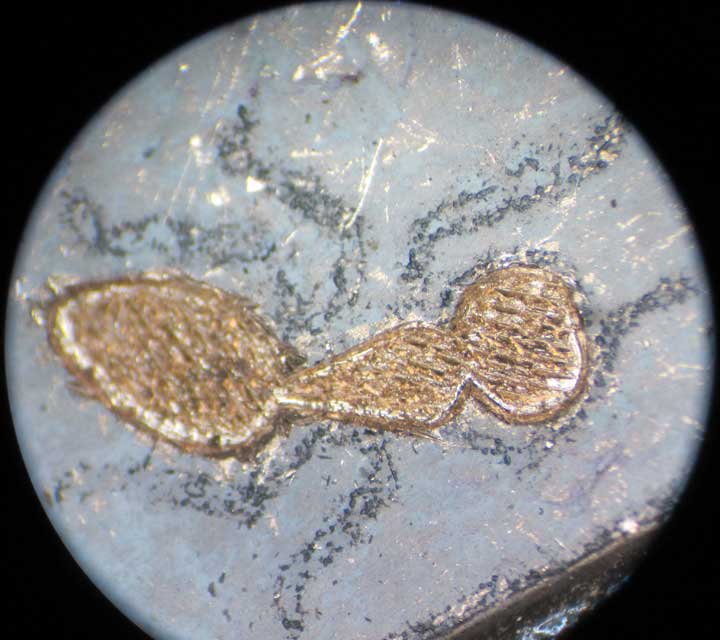
I begin by using my three ant punches to mark where the ant will go, just by hammering the punches lightly into the surface (I wouldn’t do this if the surface was steel, which would probably ruin my punches!). I use the punches for the marking so the gold inlay cavities will match at the end when I shape the ant with the punches. This is out of the order I would normally carve this pendant in, because we’re doing this for risk reduction. Normally, I would do the majority of the carving first, then inlay the gold ant. Since I’m not certain this will work in the shibuichi, I don’t want to do all that work only to find out the inlay won’t work, so I’m going to reverse the order. On the right is an image taken through my microscope of the marks left by the ant punches. From here on, I’ll be showing a lot of images through the microscope, so I apologize for the lousy photos – I’m having to hand hold my camera and finagle things to get these images.

Here. I’ve begun engraving with my Lindsay Palm Control Airgraver inside the punch marks, using a Lindsay Universal 90 degree graver. I’m intending to excavate inside the punch marks to create a cavity or pocket for the gold inlay.

Above, I’ve finished the outlines, about a millimeter deep, by going over the cuts several times.

Above, I cut a number of parallel lines inside the cavity, removing more shibuichi.
 And, here more lines cut at right angles to the first set.

Now to remove the little mountains in between the cuts. I’ll be using some really small carbide burrs for this. You can see them in this image. The top burr is a fresh, new 1/4 round ball burr from Lasco Diamonds, and the bottom one is an old, dull carbide burr, modified by cutting four flat facets in a square pattern on it with my diamond hone. This is a really great trick to re-purpose dull burrs, and actually seems to improve their cutting action, as well as making them much smaller than you can buy them! I’ll use the new burr to deepen the inlay pockets and remove shibuichi from the center area, and the smaller one for shaping the bottom corners.

Above, I’ve excavated the pockets. If you look closely, you can see a little bit of shibuichi fuzz and crud on the top edges of the pocket. Shibuichi carves very nicely, but the burrs always leave a little bit of material behind, where the shibuichi sort of “smears” a little. Copper does this even worse.

To get rid of that crud/fuzz, I’m using a small Carl Bleile style scraper, lightly cleaning up the top edges. You can see more information on this scraper and the really marvelous sharpening fixture here: http://www.airgraver.com/sharpening.htm

Now that the pocket is completed, I need to address how the gold will be forced into the pocket and be trapped in a manner that it can’t fall out. I begin by using a small cutting tool, as taught to me by by Ray Cover. It is a simply a small, symmetrically sharpened chisel, almost like a sharpened flat blade screwdriver. I use it to cut a series of parallel lines along the length of the pockets.
 Then, using the same little chisel, I put in another set of parallel lines at about a 30 degree angle to the first set, and then another set at about 30 degrees to the second set. This has the effect of making rows of little teeth in the bottom of the inlay pocket, and when the soft gold is driven down into this little forest of teeth, it will stick!
It’s difficult to see in the image above, but I also used the little chisel to undercut the sides, holding the chisel at about a 45 degree angle and driving it into the bottom corners of the pockets. This raises the surface of the shibuichi up, leaving a gap underneath. The soft 24karat gold will flow into this “cavern” and be trapped. If this all works out, the gold will be permanently installed, and the entire pendant would have to be destroyed to remove it.

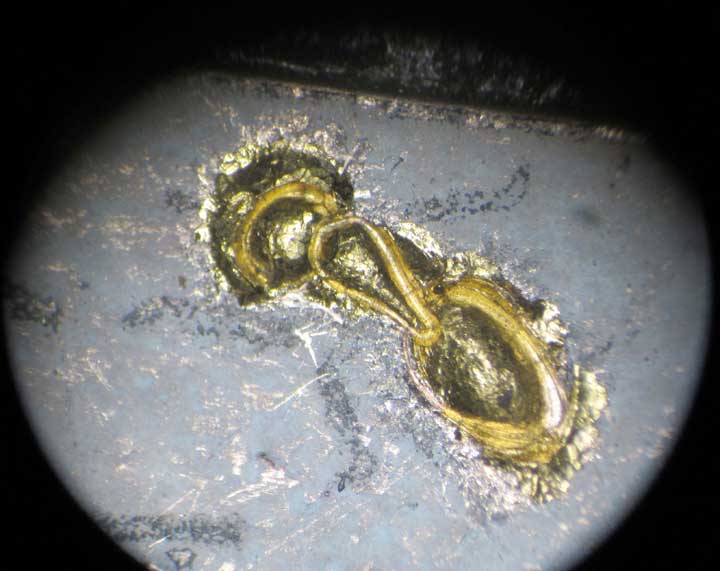
Now, what you’ve been waiting for, I begin adding the gold. On the left, I’ve taken a small piece of 18 gauge 24karat gold wire and carefully folded it twice to fit the ant’s abdomen pocket. After annealing the wire, I used a brass punch and an engraving hammer to tap the gold roughly into place (center image). My methods must have worked, because the gold stuck after the first tap! In the image on the right, I began using a smaller brass punch in my airgraver to begin shaping the gold mass, driving it even further into the teeth and undercuts of the pocket.

Here’s the little brass punch (made from 3/16 inch diameter brass rod) and my little engraving hammer I used to seat the gold in the pocket.

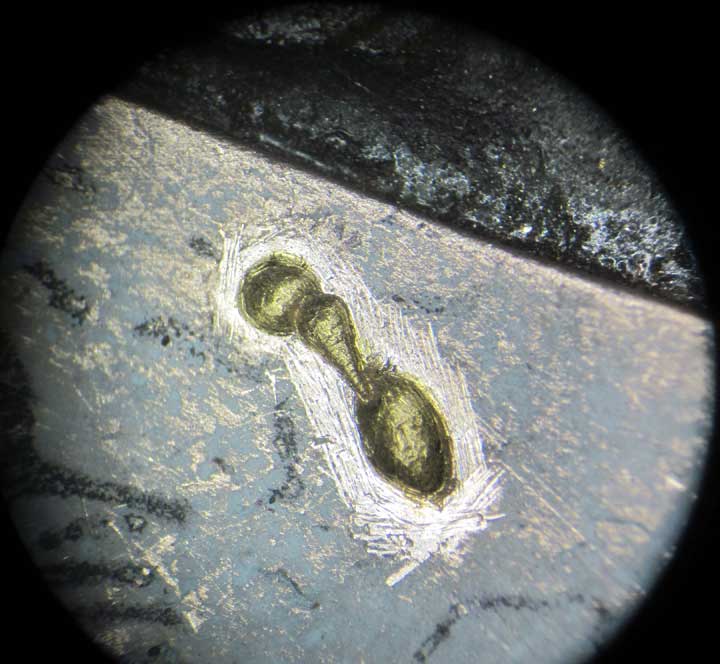
Above is the first bit of gold just after a few taps to seat the gold.

Above is my annealing setup. A small ring supports an Altoids can, that keeps the direct flame off of the tiny bit of gold, so I don’t melt it into a blob. Underneath is an old coffee cup with a little alcohol in it. I’ll quench the hot gold in the alcohol, which will instantly remove any firescale from annealing. Of course, I’m using alcohol near an open flame and really hot metal, so I have a lid nearby to cover the coffee cup with and smother any flames that might occur! No problems so far, knock on wood….

Annealing the gold will make it maximally soft, so it will flow well into the pocket undercut and teeth. Here’s a little trick I learned from Ford Hallam about annealing gold and silver without melting it into a blob – you can see that my little twist of gold looks red – I colored it with a Sharpie™ marker. I heat the piece from below with a small torch, and when the Sharpie™ color disappears, the gold is annealed! Then, into the alcohol while still hot. The little “scream” from the metal means the scale is gone.

Above, the center section of the ant in process. I used a standard graver to push up the part of the ant’s gold abdomen where the center section will connect, leaving kind of an undercut for the second piece of gold wire to fit into. On the left, I folded a small piece of wire, using my pliers to squeeze and manipulate the wire until it fit inside the pocket. Then, anneal the wire, and tap it into place with my engraver’s hammer and brass punch (center image). Then, in the right image, shaping with the smaller brass punch in the airgraver. Last, using a standard graver, push up the front end to make an undercut for the head gold to fit into.
One nice thing about 24karat gold, it readily cold-welds to other 24karat gold. Dental fillings used to be done this way. Dentists cut a small undercut pocket in a tooth, and using small bits of gold foil and punches, would repeatedly hammer layers of gold into the pocket until it was filled. The bits of gold would cold-weld to each other, making a solid gold mass.

And, repeat again for the head. Bend/fit, anneal, seat the gold, shape with small punch.
 Above, I continued shaping with a small steel punch in my airgraver. You can see the punch on the right side of this image. I made this punch from an old carbide burr by breaking off the carbide part, and shaping the steel into a low dome.

Here, the ant has been shaped with the small steel punch. I used it to also punch around the bottom edges – this tends to turn any gold that has flowed over the top of the shibuichi into gold leaf, which you can easily brush away, further shaping the ant.

Now is where the ant punches come back into play. I used them, along with a small hammer, to punch and shape the three parts of the ant, making sure I got the punch to go below the surface of the shibuichi. Since the gold overlaps the surface a little, I lined it all up as best I could.

Above, I used a standard graver to trim any excess gold from around the edges of the cuts left by the ant punches.

Using the small steel punch, I’ve punched the surface of the shibuichi all around the ant. If you recall, when we undercut the edges of the inlay pockets, we caused the edges of the shibuichi surface to raise up, now I punched that raised surface down, further trapping the soft gold. This surface punching also causes any overlying gold to be pounded into thin gold leaf – you can see some at the front of the ant’s head. This thin leaf can be easily scraped away. I also shaped the body of the ant using the same punch and really light strikes with the airgraver.

Here, I’ve used the small Carl Bleile scraper to trim the shibuichi surface flush around the outside of the ant.
 Above, I’ve used a 90 degree graver to engrave a tiny line around the edges of the ant. This will provide a good, definite dividing line, visually separating the gold ant from the shibuichi ground.

Here is an image of the small brass punch I’ve been using in the airgraver, and the small steel punch. The brass punch is made from 1/8 inch diameter brass rod, and the steel punch is from an old carbide burr. The small socket I turned on my lathe, and the 1/8 inch diameter tenon (on the right side) fits the airgraver better than the 3/32 inch diameter of the punch. A small setscrew finishes it all off.

And here’s the finished ant body, with my index finger for scale. I added a quick bit of dark patina around the ant, just to see what is will look like finished. Next, I have to inlay the little gold legs. I’m tired now – legs will have to come later.