Helheim Dagger in Knapped Steel – Part 7

Helheim_Dagger_53
Today I’m finishing up the engraving on the Hel side of the dagger.  Above, I’ve removed the background, using what I call a “scribble” texture for the cloth of her robe, and I’ve used a tiny four-sided point to stipple the non-cloth areas (see around her dead eye, and between her ribs, as well as the little Celtic cartouche at the bottom).

Helheim_Dagger_54
Here

, I’ve finished up the shading, and inked in the design.  Hel has really popped into being now!

Next, I’ve got to make lathe turn a tiny moose antler peg for her dead eye.  Getting close to finishing!

Thanks for Looking!

Posted in Engraved Knife, Knapped Knife | Tagged , , , , , , | Leave a comment

Helheim Dagger in Knapped Steel – Gold Inlays – Part 6

Today I tackled the gold inlays on Hel’s robe.  This is always a stressful time, and a major effort for me in the process.

Helheim_Dagger_47
I chose to inlay the areas in parallel gold wires, since these are mostly long and skinny locations.  I began by excavating a shallow pocket, then cutting a single line along the edge.  Then, I used a tiny flat graver to cut little undercut pockets along both bottom edges of the cut.  The gold will flow into these undercuts and become trapped.  In the images above, you can see the little flat graver cuts along the lower edge of Hel’s hood hem, and the first bit of gold wire I tacked into place.

Helheim_Dagger_48
Next , I just repeated these steps with more parallel cuts, installing a wire, and making the next set of cuts.  Above, you can see (left to right) a single wire inlaid, then two wires, then finished, scraped and smoothed.  I used four parallel wires at the widest parts of the inlay.

Helheim_Dagger_52
Above, you can see all the finished gold inlays, ready for the shading.  That’s enough for today…

Thanks for Looking!

Posted in Engraved Knife, Knapped Knife | Tagged , , , , , , | Leave a comment

Helheim Dagger in Knapped Steel – Part 5

Now it’s time to work on the Hel side of the Helheim Dagger.  I can’t claim sole authorship of the Hel design – my daughter has done a lot (most?) of that work.  I’ve been stymied for a while on this side, and my she solidified the design and came up with the shading protocols.  Thanks – now get back to studying!

Helheim_Dagger_44
In the two images above, you can see the transfer applied (left image) and the first set of engraved cuts (on the right).  Next, I’ll inlay the gold trim on her robe, and I have to do something about Hel’s dead eye.  I’m leaning towards a moose antler inlay, similar to Japanese netsuke of ghosts and decapitated heads.

decapitated_head
Above is one of a famous Japanese netsuke

, and one of my favorites (albeit a really horrible little thing!).  I’ll do something like the inlaid eye in this one for Hel’s dead half.

Thanks for Looking!

Posted in Engraved Knife, Knapped Knife | Tagged , , , , , , | Leave a comment

Helheim Dagger in Knapped Steel – Part 4

Today I’m finishing up the engraving on the Odin side of the Helheim Dagger.

Helheim_Dagger_42
Above, I’ve finished shading the Celtic knots of Odin’s beard and the little Celtic ornament at the bottom.  I’ve added a little temporary Sharpie™ inking just to see how things will look.  You can see the definite contrast between the shaded lower half and the unshaded top half.  Shading really makes thing pop and come to life!

Helheim_Dagger_43
And, above, I finished all of the shading , added some fine decorative cuts to the gold helmet “eyebrows,” and inked the whole thing.  This is my first time doing much engraving on 24 karat gold – surprisingly, even though gold is really soft, it is surprisingly difficult to engrave well.  Because it is so soft!  Next, I’ll start on the Hel side.  No rest for the wicked!

Thanks for Looking!

Posted in Engraved Knife, Knapped Knife | Tagged , , , , , , | Leave a comment

Helheim Dagger in Knapped Steel – Part 3

Helheim_Dagger_36
After a lot of design pain I’ve finally come up with a design for this side of the knife – One-eyed Odin.  Above, you can see the design transferred to the knife scale, ready to begin the engraving process.

Helheim_Dagger_38
Above, I’ve engraved all of the major lines and begun the gold inlay process.  On one side of Odin’s helmet you can see a mostly completed 24 karat gold inlay, and on the right side you can see a pocket I cut out for the other inlay.  Incidentally, this inlay is too wide for a single gold wire, so I’m using a technique of inlaying parallel gold wires into the pocket, and them hammering them down into undercut grooves.  Above the surface, the gold will run across the surface and run into the adjacent gold wire.  As long as I keep the gold pretty clean, the separate wires will cold weld together and result in a really strong and wide band of 24 karat gold.

Helheim_Dagger_39
Above, I’ve completed both gold inlays, and also removed and textured the backgrounds.  On Odin’s helmet, I’ve chosen a bold texture for the relieved background, and a finely stippled background for the Celtic ribbons of Odin’s beard.

Next

, I’ll begin placing in carefully thought out and very tiny shading lines, which will really make the engraving pop to life.

Thanks for Looking!

Posted in Engraved Knife, Knapped Knife | Tagged , , , , , , | Leave a comment

Helheim Dagger in Knapped Steel – Part 2

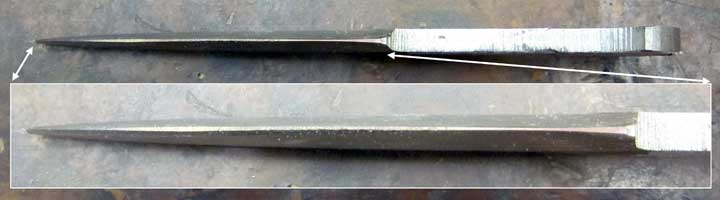
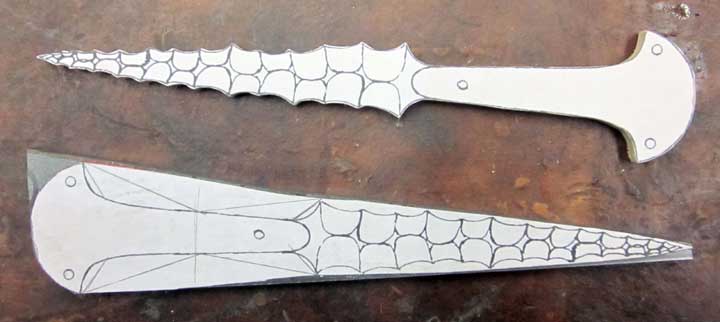
Now were ready to begin the “knapping” process.  I’m gong to be using a small drum sander in my Foredom™ flexible shaft grinder to create “flakes” in the steel similar to the flakes removed from stone to create a stone blade.

Helheim_Dagger_14
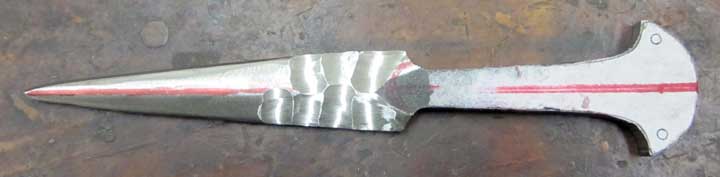
Above, I’ve carefully ground away the “flats” I so diligently placed on the blade with the angle grinder in the previous steps.  I’ve created a “lens” shaped contour on the blade, and am now ready to use the sanding drum in my Foredom™.


Helheim_Dagger_16

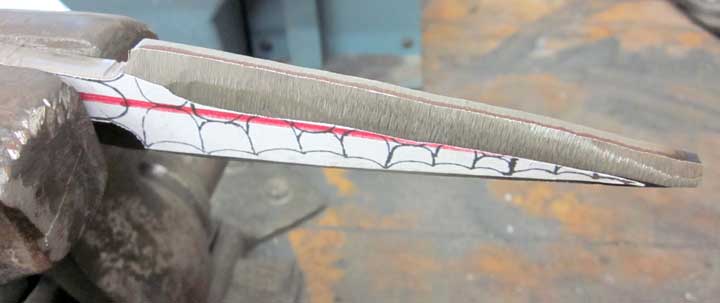
Above is a side view of the lens shaped blade.

Helheim_Dagger_17
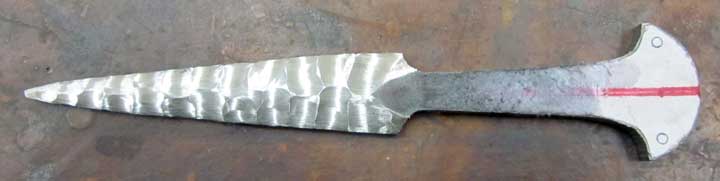
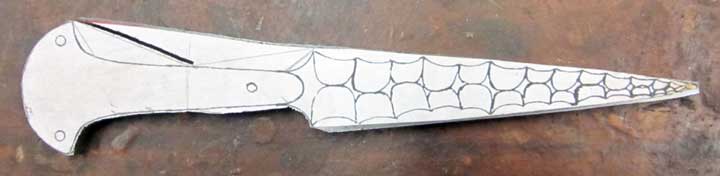
Here, I’ve been carefully sanding in “flake scars” in the steel.  Notice how I alternate the length of opposing flake scars, just because I like the visual effect.

Helheim_Dagger_18
Further along grinding in the flake scars.

Helheim_Dagger_19
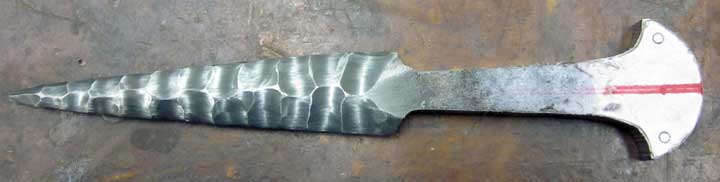
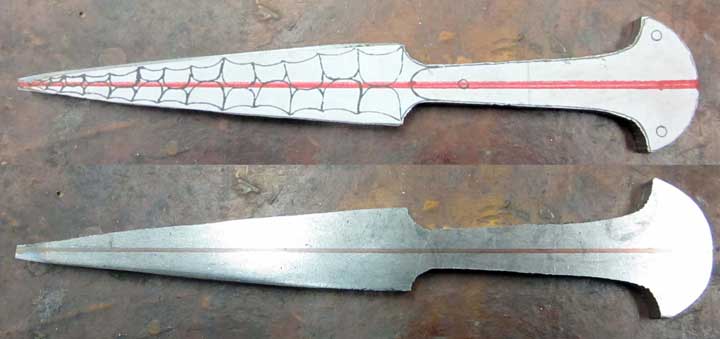
And, this side finished.  Now I have to grind the other side.

Helheim_Dagger_20
Above, the same side with a little cold blue patina, just because I’m impatient to see how it will look when I’m finished.

Helheim_Dagger_25
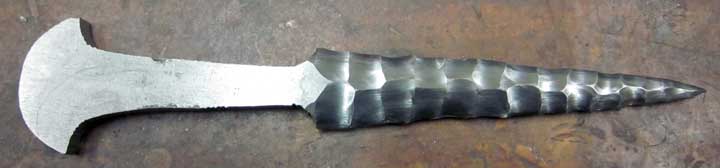
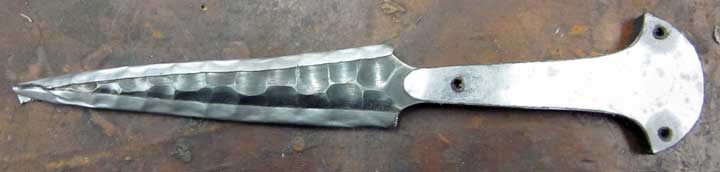
Above is the other side with the flake scars all ground in.

Helheim_Dagger_29
And, here is the back side blued.  Looking good, so far.  Keep your fingers crossed…

Helheim_Dagger_30
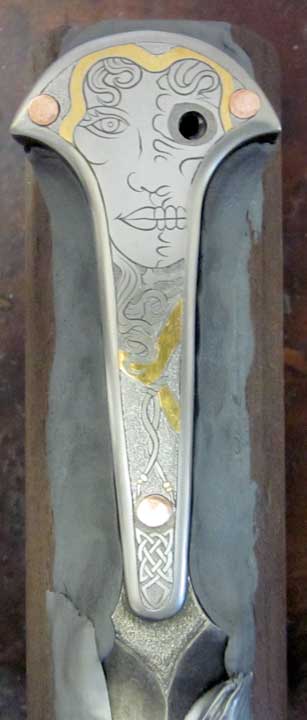
Above, I’ve drilled holes for the pins that will retain the knife scales.

Helheim_Dagger_32
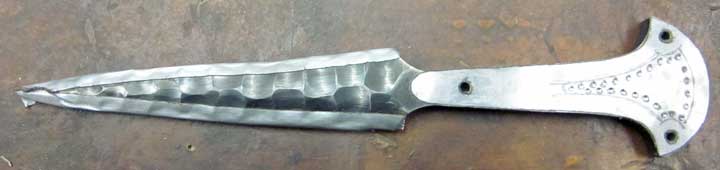
To keep the weight of this all metal dagger down, I’ll remove as much metal from the handle of the knife as I can without weakening it.  Above, I’ve marked where I’m going to begin drilling holes.  I’ll join all these holes together with a jeweler’s saw.

Helheim_Dagger_33
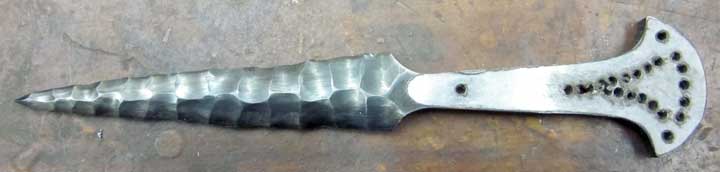
Above, all the holes drilled.

Helheim_Dagger_34
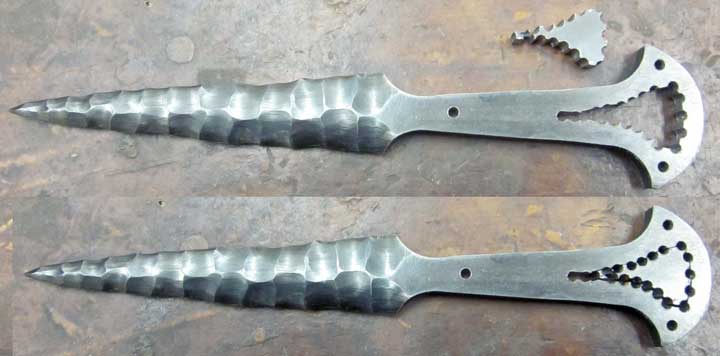
And, in the two images above I’ve sawn through the little webs of metal between the holes.

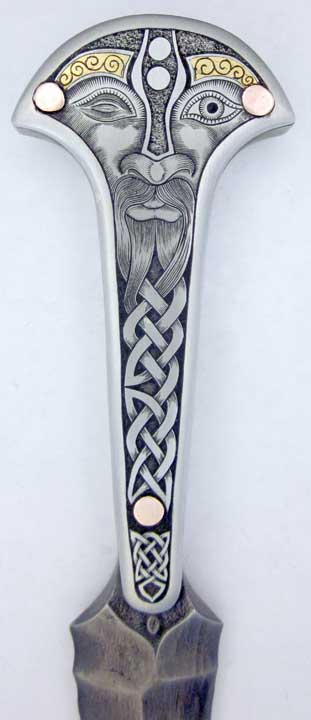
Next , I’ll harden and temper the blade, then I’ll install the scales, and we’ll be ready to begin engraving.  Of course, the really hard part of the process is coming up with an interesting design to engrave!

Thanks for Looking!

Posted in Engraved Knife, Knapped Knife | Tagged , , , , , , | Leave a comment

Helheim Dagger in Knapped Steel – Part 1

Here is the start of the “Helheim Dagger.”  Done in 1075 carbon steel I decided to do this one in my signature “knapped steel” style, so it resembles a stone knife.

Helheim (” the house of Hel”) is one of the nine worlds of Norse mythology, and is ruled by the goddess Hel, who is half beautiful woman and half corpse. Those who die of old age or disease go to Helheim, while those who die bravely on the battlefield go to Valhalla (which is ruled by Odin, the greatest of the gods).
Helheim_Dagger_2
I began by making a wooden mockup of the proposed dagger, then transferred the pattern to a piece of steel.

Helheim_Dagger_3
Above, I’m carefully sawing out the knife, trying to be as neat as possible.

Helheim_Dagger_5
And, here is the resulting blank.

Helheim_Dagger_7
Above, I’ve clamped the knife blank in a vise, ready to begin shaping with a hand held angle grinder.

Helheim_Dagger_8
The first pass with the angle grinder.

Helheim_Dagger_9
More passes with the angle grinder.

Helheim_Dagger_11
And

, above after quite a few passes with the angle grinder.

Helheim_Dagger_12
And, above, both sides ready to be shaped for the “knapping” process.

Thanks for Looking!

Posted in Engraved Knife, Knapped Knife | Tagged , , , , , , | Leave a comment

Engraved Spyderco Robin Knife

Today is just a simple little engraved Spyderco Byrd (small Robin model) pocket knife, and it’s the deal of the century.  These very inexpensive stainless steel Spydercos are decent quality knives, and I just happened to have one on hand.  I wouldn’t normally engrave one of these for sale , but it was here, and I felt like it, even though this is way more quality engraving than I would normally put on an inexpensive knife.  It will make a great item for every day carry!

Spyderco_Robin_II_NW_Salmon_2Web
I’ll have this little Spyderco for sale at the 1st Annual Seattle International Knife Show, April 26th and 27th (2014) where I’m excited to say I’ve been invited to exhibit.  Hope to see you there!

Thanks for Looking!

Posted in Engraved Knife | Tagged , , | Leave a comment

Knapped “Lascaux” Small Push Dagger Part 5 – Finished!

Knapped_Lascaux_Push_Dagger_35
Well, I finally figured out what was on the other side, and finished this one!  I know, I know, a red-letter day for me!  I’ve only been dragging this out for months…  Now, I need to make a nice box or stand.  I’m leaning towards a stand at the moment…

It’s made of 1075 carbon steel, with Grade 2 Titanium scales and copper pins.  It’s 4 1/8 inches total length

, and the blade is a hair over 2 inches.

I’ll have this little push dagger at the 1st Annual Seattle International Knife Show, April 26th and 27th (2014) where I’m excited to say I’ve been invited to exhibit.  Hope to see you there!

Thanks for Looking!

Posted in Carving, Engraved Knife, Knapped Knife | Tagged , , , , , , , , | Leave a comment

Knapped “Lascaux” Small Push Dagger Part 4 – Shishiaibori Technique

Knapped_Lascaux_Push_Dagger_23
So, we’ve finished the three step engraving process of the outlines – wide graver, narrower graver, onglette graver.  Above are images of where we are now.

Knapped_Lascaux_Push_Dagger_25
Next, I begin to round over the interior shapes, using a flat graver.  In the two images above, I’ve begun that.  In the first image, your can see how I begin cutting with the flat graver – leaning the graver over to the outside as much as I can WITHOUT touching the outside edges of the outline cut.  In the second image, the rounding cut has begun to the right of the blue arrow, with no cut yet to the left of the blue arrow.

Knapped_Lascaux_Push_Dagger_27
Above is the completed first round of the flat graver rounding cut.

Knapped_Lascaux_Push_Dagger_28
Next, I go back with the flat graver and begin cutting to remove the edge of the facet I just created.  Above, you can see the beginning of that second set of cuts to the right of the blue arrow.  I’ll continue doing this, removing subsequent facets until I’m satisfied with the rounding.

Knapped_Lascaux_Push_Dagger_29
Above, I’ve completed the rounding process with the flat graver.  Note the areas where I’ve removed additional material to simulate the palm of a hand.  You’ve got a naked model right there at the end of your arm, so take a look and see why I’m doing that!

Knapped_Lascaux_Push_Dagger_29a
I’ve also used a carbide bur to excavate the hollow area of the palm , followed by using s small flat punch with slightly rounded edges in my Lindsay Nitro G20 Airgraver to sculpt (forge) the surface smooth.  Above, you can see the punch I used to sculpt and smooth the surface of the hand.

Knapped_Lascaux_Push_Dagger_31
And, above, is the finished front side.  For the deer, I’ve used a thin tipped oblong punch to simulate the hair of the body, and a wider oblong tipped punch to texture the antlers.  Now, I have to solve the problem of what goes on the back scale…

Thanks for Looking!

Posted in Carving, Engraved Knife, Knapped Knife | Tagged , , , , , , , , | 2 Comments