Dragonsbane Poniard – Part 9 – The Pile of Skulls

Dragonsbane_Poniard_56
I finished the gold inlay for the eyes, and began carving the pile of skulls just below the dragon pommel (she’s been really hungry lately…)  After transferring my design, I engraved all the lines (above).

Dragonsbane_Poniard_59
Above, from left to right, I’ve been relieving the background around the skulls with a large round carbide bur.  You can see all four sides.

Dragonsbane_Poniard_60
And here are a couple of side views of the same.

Dragonsbane_Poniard_63
Above

, I continued relieving the background with smaller and smaller burs (far left), and then began rounding over the edges of the skull, again with smaller and smaller burs, adding more and more detail and sculpting.

Dragonsbane_Poniard_68
And, above, that’s all she wrote for today.  I’ve finished sculpting two sides, and also have smoothed the bur marks out by sculpting (forging) with a flat punch.  Tomorrow, I’ll use a V-graver to put back the tooth detail I carved away while rounding things over, and cleaning up around the edges of the skull.

Thanks for looking!

Posted in Carving, Engraved Knife, Misericordia | Tagged , , , , , , | 3 Comments

Dragonsbane Poniard – Part 8 – The Dragon

Dragonsbane_Poniard_50
Today was working on the dragon’s throat.  I began (above) by engraving large armored plates on the dragons’s throat – on the left is a side view, and on the right is the view from below.

Dragonsbane_Poniard_51
Of course, since the dragon’s throat needs to be flexible, there needs to be skin in between the plates so it can all expand when he (or she) eats a cow or a knight (whole, of course).  So, above, I’ve obliged by using a small carbide bur to cut a “scribble texture” in between the plates.

Dragonsbane_Poniard_52
It’s also time to address her lower jaws , and I think the appropriate thing here would be more scribble texture for her rough skin.  She doesn’t need armor here, since there is very thick bone beneath.  No vulnerable spots here…

Dragonsbane_Poniard_54
And, of course, scribble texture for her upper snout as well.  The images above show the texture before and after adding patina.  Next, I’ll inlay 24 karat gold for the eyes.

Thanks for looking!

Posted in Carving, Engraved Knife, Misericordia | Tagged , , , , , , | Leave a comment

Dragonsbane Poniard – Part 7 – The Stand

Dragonsbane_Poniard_40
I’ve been dreading this part, but since I’m not terribly enthused today about carving steel, I’ll make stands for the knives I’m going to present at the upcoming 1st Annual Seattle International Knife Show.  I’ve decided a Norse-style dragon head would look good, so I’ve cobbled together a plan, and started to make the thing.  I’ve used a Forstner bit to drill the mouth hole, and will use my bandsaw to cut out the head shapes.

Dragonsbane_Poniard_41
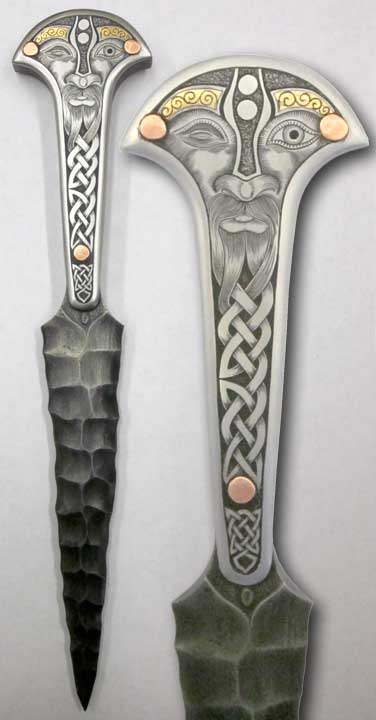
Above, I’ve used two large washers for the beginnings of eyes, superglued them together and carefully step-drilled (several passes with sequentially bigger drill bits) five holes for copper rivets.  I go slow and try to keep the glued together washers cool so they don’t separate and destroy my carefully indexed holes – they need to match up on both sides.  I’ve also marked the interior of matching holes on each side so I know how to match them up again.  Then, I located one of the washers on one side, drilled the first hole, inserted a copper rivet to keep that hole indexed, and then drilled a second hole, inserting a copper rivet in it.  Then with the washer immobilized by the two rivets, I drilled the rest of the holes, as well as a 1/2 inch diameter hole for the center of the eye.

In the second image, you can see the test fit with the poniard in it’s rough position.  Looks good, now on to the next steps, starting with gluing the head/neck into a matching notch in the main body block.

Dragonsbane_Poniard_43
Above, I’ve cut a notch into the walnut block so the head piece will fit closely in it, glued it into place, and drilled and pegged three dowels into the neck to keep things sturdy.  I’ve also used my bandsaw to cut the rough shape of the stand.

Dragonsbane_Poniard_44
Here’s a view from the top.  You can see I’ve also cut the vertical profile of the stand as well.  I’ll use my Foredom™ flex shaft grinder and a quick-cutting carbide Typhoon™ bur to round things over.

Dragonsbane_Poniard_45
Here

, I’ve carved the rough shape of a Viking-style dragon, and used a torch to “ebonize” the wood.  I’ve also installed the metal eye parts and peened the copper rivets over.  The poniard is just sitting in place to see how it will look…

Dragonsbane_Poniard_46
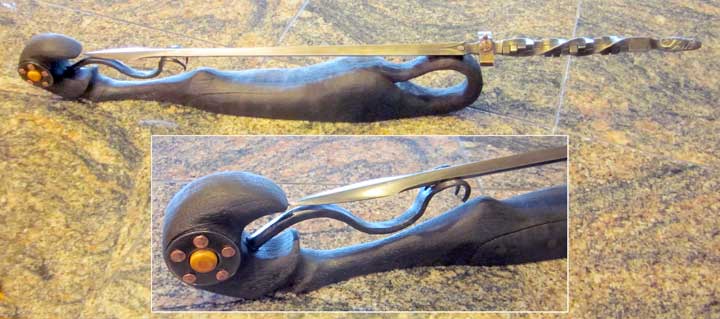
And, above is the finished stand.  I’ve forged a steel tongue, and lathe-turned a boxwood peg for the center of the eye.  The steel tongue turned out to require a lot of fiddling with to get its’ shape correct.

Thanks for looking!

Posted in Carving, Engraved Knife, Misericordia | Tagged , , , , , , | Leave a comment

Dragonsbane Poniard – Part 6 – The Dragon

Dragonsbane_Poniard_32
The lower jaw looked a little thick to me, so I adjusted it.  The right side of the above image is after I engraved the jaw line and removed the excess metal.  The left, with the blue arrows, still shows some of the excess metal to go.  I want this to look like an alligator’s under jaw/throat area, with a dewlap of skin like she is just getting ready to exhale (fire, of course…)

Dragonsbane_Poniard_33
And , above, three views of the top of the head, where I’ve added in the jagged scales on her top centerline, and scaled up the cranium.

Dragonsbane_Poniard_36Above, four views of how far I got today.  A good deal more detailing to go, as well as fighting with the awkward work holding.  Remind me not to do detailed long pieces next time.

Thanks for looking!

Posted in Carving, Engraved Knife, Misericordia | Tagged , , , , , , | Leave a comment

Dragonsbane Poniard – Part 5 – The Dragon

Dragonsbane_Poniard_22Time to start carving the dragon on the pommel. Above, I’ve colored the steel with a white permanent marker so I can draw on it in pencil. Once I had the basic layout penciled in, I engraved the lines to make them permanent, and then began carving away the excess steel with a large ball shaped carbide bur. “Large” means it is about 1/8 of an inch in diameter…

This is a real challenge to use in my engraver’s vise since the dagger is so long. The carving is being done at the end near the vise, and the long side sweeps across my work surface, bumping into everything, and I can’t turn it in a full circle since I’m in the way…Oh, well…

Buy Doxycycline Without Prescription

, 192, 227, 0.230469); -webkit-composition-frame-color: rgba(77, 128, 180, 0.230469);”>Dragonsbane_Poniard_24 Above, I’ve established all of the basic anatomic masses of the dragon’s head. From here I’ll begin working on establishing finer and finer details, using a combination of gravers, burs, scrapers and abrasives.

Dragonsbane_Poniard_27
After more detail work and decisions concerning scale layout, I’ve finished the basic head anatomy on the left side, as well as deciding how the area beneath the jaw is formed. Tomorrow I’ll match up the right side.

Dragonsbane_Poniard_30
Above, just to see how things will look at the end, I’ve thrown on a quick darkening of the steel.

Thanks for looking!

Posted in Carving, Engraved Knife, Misericordia | Tagged , , , , , , | Leave a comment