Knapped “Lascaux” Small Push Dagger Part 3 – Shishiaibori Technique

Knapped_Lascaux_Push_Dagger_11
It’s time to begin the shishiaibori carving process.  Above is the design transferred to the titanium scales.  I use a laser printer on kitchen/cooking parchment and damar varnish transfer method.

Knapped_Lascaux_Push_Dagger_12
Step 1:  I begin engraving with a Lindsay Universal graver (116 degree V-graver), and make as deep a cut as I can.  I’m using a Lindsay Classic with Palm Control and tungsten piston for maximum power.

Knapped_Lascaux_Push_Dagger_13
Above is a close up of the 116 degree Universal graver cuts.

Knapped_Lascaux_Push_Dagger_14
Step 2:  Recut the same lines again, but this time I use a 90 degree V-graver.  Again, I cut as deep as I can WITHOUT widening the first set of wide graver cuts.  Above, you can see the difference between the 116 degree cuts (left of the blue arrow) and the 90 degree graver cuts (right of the blue arrow).

Knapped_Lascaux_Push_Dagger_15
Above, a closeup of the 90 degree graver cuts.

Knapped_Lascaux_Push_Dagger_16
Here, you can see the 116 degree cuts on the left image, and the 90 degree cuts on the right.

Knapped_Lascaux_Push_Dagger_17
Step 3:  I use an onglette graver to continue deepening the cuts.  Again, I’m cutting as deep as I can without widening the previous cuts.  Above, you can see the 90 degree cuts to the left of the blue arrow,and the onglette cuts to the right of the blue arrow.

Knapped_Lascaux_Push_Dagger_18
And, here, you can see a close up of the onglette cuts.

Knapped_Lascaux_Push_Dagger_22
Above

, all three steps together – 116 degree graver on the left, 90 degree graver in the center, and the onglette cuts on the right side.  Next, we’ll begin to carve the interiors of the cuts with flat gravers and begin the 3D-ish part of the shishiaibori process.

Thanks for Looking!

Posted in Carving, Engraved Knife, Knapped Knife | Tagged , , , , , , , , | Leave a comment

Knapped “Lascaux” Small Push Dagger Part 2

Knapped_Lascaux_Push_Dagger_6
Above, I’ve epoxied the titanium scales into place on the fully heat treated blade, and peened all four of the copper pins into place.  While the epoxy is an important part of the holding process, it’s real value is in sealing the titanium scales to the steel tang, not allowing water or other fluids to get in underneath and work their dastardly deeds.

I’ve also done a little grinding and filing to make certain everything matches up for the fit-and-finish I (and my clients!) expect in my work.  Also, you might notice I’ve carved and textured the “neck” of the blade, so I’m done with the blade itself, and ready to begin the embellishment process.

Knapped_Lascaux_Push_Dagger_6
Above is a titanium practice piece for the embellishments with designs inspired by European cave paintings.  So far, I’ve spent a total of three or four bladesmithing days getting to this point, and I’m figuring the engraving and carving will take another four engraving days.  I’m not interested in risking the work I’ve done so far on an untested technique without a test piece first.

I’m going to decorate my titanium scales with a Japanese metal carving technique called shishiaibori.  It is a technique that many authorities credit to a Japanese sword furniture maker named Joi , but I also notice it is very similar to certain styles of Egyptian hieroglyphics.  So, who came first?  I don’t know.  I also don’t really care – but whoever figured it out first, I really like the effect it provides.  No, I’m not interested in an art history debate, I’m simply pointing out some observations I’ve made about the technique so far

The technique starts out with a very deep outline (takes me three times around with three different gravers to get deep enough, and heavily cutting each time). Then, the inside edges are carefully carved back, rounding them over to achieve a 3D look. Obviously, you need to have steeper sides in some areas, and shallower sides in others to achieve the 3D look.

The main point is there is no background removal, as in normal US and European engraving, and all of the design is at or below the surface, so wear and tear on the engraving should be less of a concern.  This particular set of scales for my little knapped push dagger is CP titanium, so I can either ink it in, or darken the whole thing (I think, I have to experiment a bit there), but I haven’t figured out how to selectively darken titanium yet.

Knapped_Lascaux_Push_Dagger_7
Above is a closeup of the technique.

Knapped_Lascaux_Push_Dagger_8
And, here is a view from the side, hopefully showing how flat this technique actually is, and how much of a 3D effect it gives when viewed from above.  So far this looks really good, so the actual engraving is now a go.

Thanks for Looking!

Posted in Carving, Engraved Knife, Knapped Knife | Tagged , , , , , , , , | Leave a comment

Knapped “Lascaux” Small Push Dagger Part 1

Here’s the start of a small push dagger, done in my signature “knapped” style.  It’s made of 1075 carbon steel, with Grade 2 Titanium scales and copper pins.  It’s 4 1/8 inches total length, and the blade is a hair over 2 inches.

Knapped_Lascaux_Push_Dagger_1
Above, I’ve shaped the blade portion and also ground in the “knapped” flake scars.  I’ve also shaped and fitted the titanium scales to the tang.  Note that I’ve taped the business parts of the blade for safety.  I’ve had these things bite me in the past, so I’m doubly careful now.

Knapped_Lascaux_Push_Dagger_2
This is a pretty thick piece of steel (3/16 inch thick), so it is pretty heavy to start with.  Add in the titanium scales (even though they are pretty light) and four thick copper pins and you have a pretty beefy little handful.  Above, I’m trying to lighten the load as much as possible, without significantly weakening the tang.  I’ve carefully located and marked out 5 large 1/4 inch diameter hole positions, and center punched and drilled 1/8 inch diameter holes to begin with.  I like to “sneak up” on large holes in high carbon steel like this 1075, because I’ve had some bad experiences in the past when trying to start with too large a drill bit, work hardening the steel and destroying the drill bit in the process.  Experience has taught me that I can drill a 1/8 inch diameter hole in any of the carbon steels I’ve used

, and then gradually enlarge them in 1/32 inch diameter increasing steps.  I’ve filled in between the larger hole-to-be with more 1/8 inch diameter locations, and center punched those, ready for drilling.

Knapped_Lascaux_Push_Dagger_3
Above, I’ve drilled all the 1/8 inch diameter holes, and I’m ready to move up to the next size 1/32 inch diameter larger to enlarge the 5 special corner holes.  Incidentally, I’ve chosen holes as large as I can get away with at the corners to avoid creating “stress risers” where cracks might start when I heat treat the blade in a future manufacturing step.

Knapped_Lascaux_Push_Dagger_4
Above, all the holes have been drilled (in steps) to their final sizes.  I’m ready now to use a jeweler’s saw to saw between the holes and remove the heavy center chunk.

Knapped_Lascaux_Push_Dagger_5
And, here I’ve finished the sawing.  It’s now a lot lighter than it was before.

Thanks for Looking!

Posted in Carving, Engraved Knife, Knapped Knife | Tagged , , , , , , , , | Leave a comment

Engraved Spyderco Cricket Puget Sound Knife

Today is just a simple little engraved Spyderco Cricket folding pocket knife.  These stainless steel Spydercos are very nice quality knives that engrave well, and it’s fun to occasionally work on one.

Spyderco_Cricket_Puget_Sound_Knife_1
Above, I’ve cut the lines of the design, here in a NW Native American style with salmon and octopus.  The top image is plain as cut, and the bottom I’ve inked the lines.  I like to do a preliminary inking of the lines before I begin to remove the background.  It cuts down on glare, and anything that helps my old eyes is a good thing…

Spyderco_Cricket_Puget_Sound_Knife_4
Above I’ve removed the background areas with a carbide bur, being careful to “color” within the lines, and keep the floor as flat as I can.

Spyderco_Cricket_Puget_Sound_Knife_5
Next, I stippled the background areas with a tiny, sharp pointed punch.  This particular punch I’ve ground with four flat surfaces coming together at a point , so the mark it leaves is a tiny inverted pyramid in the metal.  This leaves a matte background that will accept and hold ink really well.  It also doesn’t look bad all by itself…

Spyderco_Cricket_Puget_Sound_Knife_8
And here is the finished version, shown both inked and uninked.  I’ll have this little Spyderco for sale at the 1st Annual Seattle International Knife Show, April 26th and 27th (2014) where I’m excited to say I’ve been invited to exhibit.  Hope to see you there!

Thanks for Looking!

Posted in Engraved Knife | Tagged , , | 2 Comments

Dragonfly Blossom (B30) William Henry Studios Knife Scales – Part 5

I’m finally within striking distance of finishing this pair of William Henry knife scales.  It’s now time to inlay the 24 karat gold accents.

William_Henry_B30_Cherry_Blossom_Knife_Scales_47
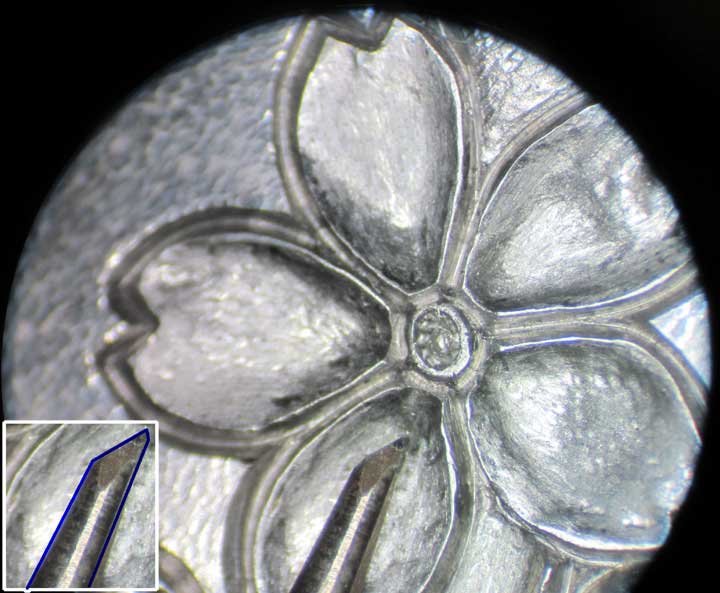
Above, I’m beginning to inlay the stamen area of a cherry blossom.  I start by carving a deep depression in the center with my smallest carbide bur in my NSK grinder.  This bur is about a quarter of a millimeter in diameter, so that should give you an idea of how tiny the cherry blossoms are.

William_Henry_B30_Cherry_Blossom_Knife_Scales_48

Next, I need to undercut the bottom of the depression so the gold will have an undercut area to flow into when I pound it in, thus being “captive” in the metal.  Since this depression is so tiny, there isn’t enough room inside to use anything but a very narrow punch. You can see a side view of the little sharp ended punch, along with a detail view I altered to try and make the geometry a little clearer.  I make these from broken or worn out carbide bur shafts (the shafts are high speed steel).  The large face is ground in at 30 degrees, with about a ten degree smaller bottom angle

, so the entire angle is about 40 degrees.  I simply drive the punch in the bottom edge of the hole at a low angle, which cuts a depression.  I continue doing this all around the circle, leaving a groove completely around the bottom.

William_Henry_B30_Cherry_Blossom_Knife_Scales_48B
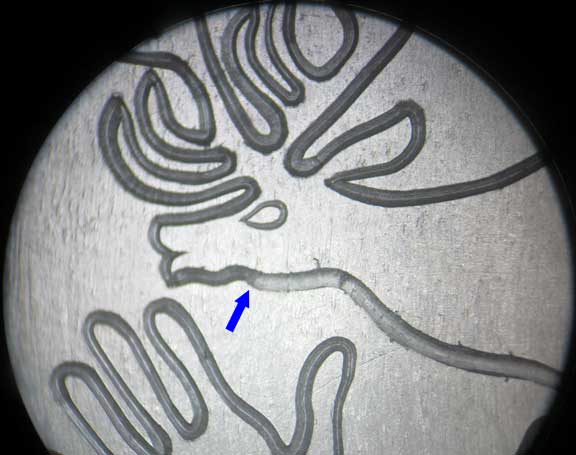
Above, a diagram of the process, hopefully a little clearer than my verbose explanation.

William_Henry_B30_Cherry_Blossom_Knife_Scales_49
Here is a piece of 30 gauge 24 karat gold wire.  It’s a little on the small side for this circular inlay, so I’ve used an old engraver’s trick to make it a little larger by melting a small blob on the end.  This also serves the purpose to automatically anneal the gold making sure it is soft enough to flow into the undercuts.

William_Henry_B30_Cherry_Blossom_Knife_Scales_50
And, above, I’ve used a small brass punch to pound the gold into the cavity.  I use a brass punch because it is hard enough to drive the gold, but soft enough not to damage the steel around the inlay cavity.  You can see the gold has stuck, because I’m no longer holding the wire and it is held fast.  Now I’ll use a sharp blade to carefully cut the gold wire free.

William_Henry_B30_Cherry_Blossom_Knife_Scales_51
A close up view.

William_Henry_B30_Cherry_Blossom_Knife_Scales_52
Above you can see two inlays in, and the business end of my little brass punch.

William_Henry_B30_Cherry_Blossom_Knife_Scales_53
I use a slightly rounded steel punch to finish the inlay.  You can see the punch above, and the thin gold leaf remaining after further punch use.  A little work with a small scraper to get rid of the waste and the inlay will be complete.  If you want the gold to be shiny, this is the time to use a burnisher to smooth the surface.  I tend to like the raw look of the gold, so I’ll leave it a little rough.  Microscopically rough, of course.

William_Henry_B30_Cherry_Blossom_Knife_Scales_54
Above, three finished inlays after the scraper has visited them.

William_Henry_B30_Cherry_Blossom_Knife_Scales_55
Now that the blossom inlays are complete, I need to add a few little gold accents to the butterfly wings.  This process is similar to the previous inlays, except that the pockets are a little larger.  I use a tiny flat graver to raise a forest of burs in the bottom of the pocket to further help trap the gold, and use the same bur/chisel punch to undercut around the bottom that I used for the blossoms.  These are still pretty small inlays, but I’ll bend the 30 gauge wire to fit the pocket.  After bending, then annealing, I’ll pound the gold into the inlay.  High karat gold like this will cold weld to itself and form a solid chunk quite nicely, as long as I keep everything really clean.

William_Henry_B30_Cherry_Blossom_Knife_Scales_56
And, above, stuck fast after using the brass punch.  I’ll use the steel punch, and then scrape the inlay flush as before, being extra careful since the shibuichi butterfly wing is much softer than the steel of the knife scales.

William_Henry_B30_Cherry_Blossom_Knife_Scales_57B
And, finally, I’ve added my special process of patinating the 416 stainless steel in the shishiaibori carved areas.  The scales are finally complete.  I’ll send them back to the William Henry knife studio for final assembly, and hopefully then they will move on to become a family heirloom of some lucky customer.

Thanks for Looking!

Posted in Carving, Engraved Knife, William Henry knife | Tagged , , , , , | 2 Comments

Dragonfly Blossom (B30) William Henry Studios Knife Scales – Part 4

William_Henry_B30_Cherry_Blossom_Knife_Scales_36
Now it’s time to carve the branches in the style of Japanese shishiaibori, where all of the detail is below the original surface of the scales.  If you’ll recall, we cut VERY deep lines around the outside of the branches and between the petals of the cherry blossoms.  I begin by cutting a steep bevel along the inside edges of the very deep cuts I made at the beginning, using a flat graver.

William_Henry_B30_Cherry_Blossom_Knife_Scales_37
I continue to add in additional bevel cuts along the edges of the branches with the flat graver , making them shallower (less steep) as I go up along the surface of the branches.  I’m also making deeper cuts in places where there would be lumps and bumps on a real branch.  Believe me when I say you need to study real branches to make this convincing.  You’ll also notice I’ve added details like knots to complete the illusion.  I’ve also used small carbide burs around the big knot, as well.

I complete the illusion by using a small oval punch to place the bark texture, orienting the long axis of the oval along the long axis of the branches.  This texture not only looks like bark, but also planishes out any odd graver or bur marks.

William_Henry_B30_Cherry_Blossom_Knife_Scales_38
That leaves just the flowers.  Above, you can see the small bur I’ve used to carve each flower petal into a small bowl.  While I’m carving away the waste material, I’m also trying to be careful to leave as smooth a surface as I can with the bur.  Petals typically have a smooth texture, so keeping everything neat will pay off in less work when I’m using a punch to smooth the petal surfaces.  In the above image, I’ve left one petal uncarved to sow the difference between the flat metal and the bowl shape of the petals.

William_Henry_B30_Cherry_Blossom_Knife_Scales_41
Above, an unmagnified view of the same.

William_Henry_B30_Cherry_Blossom_Knife_Scales_43
And, above, I’ve used my standard little round punch to smooth the interior of the petal surfaces in the flower cluster on the left.  The flowers on the right have been carved with the carbide bur, but not planished with the round punch, and the difference is pretty obvious.  In this image, you can’t really see the punch texture left behind in the left flower cluster, but I’ll be removing even that in the next step with a small abrasive stone.

William_Henry_B30_Cherry_Blossom_Knife_Scales_44
Above, you can see the little ceramic super stone I’m using to further smooth the flower petals.  I’ve finished the two lower petals, so you can see the differences.  These little ceramic super stones are really marvelous.  This one is held in a 0.5 mm mechanical pencil, and I just feed out a little more as it is used up, just like you would lead in a mechanical pencil.  You can purchase these stones here: Mini Super Finishing Stones.  I think mine here is 400 grit, and is 0.5 mm.  Larger diameters are available, and they are surprisingly strong and durable.  Don’t forget to get a mechanical pencil of the appropriate size to hold them (also sold in the same place).  By the way, you need to use these with a little stoning lubricant like kerosene or light oil.  I haven’t tried water with them, but I’m guessing it would do fine, if rust isn’t an issue.

William_Henry_B30_Cherry_Blossom_Knife_Scales_45
Above, The flowers and branches are complete, ready to apply a little patina.  Next, I’ll be inlaying gold in the flower centers, and a few highlights on the butterfly wings.

Thanks for Looking!

Posted in Carving, Engraved Knife, William Henry knife | Tagged , , , , | Leave a comment

Dragonfly Blossom (B30) William Henry Studios Knife Scales – Part 3

William_Henry_B30_Cherry_Blossom_Knife_Scales_23
The piece of shibuichi I used for the inlay is waaay too thick for my butterfly.  Since I have to cast and roll my own shibuichi, I don’t have lots of thicknesses just laying around, so I use what I have on hand.  This butterfly is really tiny, anyway, so there’s not really going to be much waste.  Above, you can see the carbide bur I used to carve away the waste material.

William_Henry_B30_Cherry_Blossom_Knife_Scales_24
Of course, no good deed goes unpunished, so above I’m using a small scraper to smooth out the ugly texture left by the carbide bur.  I’ve also colored the areas I’m scraping with Sharpie™ permanent marker to cover the annoying shiny surface, and better visualize my scraping.

William_Henry_B30_Cherry_Blossom_Knife_Scales_25
Here you can see the inlay completely smoothed

, and ready for detailing.

William_Henry_B30_Cherry_Blossom_Knife_Scales_26
Above, I’ve used a 90 degree (square) graver to outline the body and upper wing.  I followed that with a flat graver to relieve the lower wing area.

William_Henry_B30_Cherry_Blossom_Knife_Scales_28
Above, the same view without magnification.

William_Henry_B30_Cherry_Blossom_Knife_Scales_31
Now it’s time to begin detailing the wing areas.  I’ve colored the wings with Sharpie™ white marker so i can use a sharp pencil to mark the shibuichi (see the two lower wing ovals).  I’ve chosen to use a round graver to scoop out areas representing the colored areas of the wing, so I’ll be removing metal inside these ovals.

William_Henry_B30_Cherry_Blossom_Knife_Scales_32
Above, I’ve use the round graver to scoop out areas in the wings, and a flat to detail the body.  Next, I’ll use my little round punch to texture inside the raised areas, smoothing out the  striations left by the round graver, and leaving a texture similar to the surface of the scales, hopefully helping to visually unify everything.

William_Henry_B30_Cherry_Blossom_Knife_Scales_35
Above, I’ve added a little patina, just ’cause I have to see how things are going to turn out…

Thanks for Looking!

Posted in Carving, Engraved Knife, William Henry knife | Tagged , , , , , | Leave a comment

Dragonfly Blossom (B30) William Henry Studios Knife Scales – Part 2

William_Henry_B30_Cherry_Blossom_Knife_Scales_7
It’s time to add in the butterfly inlay.  This will be in 25% shibuichi (a Japanese art metal, alloyed from 25% silver and 75% copper).  I cut out the butterfly with a jeweler’s saw and then carefully scribed around it on the knife scale to mark the area to remove.  Above, I’ve cut inside the outline, and begun to remove the waste material by engraving multiple cuts within (90 degree graver used here).

William_Henry_B30_Cherry_Blossom_Knife_Scales_9
Above, I’ve used carbide burs and flat gravers to remove the waste material from the “pocket.”  If I’ve done it right, it should be just a tiny bit too small for the inlay.

William_Henry_B30_Cherry_Blossom_Knife_Scales_10
Here, used a special tool to drive into the base edges of the pocket, lifting the edges a little bit, and providing a cut all the way around the underside.  This tool isn’t really sharp, it is used more like a punch and is driven straight into the metal.  This frees the metal above to be more easily moved so I can enlarge the pocket just enough to let the inlay fit.

William_Henry_B30_Cherry_Blossom_Knife_Scales_12
Above, I’m in the process of punching the edges back so the inlay will just fit.  You can see the punch I used – just a worn out bur end, ground flat with a slightly rounded face.   This will also have the effect of lifting the edges of the pocket, leaving a little raised edge.  Once the inlay fits snugly, I’ll be pounding those raised edges back down, forcing the steel into contact with the freshly annealed (and soft) shibuichi, holding the inlay securely.

William_Henry_B30_Cherry_Blossom_Knife_Scales_15
Above is a test fit of the shibuichi.  As you might imagine, there are a number of trial fits, punch back a little here and there, until the inlay slips into the pocket.

William_Henry_B30_Cherry_Blossom_Knife_Scales_17
In the above two images, I’ve been using the same punch to punch down the raised lip, so the inlay is captive.  In this case, I’ll be using a similar texture on the rest of the knife scale surface, so the textures will blend together.  If I wasn’t going to texture the surface, I would need to use scrapers and stones to smooth the surface to match the rest of the surface.

William_Henry_B30_Cherry_Blossom_Knife_Scales_18
Above , I’ve begun to texture the rest of the knife scale surface.  The texture isn’t deep, just enough to give a little “tooth” to the surface.  You can see the dramatic difference between the smooth satin and the texture in the area right next to the third flower from the left.

William_Henry_B30_Cherry_Blossom_Knife_Scales_21
Here’s a closeup of the area I mentioned above.

Thanks for looking!

Posted in Carving, Engraved Knife, William Henry knife | Tagged , , , | Leave a comment

Dragonfly Blossom (B30) William Henry Studios Knife Scales – Part 1

B30-Tom-Sterling B30-Tom-Sterling_Detail B30-Sterling-butterfly-side

Lately, I’ve been engraving and carving a set of knife scales for William Henry Studios, a real challenge for me.  This is a set of scales for their B30 (Gentac) model, and fairly large as their folding knives go.  The scales are 416 stainless steel, and arrived with a mirror polish and very finely machined – almost like jewelry in their own right.  You can color me impressed with William Henry fit and finish.  The challenge comes from the large area of real estate these scales provide, almost intimidating, and the need for an elegant and appropriate design.  After many false starts along the design trail, I finally came up with the theme of dragonfly, butterfly and cherry blossoms, done in Japanese shishiaibori style.

William_Henry_B30_Cherry_Blossom_Knife_Scales_1
Above is the first step in engraving, cutting the outlines of the design.  I’ve chosen a  Japanese-style where all the carved detail (except the inlays) is at or below the surface of the metal (shishiaibori).  No background is removed.  Previous to this, I removed the mirror finish with a 900 grit stone, leaving a nice satin finish.

William_Henry_B30_Cherry_Blossom_Knife_Scales_5a
Here’s how I go about it.  I (see Step 1) begin with very deep cuts with a 116 degree Lindsay Universal graver.  This is a pretty wide graver, and I follow up by recutting as deeply as I can with a narrower 90 degree (or square) graver (Step 2).  Then, I recut even deeper with an onglette graver (Step 3).  I find the onglette graver is a fairly weak graver point, and is easily broken, so I spend a bit of time on this step resharpening the onglette.  Each subsequent cutting makes the line deeper and deeper.

I need a really deep cut here, as it is the key to getting a good three dimensional illusion later on in the shishiaibori process.

William_Henry_B30_Cherry_Blossom_Knife_Scales_4
Above, a closer view of the cuts after the three steps.  Later

, I’ll come back with a flat graver and round over the branch inside the deep cuts.

Thanks for looking!

Posted in Carving, Engraved Knife, William Henry knife | Tagged , , , , , | Leave a comment

Dried Sardine Scalpel and Reliquary – Finishing Up – Part 6

Dried_Anchovy_Scalpel_124
Finally finished!  It’s only been a year in the works………….

Dried_Anchovy_Scalpel_116
OK , we’re finally within striking distance of finishing this puppy.  Time to add all the eyes.  I turned moose antler for the whites of the eyes, and dark horn for the pupils. Above, you can see the antler installed and trimmed, and the cylinders of dark horn glued in for the pupils.  Next, I’ll trim the horn flush.

Dried_Anchovy_Scalpel_117
Here’s a view of the bottom side.  I’ve trimmed all the eyes flush, except for one, which will serve as one of the locating pins for the reliquary lid.  You can see the other pin (brass rod) at the rear.

Dried_Anchovy_Scalpel_118
Here’s a view of all the elements, disassembled.

Dried_Anchovy_Scalpel_119
Views of the scalpel, both sides.

Dried_Anchovy_Scalpel_121
The finished lid.

Dried_Anchovy_Scalpel_122
More detail…

Dried_Anchovy_Scalpel_125
And, another view of the finished reliquary, completely assembled.

Come see the Dried Sardine Scalpel and Reliquary at the 1st Annual Seattle International Knife Show, April 26th and 27th (2014) where I’m excited to say I’ve been invited to exhibit.  Hope to see you there!

Thanks for Looking!


Posted in Carving, Engraved Knife | Tagged , , , , , , , | Leave a comment