Dried Sardine Scalpel and Reliquary – Part 5

Dried_Anchovy_Scalpel_97
Above, I’ve transferred my detailed pattern to the sardines on the lid, ready to begin detailing.

Dried_Anchovy_Scalpel_99
I’ve begun detailing by engraving the eye, gill and fin details just like on the shibuichi scalpel scales.

Dried_Anchovy_Scalpel_101
Continuing with the detailing by using a flat graver to lower the areas behind the engraved gills, and around the fins.

Dried_Anchovy_Scalpel_105
Above, I’m using a small scraper to remove some of the tool marks left by my NSK micromotor grinder and carbide burs.  It is a metal scraper, the idea for which I stole from Clive Hallam (a famous netsuke carver).  You can see the start of his instructions for how to make one here:  Netsuke Knife Making Tutorial Part 1

And here is a link to a tutorial by me about pretty much the same thing, but from an engraving and metalwork viewpoint:  Clive’s “Shirley Temple” Scrapers for Contemporary Engravers

Dried_Anchovy_Scalpel_106
Above, I’ve used the same little circular punch I used on the shibuichi scales to texture the head area of the top sardine.  That looks a little bland to me, so I’ll add in the muscle striations you would see on a cooked and canned sardine.

Dried_Anchovy_Scalpel_108
Since these sardines aren’t dried, I’ve decided to use a little different method to delineate the muscle striations.  I used a round graver to carve in long depressions between the muscles (see the top sardine).

Dried_Anchovy_Scalpel_109
Above, I used the circular punch to retexture the area.  Much better!

Dried_Anchovy_Scalpel_111
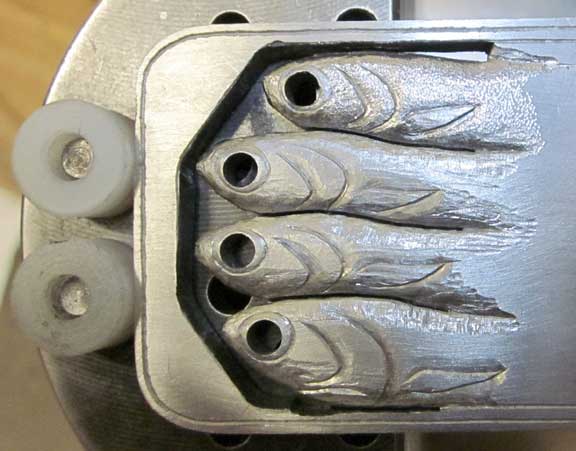
The rest of the sardines carved with the round graver.

Dried_Anchovy_Scalpel_112
And here they all are with their finished texture, and the fins detailed with the same round graver.  I’ve also trimmed a little here and there with files and abrasive ScotchBrite™ pads.

Dried_Anchovy_Scalpel_113
Now it’s time to solder on the silver lid and rolled up key.  You can see my cobbled together soldering rig above.  I’ve used a ceramic fiber soldering pad

, a piece of firebrick, and a charcoal block to lift the steel top up so I can get the torch flame underneath it.  I’ve also pressed into service my little copper and lead soldering hold downs.  I’m using low temp (400 degree F) silver-bearing paste solder for this task, since it will be difficult to get this much metal up to silver soldering temperatures.

Dried_Anchovy_Scalpel_115
And, here’s the soldering finished.  Notice the faint oxidation colors on the stainless steel fish.  Now, I need to clean all this up.  I can’t use my normal pickling method, since the iron will cause an electrochemical reaction and plate everything with copper.  I’ll just use mechanical methods for the clean up.

Thanks for Looking!


Posted in Carving, Engraved Knife | Tagged , , , , , , | Leave a comment

Dried Sardine Scalpel and Reliquary – Part 4

Now it’s time to start carving and engraving the reliquary.

Dried_Anchovy_Scalpel_74
I’ve begun using a jeweler’s saw to partially saw out four sardines in a piece of 3/16 inch thick 416 stainless steel.  This will be part of a lid for the reliquary.

Dried_Anchovy_Scalpel_75
Here, I’ve finished sawing out the sardines, and completed the wooden base of the reliquary (which will store the scalpel and the stand when not assembled).  You can also see the beginnings of the rolled sterling silver lid and copper key.

Dried_Anchovy_Scalpel_78
Above, I’ve been starting to round over the sardines with my NSK Electer micromotor grinder and carbide burs.

Dried_Anchovy_Scalpel_81
It’s also time to begin detailing the sardine scalpel.  Here the scalpel is installed in Thermoloc™ on a wooden block, for holding in my engraver’s vise.  I’ve begun engraving the eye, gills and fin details.

Dried_Anchovy_Scalpel_82
One I engraved the gills (using a 90 degree V graver), I used a flat graver to carve back the lower edges, followed by a punch to begin sculpting and texturing the surface of the shibuichi.  You can see details of the punch in the image – I made it from an old worn out bur.  It is simply a cylinder, with slightly rounded edges.

Dried_Anchovy_Scalpel_84
Above, all the front portion of the fish has been textured with the punch.

Dried_Anchovy_Scalpel_87
Here, I’ve begun to make the little muscle striations along the back half (the blue arrows).  I’m using a “bean” shaped punch for this.  You can see it below the fish.

Dried_Anchovy_Scalpel_90 Dried_Anchovy_Scalpel_96
And , above, all the muscle striations and punch texturing is finished.  I’ve also used a round graver to finish the pectoral fins.

Thanks for looking!

Posted in Carving, Engraved Knife | Tagged , , , , , , | Leave a comment

Dried Sardine Scalpel and Reliquary – Part 3

Now it’s time to make some of the accessory items, including rivets and eyes for the scalpel.

Dried_Anchovy_Scalpel_54
Above, I’m using my Sherline lathe to turn a small piece of moose antler for the eyes.  This little cylinder will extend through the entire knife, and is an important item in the knife structure, acting as a pin as well as being decorative.

Dried_Anchovy_Scalpel_55
Here, I’m drilling the hole through the antler pin to install the horn pupils.

Dried_Anchovy_Scalpel_56
Test fitting the moose antler pin/eyes before removing the antler from the lathe.  If I remove the antler before the fit is correct, I’ll never get it reinstalled and centered if I need to trim a little more off.

Dried_Anchovy_Scalpel_57
Above, a small sliver of dark cow horn installed, ready to turn the tiny pupil cylinder.  This cylinder will extend all the way through from one side of the sardine to the other.

Dried_Anchovy_Scalpel_58
Carefully turning the horn pupil cylinder to diameter.

Dried_Anchovy_Scalpel_59A
Beginning to create the silver rivets.  This is the top side of my tiny little blacksmith’s “nail header”.

Dried_Anchovy_Scalpel_60
The bottom side of the nail header.  Note the larger holes partially drilled through to provide clearance so the rivet wire doesn’t bind tight and can be removed.

Dried_Anchovy_Scalpel_61
The 16 gauge wire with melted blob installed in the nail header

, ready to peen the rivet head.

Dried_Anchovy_Scalpel_62
The rivet head peened.

Dried_Anchovy_Scalpel_63
Test fitting a rivet in the front pin hole.

Dried_Anchovy_Scalpel_64
The rivet needs to be trimmed to proper length.

Dried_Anchovy_Scalpel_65
The rivet trimmed to length – a little more than one wire diameter above the surface of the shibuichi scale seems to work well for me.

Dried_Anchovy_Scalpel_59B
And here are the moose antler pin, the cow horn pupil pin, and the two 16 gauge silver rivets ready to install.

Dried_Anchovy_Scalpel_68
All the elements ready for final assembly.

Dried_Anchovy_Scalpel_70
Dried_Anchovy_Scalpel_73
And, above, everything installed, epoxied, and peened.

Thanks for looking!

Posted in Carving, Engraved Knife | Tagged , , , , , , | Leave a comment

Dried Sardine Scalpel and Reliquary – Part 2

Dried_Anchovy_Scalpel_15
Above, I’ve started to shape the shibuichi scales.  I’ll be mainly using a my Foredom flex shaft grinder and small drum sanders.  You can see the central area where I’ve started the grinding.  Note that I’ve superglued the scales into position, and also used two pieces of 16 gauge copper wire as temporary rivets, and (very lightly!) peened them into place.  I’ll remove these when I’m ready to do the final assembly, and replace them with 16 gauge silver wire rivets.

Dried_Anchovy_Scalpel_18
Tapering back by the tail (blade).

Dried_Anchovy_Scalpel_23
Carving behind the head, and tapering the nose.

Dried_Anchovy_Scalpel_25
As you can see, this stage simply is a gradual tapering of both ends, and gently shaping here and there.

Dried_Anchovy_Scalpel_37
Above, the shaping is complete, and I’ve used a single edge razor blade as a wedge to gently pry the scales loose from the tang.  Now I’ll clean off the remaining super glue.

Dried_Anchovy_Scalpel_39
Above, everything cleaned up.  I’m using a larger drill bit to chamfer the holes in the tang of the knife, and the inner holes of the scales.  This generally neatens things up (every successful artist needs a little touch of OCD) and will facilitate lining things up at final assembly.

Dried_Anchovy_Scalpel_41
A shot of the scales together, to make certain my carving job matches up on both sides.

Dried_Anchovy_Scalpel_42
A view from the back end.  At this scale of tiny carving, you must pay attention to EVERY surface.  Any roughness or mismatching will be very obvious once permanently assembled, and VERY difficult to fix then.  Do yourself a favor and take care of the details as you go along.  Remember the little touch of OCD?  It will serve you well…

Dried_Anchovy_Scalpel_43
Now it’s time to shape the blade.  I need to taper the blade both in length and form the “flats” that taper to the sharp edge.

Dried_Anchovy_Scalpel_44
As you’ve seen me do before, I’m using files to cut in the “flats.”  Above is my clamp rig to help with that little chore.  You can see a little more detail about filing flats here:  Ants Miseretto Part 3

Dried_Anchovy_Scalpel_45 Dried_Anchovy_Scalpel_46 Dried_Anchovy_Scalpel_47
The above images show the results of filing with a standard bastard file.  You can see the rough finish left behind.

Dried_Anchovy_Scalpel_48
Above , I’ve used a finer cut, and almost worn out file to refine the deeper scratches left by the coarser file.

Dried_Anchovy_Scalpel_50 Dried_Anchovy_Scalpel_52 Dried_Anchovy_Scalpel_53
And so here we are, the scales shaped, and the knife blade and tang ready for fitting the  stand, followed by heat treating the blade.

Thanks for looking!

Posted in Carving, Engraved Knife | Tagged , , , , , , | Leave a comment

Dried Sardine Scalpel and Reliquary – Part 1

Well, here’s another of my crazy reliquaries, this one a tiny dried sardine scalpel, in (and on) a sardine can.  This is loosely based on Japanese netsuke and menuki that I’ve seen, carved as tiny dried fish.  My version is of 1075 carbon steel, shibuichi, 416 stainless steel, bocote wood, copper and bronze, moose antler, cow horn and a little silver.

Dried_Anchovy_Scalpel_1
Above, I’ve rubber-cemented my pattern on a sheet of 25% shibuichi, and begun to saw them out with a jeweler’s saw.

Dried_Anchovy_Scalpel_2
Here, I’ve finished cutting them out.  These are the scales (the sides) of the knife.

Dried_Anchovy_Scalpel_4
Above, I’m doing the same with a sheet of 1/16 inch thick (annealed) 1075 carbon steel.  This will form the full tang and blade of the knife.

Dried_Anchovy_Scalpel_5
Both scales and the knife, cut out.  The red area is to remind me I must eventually saw out this area of the tang, before I forget and assemble the knife.  This is where the stand portion of the reliquary will fit into the knife.

Dried_Anchovy_Scalpel_6
And here are the elements as they will be assembled later.

Dried_Anchovy_Scalpel_7
The back sides.

Dried_Anchovy_Scalpel_8
Dried_Anchovy_Scalpel_9
The above images show where I have (carefully!) drilled all of the holes in all the pieces for the silver rivets and the eyes.  To drill the holes

, I first completely drilled one scale, then carefully drilled the rear rivet hole in the other two elements.  With that rear hole lined up properly, I could install a temporary pin and drill the rest of the holes, using the previously drilled holes in the top scale as a drill guide.  That way, all the holes match up correctly, with no unpleasant surprises.

Dried_Anchovy_Scalpel_12
Above, top and bottom views of the knife blank and the scales, assembled with temporary pins.

Thanks for looking!

Posted in Carving, Engraved Knife | Tagged , , , , , , | Leave a comment

Clockwork Trilobite – Part 7

Today is mostly using the punches to sculpt and texture.

Clockwork_Trilobite_Pendant_79
In the above three images you can see some of the sculpting in progress.  The image on the left has had the head part (cephalon) sculpted and textured , and you can see the two punches I’ve be used – the large one on the left is for general texturing (made from hardened 1/8 inch diameter piano wire) and the one on the right is for shaping via forging (it’s made from an old rotary bur and is flat on the end with just a bit of rounded edges).  In the center image you can see a carved but unsculpted part of the trilobite’s central lobe (blue arrow), and in the right image is the same lobe after sculpting (green arrow).

Clockwork_Trilobite_Pendant_83
Above are several of the lobes after sculpting.

Clockwork_Trilobite_Pendant_84
And here all the central and lateral lobes have been sculpted.  The punch easily shapes most metals, including steel but especially something as soft as silver, and really starts making this thing come to life.

Clockwork_Trilobite_Pendant_88
And here is the completed trilobite, with a bit of patina thrown on.  There is an option here to leave the copper eyes as they are, or to use a tiny carbide bur and place lots of tiny dimples on them, like the eyes in the image below, courtesy of Bladegallery.com.  I’ll ask the client and see what they want to do.  Next I’ll fabricate a beefy silver jump ring and mess with the patina a bit more, followed by boiling in distilled water to make sure all the nasty chemicals are gone.  Then I’ll do a serious quality control inspection, correcting any faux pas, and then she’ll be ready to go!

Clockwork_Trilobite_Pendant_89

Clockwork_Trilobite_Pendant_90

Clockwork_Trilobite_Pendant_92

Clockwork_Trilobite_Pendant_97
And, above are several different views of the completed Clockwork Trilobite.

I guess this finally solves the mystery associated with the most successful and long-lasting group of organisms the world has ever known.  What happened to them?  Why did they suddenly disappear from the oceans?

They simply ran down, of course.  But, in science solving one mystery usually just exposes more things to seek answers to, and brings to mind a completely new mystery of the trilobites – who wound them up in the first place?

Thanks for looking!

Posted in Carving, Jewelry, Pendant, Steampunk | Tagged , , , , , , | 2 Comments

Clockwork Trilobite – Part 6

Starting the carving today.

Clockwork_Trilobite_Pendant_69
Here I’ve set the trilobite (right side up this time) in Thermolock™ and drawn in the exoskeleton.  I’ve also used a tiny carbide bur to do a “scribble” texture on the gears and the surface they sit on.

Clockwork_Trilobite_Pendant_70
Those huge rivets for the eyes have been bothering me, so I trimmed them down a great deal, above.

Clockwork_Trilobite_Pendant_72
Here I’ve engraved all the exoskeleton lines in.  I’ve done this three times in order to achieve the depth I need.  The first pass was with a Lindsay Universal graver

, the second with a 90 degree (also called a square graver) and the last pass with an onglette graver.  I couldn’t just go straight to the onglette at this kind of depth – it’s very thin and isn’t the most manly of gravers and would have broken.

Clockwork_Trilobite_Pendant_73
Above I’ve used a flat graver and cut angled facets to “round” the exoskeleton elements.  You can still see some areas I haven’t rounded yet.

Clockwork_Trilobite_Pendant_77
Above I’ve detailed some around the eyes and added a quick patina to visualize what needs to be done next.  Tomorrow I’ll attack the ‘bite with a punch to smooth out all the rounded exoskeleton elements, and leaving a nice texture.

Thanks for looking!

Posted in Carving, Jewelry, Pendant, Steampunk | Tagged , , , , , , | Leave a comment

Clockwork Trilobite – Part 5

Today I’m adding all of the rivets and completing the engraving for the pendant back.

Clockwork_Trilobite_Pendant_51
Above are the wires I’m going to make my rivets out of, along with my blacksmith’s “nail header.”  The silver wire is 16 gauge silver, and the copper is 12 gauge.  You can see the end of the wires where I’ve melted little balls.  These I’ll make into a lost completed rivet heads with the nail header.  That way, there’s only one end of the wire I need to worry with to turn into a good looking and well doe rivet – a bit of risk reduction (sometime ask me about my Graceful Degradation Philosophy of Life).  If you look closely at the holes in the trilobite underside, you should be able to see where I used larger drill bits and did a little countersinking – especially for the copper eye rivets, I want those to be flush on the bottoms.

Clockwork_Trilobite_Pendant_52
Above are two close-ups of the nail header with completed rivets in place.  In the top image you can see a completed silver rivet laying on the top.  I just use a small ball peen banner to mash the little melted balls into rivet heads, then remove, trim the wire to length, and they are ready to be put into place as rivets.  The larger copper rivets will be both eyes and additional security for my solder job.  Belt-and-suspenders, remember?

Clockwork_Trilobite_Pendant_53
Above is a sequence of images, starting with a bottom view, and then top views of installing the rivets, and peening over the wire ends.  Should be self explanatory (I hope…..).

Clockwork_Trilobite_Pendant_62
Above are all the rivets in place, and the copper eye rivets carefully made flush with the surface.  I want as little of these to come in contact with the wearer’s skin as possible.

Clockwork_Trilobite_Pendant_63
Here I’ve installed the trilobite upside down in a holder for engaging.  I’ve used Thermolock™ plastic (sold by GRS Tools) to hold it securely place – heating with a heat gun to install or release is quick and easy.

Clockwork_Trilobite_Pendant_66
In the above sequence of images I’ve textured and engraved the details on the back (upper left) , added a quick patina and polished it back quite a bit to get an inkling of how it will look when completed.  The client suggested a wind-up key fixture on the back – good call!  It’s starting to look very SteamPunk…  Next comes the exciting part – carving and engraving the top.

Thanks for looking!

Posted in Carving, Jewelry, Pendant, Steampunk | Tagged , , , , , , , | Leave a comment

Clockwork Trilobite – Part 4

Today I need to make the last little gear, solder everything together and do the initial shaping.

Clockwork_Trilobite_Pendant_34
Above, I’m using a computer printout as a pattern for the tiny gear, and drilling the starting holes.  I used a scan of the top silver trilobite plate and carefully scaled the gear to that – the pattern isn’t anything more than than a 16 gauge center hole, and 18 gauge outer holes.  I glued the pattern on my scrap of shibuichi, and used a tiny carbide bur to make a tiny dent for centering the equally tiny drill bits, which like to wander if not center punched or drilled.  I’ve also used my dividers to mark the outer rim.

Clockwork_Trilobite_Pendant_35
Here, I’ve begun sawing out the gear with a 5/0 jeweler’s saw blade.  I’ve left some of the gear unsawn to provide me with a handle – one of the biggest challenges in this game is holding onto the work.  I then continue sawing by removing the little nubs of the web to create the little gear teeth.

Clockwork_Trilobite_Pendant_37
And, above, is the tiny gear sawn free.  Now I have to use jeweler’s files to trim everything up.

Clockwork_Trilobite_Pendant_39
As I mentioned

, holding the work is a big problem, and you need to be creative with your work-holding solutions.  Above, I’ve pressed a tiny little hand clamp into service, and drilled a matching hole in my sawing birdsmouth.

Clockwork_Trilobite_Pendant_41
Here is the little gear in position.  Did I mention the center hole was 16 gauge wire diameter?  There is a little madness to my method, since I will eventually use a 16 gauge silver wire to make a rivet for my belt-and-suspenders methodology.

Clockwork_Trilobite_Pendant_42
It’s finally time to solder everything together, and I can quit worrying about dropping a tiny part on the floor, to disappear into the clutter…….  Above is my soldering setup – a fiber soldering block, with a charcoal block on top of it, to keep from burning my bench.  The funny little contraptions you see are thick copper wires with wooden bases, and I place small lead blocks on top to provide weight in selected spots while I solder.  They work incredibly well to keep all the parts from moving during soldering.  I think I saw them originally on the Ganoskin web site, but I’m too lazy to look up the link.  I use silver paste solder for most of my soldering needs.  Did you know that solder becomes a lubricant when it is molten, and things will slide around easily?  Also, when the flux starts to boil and bubble the water away during heating, the pressure generated can also make things move.  These clever little contraptions pretty much make that a thing of the past, so whoever thought these up, they are sheer genius, and many thanks to you!

Clockwork_Trilobite_Pendant_46
So, above is the sequence of what happened after soldering, pickling, and a little more sawing.  Notice also, I’ve gone ahead and drilled most of the holes I’ll be needing.  It is MUCH easier to do that now while the bottom and top surfaces are flat and parallel.  I might need a few more holes, but that will depend on the carving part, so I’ll have to wait and fight that battle then.  In the bottom view, I’ve added a quick patina to begin getting the idea of how this bad boy will eventually look.

Clockwork_Trilobite_Pendant_50
Next, I’ve used my flex shaft grinder and a sanding drum to sand away the sharp corners into a a fat pumpkinseed shape.  Then I followed up that rough sanding with a general smoothing with jeweler’s files and coarse Scotchbrite™ pads, and we’re ready to begin the carving process.  At last, some fun to look forward to!

Thanks for looking!

Posted in Carving, Jewelry, Pendant, Steampunk | Tagged , , , , , , , | Leave a comment

Clockwork Trilobite – Part 3

In order for the parts to solder well, I need to flatten all the mating surfaces – the top surface of the bottom plate, the bottom surface of the top plate, and the bottom of the gears (there’s a parsing conundrum for you!).

Clockwork_Trilobite_Pendant_19
I use a file most often for this , but a flat plate topped with sandpaper would also work.  On the bottom surface of the top plate (the lowest piece in the image above) I’ve used a black Sharpie™ permanent marker as layout fluid so I can easily see the low spots and know when I’ve accomplished flatness.

Clockwork_Trilobite_Pendant_22
Next I need to cut the pockets the gears will fit in to do a “disappearing act” into the top plate of the trilobite.  Above, I’ve colored the silver with a red Sharpie™, carefully positioned the gears and then scribed a line around them so indicate how far into the plate I must remove the metal.

Clockwork_Trilobite_Pendant_23
I also need to mark the depth on the inside of the gear pocket.  Once again, I press my Sharpie™ into service, and scribe the depth with a pair of dividers (see above) – after carefully measuring, of course.

Clockwork_Trilobite_Pendant_25
Above is a view through the engraving microscope.  I’ve been using small carbide burs to carve away the metal that needs to be removed.

Clockwork_Trilobite_Pendant_29
Once I’m close on the fit, I use a flat graver to remove the inside radius left along the back corner, and then use a small scraper to refine the surfaces.  This scraper is the one I used in much of the carving of the Orca Knife – it carves metal really well.  Heres the link:  http://sterlingsculptures.com/wp/?p=2333

Clockwork_Trilobite_Pendant_31
And, at last, the gears fit, the surfaces are flat and ready for soldering.  One last gear left to make, which will go on top of the large gear in the circular opening, and then we can get on to the fun parts.

Thanks for looking!


Posted in Carving, Jewelry, Pendant, Steampunk | Tagged , , , , , , , | Leave a comment