Steel and Gold Dragonfly Earrings

A pair of steel and 24k gold dragonfly earrings we did, inspired by a possible commission.  These were a lot of fun to make!  The 24k gold inlays are parallel wire inlays, inlaid into the steel.  24k gold has an interesting property where it readily “cold welds” to itself.  In fact, old time dentists used this technique to pack sequential bits of gold foil into teeth to fix dental cavities, instead of the modern amalgam and plastic fillings used today.


Each earring is 3/4 of an inch tall, and 3/8 of an inch wide.

Thanks for looking!

Posted in Jewelry | Tagged , , , | Leave a comment

Engraved Spyderco Knife – The Maiden of Deception Pass

Here’s a small engraved Spyderco knife we just completed.  The theme is the “Maiden of Deception Pass,” a Native American legend near where I live on Whidbey Island, WA.


The knife is currently available at the Penn Cove Gallery, in Coupeville, WA, www.penncovegallery.com

Thanks for looking!

Posted in Uncategorized | 2 Comments

Dancing Frog Silver Earrings

Here are a pair of tiny dancing frog earrings I just finished.  They’re made of hand fabricated and engraved Sterling silver, and are 3/4 inches tall, and 5/15 inches wide.

Thanks for looking!

Posted in Jewelry | Tagged , , , | Leave a comment

Floating Treasures Part 2

Here is the Dragonfly Floating Treasure Pendant finished.
It’s about 1 1/2 inches in diameter, with a Sterling silver bowl, engraved and textured steel “floating” plate with .999 Fine silver and copper inlays.


Posted in Carving, Floating Treasure, Jewelry, Pendant | Tagged , , , , , | Leave a comment

Floating Treasures Part 1

In the distant past I made a bunch of pendants I called “Floating Treasures.”  These were loosely based upon kagamibuta style netsuke.  Kagamibuta netsuke became popular in Japan after the wearing of swords was banned, and the metal artisans who spent their lives creating the wonderful sword furniture we admire today became unemployed, and turned their skills to decorative items.  Most had a highly decorated metal lid on a non-metal bowl, with a central cord hole (himotoshi).


Here are a few images of a kagamibuta netsuke of mine, with a porcelain lid, yew bowl with ivory cord hole liner, about an inch and a half in diameter.

I’ve always thought kagamibuta would make an excellent pendants, but the awkward cord mounting system precluded their use.  I set out to blend the best aspects of kagamibuta netsuke and make a new style of pendants, and called them “Floating Treasures” since the decorated part seems to “float” in the center of the bowl.


Above are a few of my earlier “Floating Treasure” pendants.


Above is an image of the components of one of my floating treasures, (shown from the left) 1. the bowl, 2. a small spacer and 3. the “floating” plate (shown here upside down).  These were originally made of wood, fossil ivory, antler, and maybe a tiny bit of metal work, but I could never figure out how the make the bowls of metal.  Recently, I broke that code.


Above is my first “Floating Treasure” pendant using all metal in it’s construction.  The bowl is copper, and the “floating” part is engraved Sterling silver.


The above three images are an inlaid dragonfly I’m currently working on, with a silver bowl, and a steel “floating” plate, with inlaid components of copper and .999 fine silver.  Two of the dragonfly wings are inlaid, with two left to go.

The difficulty in making the bowl wasn’t the initial cup forming portion, but the ability to bend the edges of the bowl over and back into the center of the bowl, and I finally figured that part out.

Posted in Carving, Floating Treasure, Jewelry, Pendant | Tagged , , , | 2 Comments

Koi Pendant

Another project I just finished (it’s been a sort of cleanup the projects kind of month), the Koi Pendant.   It has an inlaid silver koi and copper inlaid lily pads and is backed with silver, with an Argentium™ silver chain.

The dark surface of the pendant is made from an ancient piece of wrought iron anchor chain from Whidbey Island, Washington, where I live.  Wrought iron is an early composite material created by forge welding lots of thin iron plates together to make thicker pieces of steel.  It was made this way because the technology didn’t then exist to make large quantities of decent quality steel.  There are large quantities of silica slag in the steel from the welding, making it pretty resistant to rust.  Because it was created with many layers and slag, you can etch the surface of the steel and reveal a sort of wood grain pattern, which works very well as subtle water in this case.

It will be available soon at Bladegallery.com http://www.bladegallery.com/shopdisplayproducts.asp?id=721&cat=Sterling%2C+Tom


Posted in Jewelry, Uncategorized | Tagged , , , | Leave a comment

Dragonslayer Spike Poniard and Reliquary

My latest major project, the Dragonslayer Spike Poniard and Reliquary (and The Project From Hell). I guess you can call it finished, but it turned into one of those projects where it became more abandoned than completed – it just kept insisting that I add another element, then another, then another and so forth.  I seem to have a lot of those.

Anyway, it’s a fantasy integral poniard dagger, made from 1045 carbon steel, 15 inches overall length. The reliquary is fabricated from a brass rail from the bar in the historic Leopold hotel in Bellingham, Wshington (the state, not the puzzle palace), brass rod, boxwood, black walnut, desert ironwood, fossil ivory and steel with engraved runes. On the sculpted raw steel handle are four hand engraved and carved dragons and four Viking-ish helmeted dudes.

Hope you like it. Thanks for looking!


Posted in Carving, Engraved Knife, Misericordia | Tagged , , , , , , | Leave a comment

Ants Miseretto part 21 – FINISHED!

On the final stretch!  Today I finished up the centipede legs and the bark, as well as finalizing the patina.  I’ll look it over for a few days for anything I might have missed, but otherwise I think it’s done!


Above, I’ve been using a tiny scraper to round over the tops of the legs.  The three legs on the right side of the image have been scraped round and also patinated.  The two gold colored legs in the center of the image have been scraped, but not patinated, so you are seeing the raw shibuichi color.  The legs to the left side are still flat topped.  The scraper I used is a very small Carl Bleile style scraper.  You can find out more about these and how to make one here:  http://www.handengravingforum.com/showthread.php?p=26207


Here are the rest of the legs scraped round.  I still need to work on the antennae.  This handy little scraper makes pretty short work of this task, and is invaluable for the finesse I require to make these little bugs “come to life.”


And, above, they’ve had the patina applied.

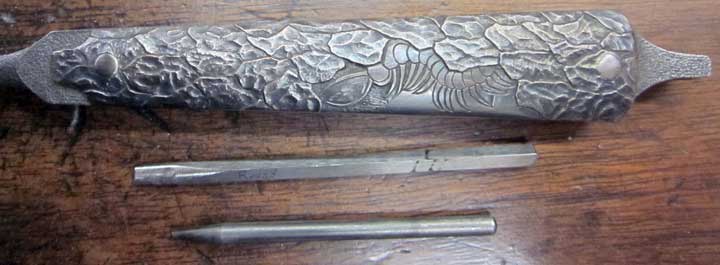
And here is the centipede finished.  I’ve also deepened a lot of the junctions where the little plates of pine bark come together, making them look a little better defined.  Watch out here though – It’s VERY EASY to overdo the bark!  For this kind of texture, LESS is usually MORE.


Above, here is the finished knife, both sides, shown on it’s display and storage box.  This has been a long time coming together, and I’ve had to travel a pretty far distance gaining the skills and techniques to make all this come together.

Here’s a short list of most of those (and some of these are firsts for me!):
Created the design concept, researched and formulated the patterns.
Forged, filed and carved the dagger to shape.
Hardened and tempered the dagger.
Formulated the shibuichi, melted and cast the ingot, forged and rolled the handle scales.
Shaped, fitted and riveted and epoxied the scales to the dagger.
Drew drown the gold wire to the desired diameter.
Engraved and fabricated punches for the ant inlays.
Engraved and inlaid the 24karat ants.
Carved the weathered wood, bark and centipede.
Made the display and storage box.

Here are closeups of the two finished handle scales.


And, last but not least, all of the pieces of the ensemble all shown together.  To see how to make display boxes like this, visit this link:  http://sterlingsculptures.com/wp/?page_id=882 

Thanks for Looking!

Posted in Carving, Engraved Knife, Misericordia | Tagged , , , , , | Leave a comment

Ants Miseretto part 20


I spent yesterday working on the centipede, here about halfway done.  I still need to round over all the legs, and finish up the bark.

I used small carbide burrs, tiny flat gravers and punches to shape the centipede and remove the background.  Still a fair amount to go, but another day or two should see the miseretto finished!

Posted in Carving, Engraved Knife, Misericordia | Tagged , , , , , , | Leave a comment

Ants Miseretto part 19

Carving the bark today, before I get too far on the centipede.

Above, I’ve begun carving the bark using a round graver with a pretty broad sweep.  You can see three little bark spots I’ve already completed, and the gold colored area is where I’ve been working with the round graver.  I’ll follow up the graver cuts with a round faced punch.


Here I’ve added a quick and dirty patina to get an idea of how the bark will look.


Above, I’ve gone back and forged over the carved surfaces with the round faced punch and my Lindsay Nitro G20 airgraver.  This punch has a sort of frosted finish on it, leaving behind a bit of texture.  This is bark, so I don’t want a smooth, shiny finish left behind.

You can read a little more about the powerful Lindsay Nitro G20 airgraver here:  http://www.airgraver.com/Air%20Engraver%20NitroG20.htm


Continuing on around the other side, here I’ve used the round graver and carved the bark surfaces.


Above, I’ve used the punch on all the gold colored areas.  The Nitro G20 airgraver really makes short work of the forged punching/sculpting.

And here we are with the patina applied.  You can see the round graver and the punch in this image.  These are the only two tools I used for this round of carving and forging/sculpting.

Posted in Carving, Engraved Knife, Misericordia | Tagged , , , , , , | Leave a comment