Making a Kagamibuta Netsuke Bowl Part 3

Above, I’ve installed the hand turning tool rest on the cross slide of the lathe, and begun establishing the outer curve of the bowl with small hand turning tools.  I repeatedly STOP the lathe and hold the original ivory bowl nearby, and sight down the edge to make sure I’m matching the curves.  Incidentally, it is much more difficult to make a matching replacement bowl than an original bowl!  An original only needs to look nice, while a replacement must be the same as the original.  A much more finicky process…


With the top half of the outside curve finished, I reposition the tool rest and begin turning the interior.


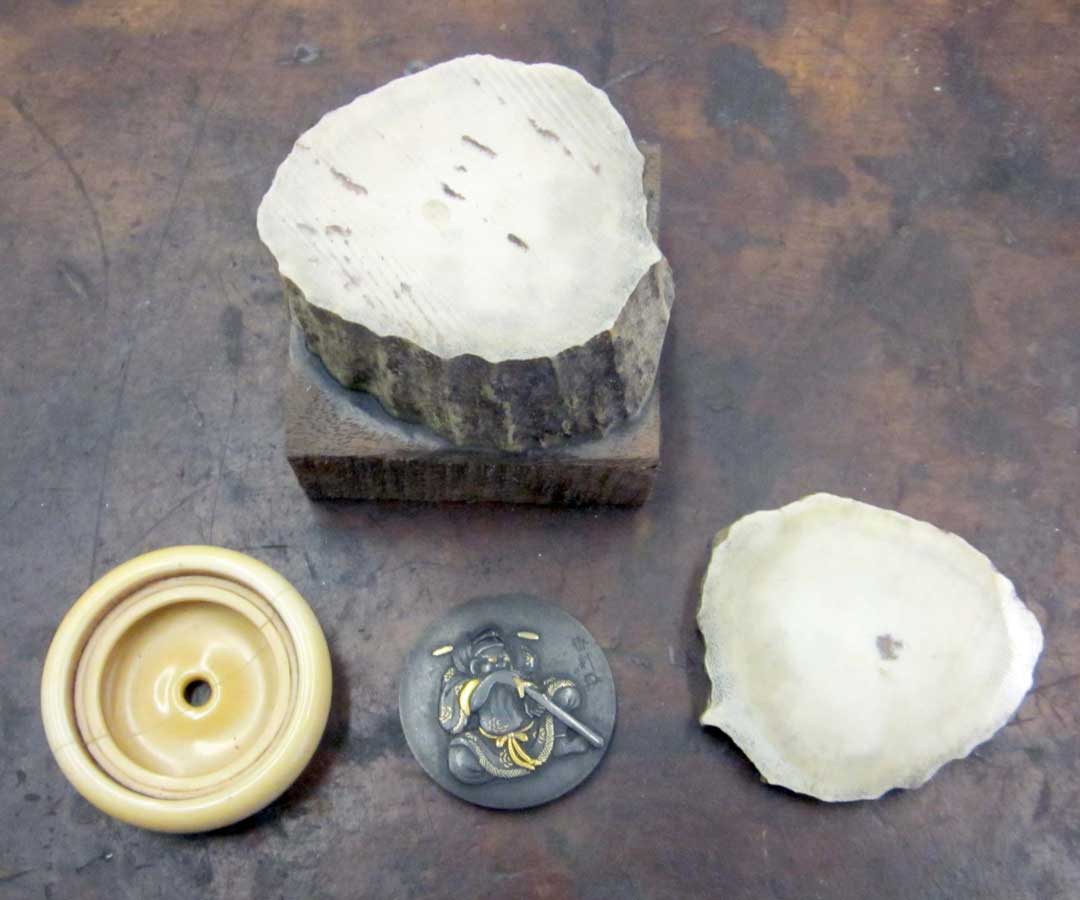
Above are the original bowl and the replacement antler bowl.  Looking pretty closely matched in shape.

More of a side view.

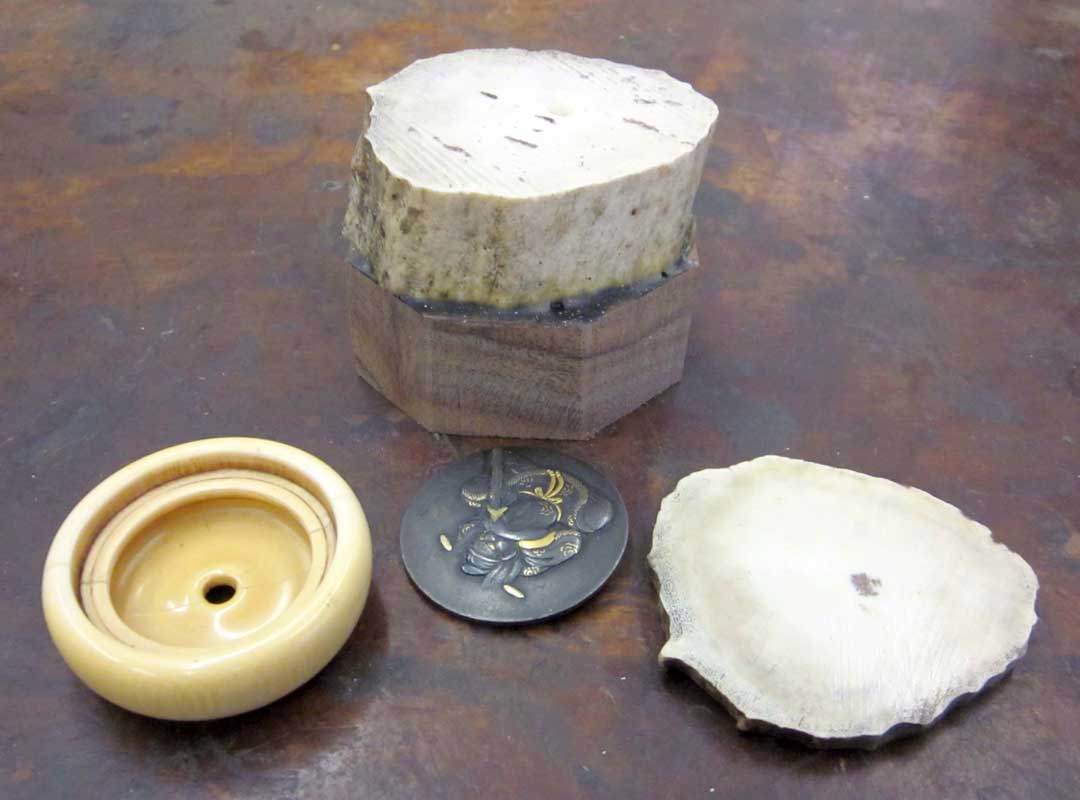
And two views without the lid.

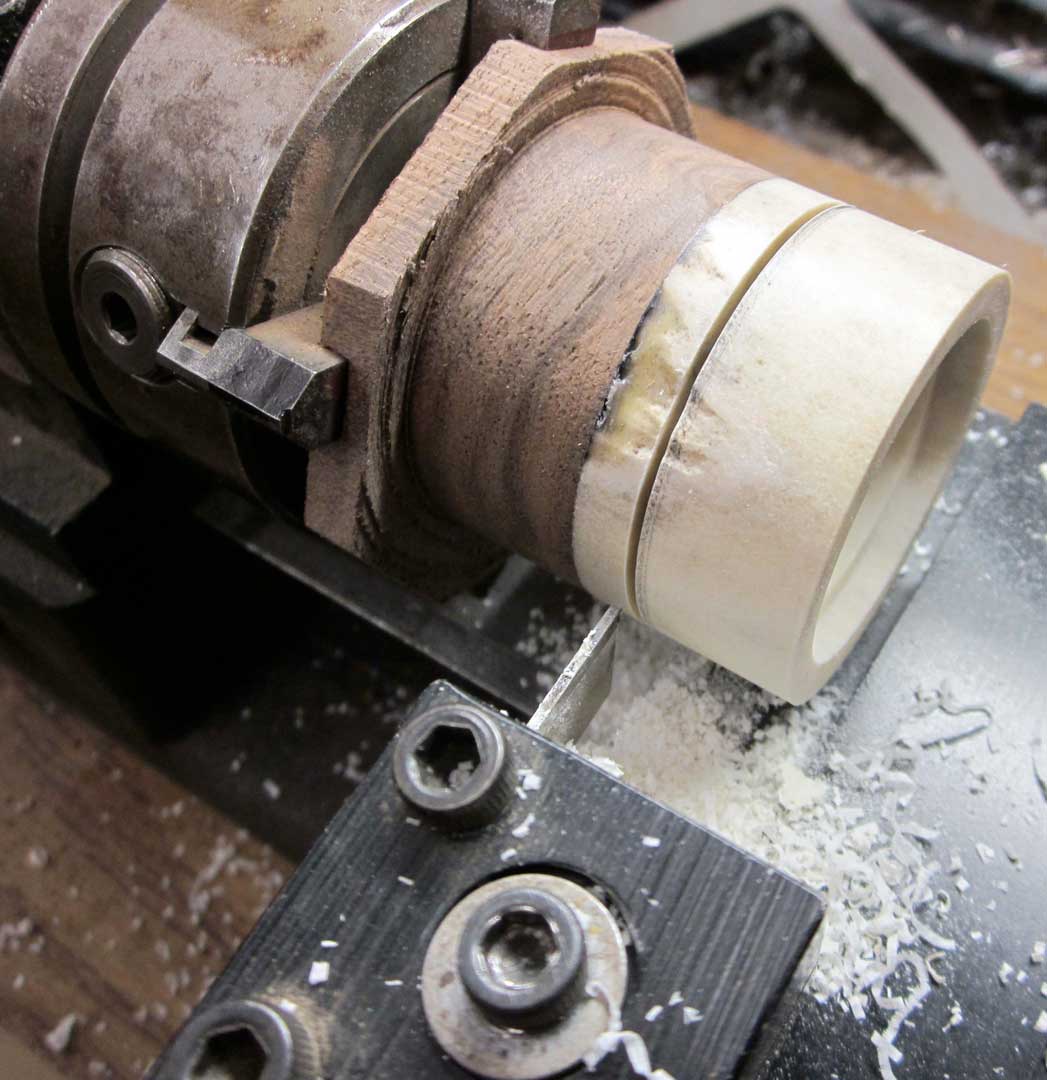
Here I’m sanding the inside and top half of the outside of the bowl.  These are 300 grit and 400 grit sandpaper strips (the two narrow ones), and emery polishing paper.

A little closer view.  Can you see the shine beginning to show?

Now that I’m satisfied with all of the curves and smoothness of the finish,  it’s time to remove the bowl from the rest of the material.  My little parting tool won’t cut all the way through, so I’m pressing my trusty jeweler’s saw into service.

Above are the original ivory bowl and the replacement.  Note that the bottoms don’t match.  I’ll now remount the antler bowl with the bottom out, and finish turning.

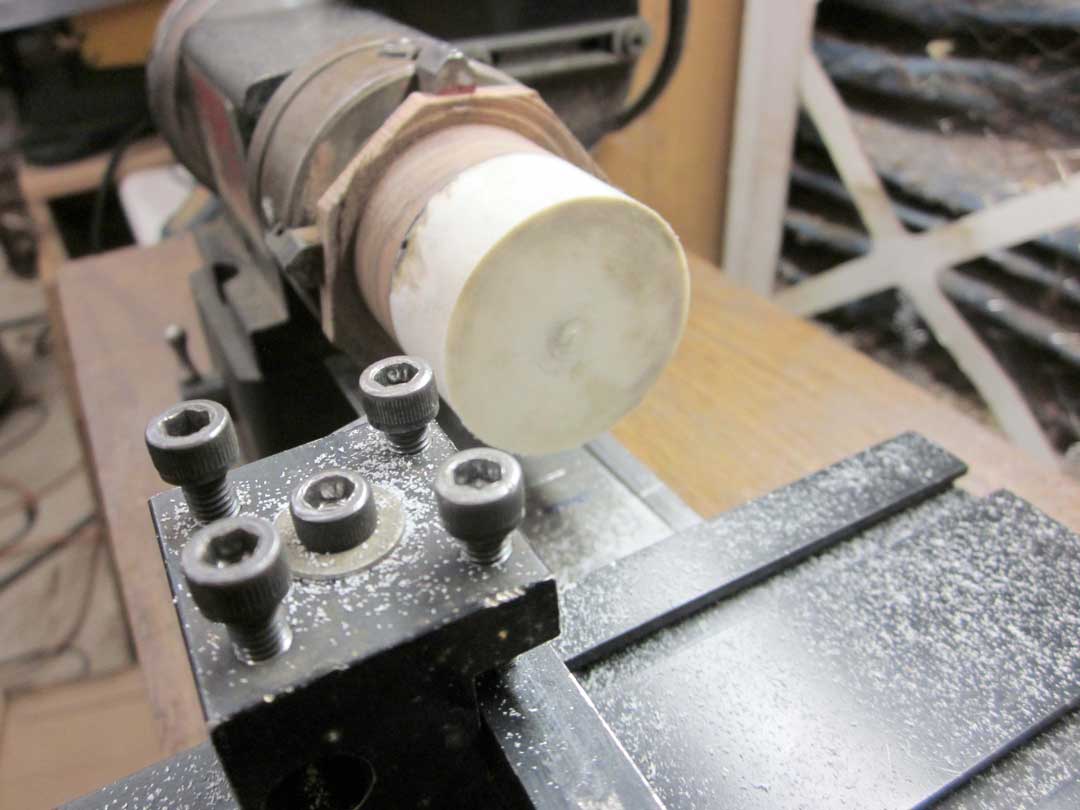
Here, I’ve remounted the bowl on a three jaw chuck (which is self centering) so I can turn the bottom of the antler bowl.

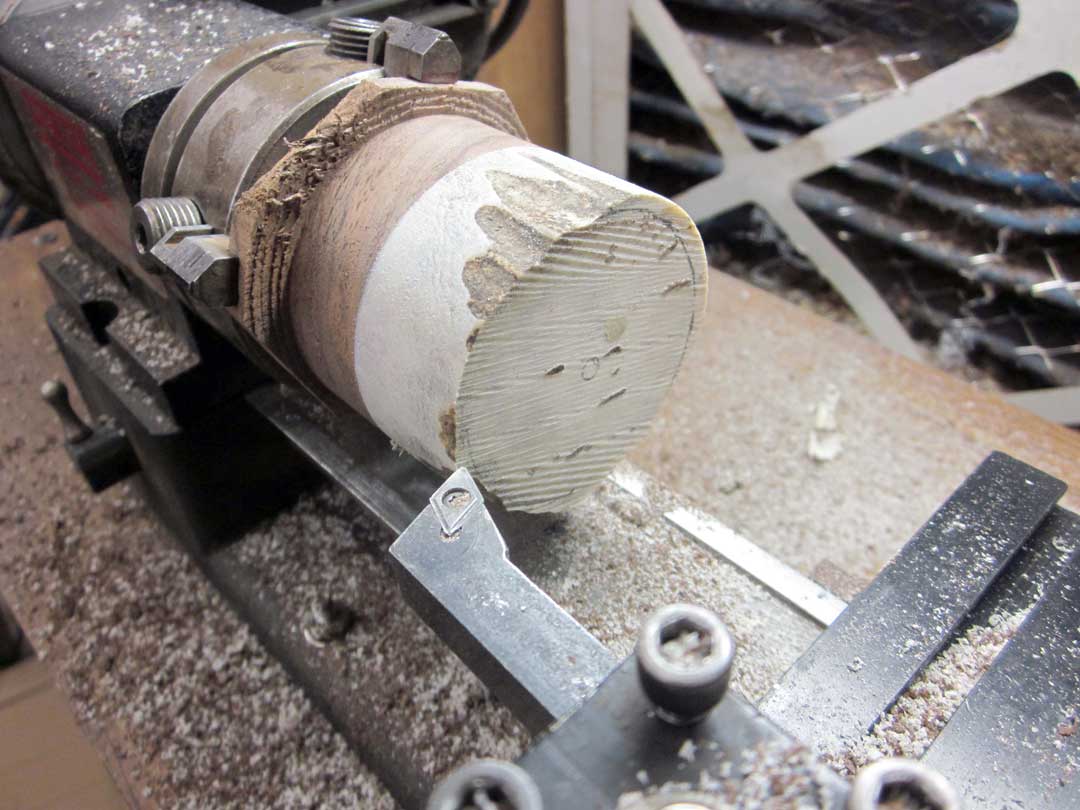
First, a little facing cut to make the antler bowl the correct thickness.

Above, I’m sighting down the original curve to make sure I’m duplicating it on the antler bowl.  I do this quite a few times, often marking on the antler with a pencil and cutting just a little bit at a time until it’s correct.

A view from above.

And a view from the bottom.  Turning and initial polishing is finished.


And a view from the side.  Pretty close match, even if I do say so myself!


And, above, through the magic of Adobe Photoshop, both bowls with the kagamibuta lid.  I’m pretty happy with it!

Posted in Netsuke | Tagged , , , | Leave a comment

Making a Kagamibuta Netsuke Bowl Part 2


Above, I’ve drilled the proper sized hole through the antler cylinder.  The cord that connects to the lid will eventually pass through here.  Incidentally, using a metal-cutting lathe for these parts of the bowl-turning process really helps with accuracy and speed.  As you might surmise, a lathe that can cut steel cuts through wood or antler like butter.


Now I’m ready to cut the recess in the top of the bowl that the plate will fit in, leaving a little flat shelf so it will lay nicely.  I’m using a carbide boring bar to carefully bore this recess, being VERY careful to measure both the proper width as well as the proper depth.  It’s easy to cut a little more if necessary, but what you remove can’t be put back.  With that in mind, by the way, I cut a little more antler than I really have to have, so I could make a mistake here, cut it away, and start again.  I try to live by the principle of “Graceful Degradation.”

Also, I’ve found antler to be very abrasive, so carbide cutting tools are a great help if possible.


Above is the finished recess for the lid.


Now I need to remove as much waste material from inside the bowl as I can.  I’ve carefully measured the original ivory bowl, and marked (with a felt tip marker) the depth I need to cut the hollow interior to.  I’m being careful to remove as much waste as possible, but leaving enough material for the final turning.  Remember that the bottom (and interior) of the bowl is rounded, so take that into consideration!


Above is an end view before interior waste removal.


The same view, with my nice little depth measuring tool.  I don’t remember where I picked this up, and there isn’t a brand label on it, but it is VERY useful.


Here is how it all looks with the waste removed.


The original kagamibuta bowl and lid.


The lid test fit into the replacement antler bowl cylinder.  Just right!


Above, I’ve installed my parting tool onto the lathe cross slide.  I’m going to partially cut a groove into the antler cylinder, marking the bottom of the bowl and providing a little free space for my hand turning tools later.  I’ve marked the cut with a pencil, using my handy little depth measuring tool.


And an end view of the same.

Above, the groove cut, leaving about 5/8ths of an inch in the center.  Don’t cut too far in and weaken the cylinder or you may get vibration and not get smooth surfaces.

Posted in Netsuke | Tagged , , , | Leave a comment

Making a Kagamibuta Netsuke Bowl Part 1

I was approached by a client to turn a replacement bowl for a lovely kagamibuta netsuke that had a cracked original ivory bowl.  In my life with netsuke, I’ve found that cracked ivory, especially kagamibuta netsuke bowls, is very common.  It’s my view that ALL ivory will eventually crack, sometimes catastrophically.  Ivory, being such a dense material, but also quite porous, moves with changes in humidity, and eventually I believe all of it will develop at least small cracks.  Now don’t let this turn you off of lovely ivory, because in most cases I’m talking about cracks occurring over many decades, and perhaps centuries.

Above is a kagamibuta netsuke of mine.  This one has a plate or lid of carved porcelain with a celadon glaze, and a deer antler bowl.  Kagamibuta means “mirror lid” in Japanese, and commonly the lid or plate was made in metal.  You can learn more about netsuke here:  http://www.netsuke.org

Kagamibuta netsuke are one of the several common forms of netsuke, and came about mainly because of changes in Japanese laws that prohibited the carrying of swords.  Those metal artisans who made all of the astounding samurai sword “furnishings” suddenly needed jobs, and kagamibuta netsuke took up some of that slack.


I had several choices to make this kagamibuta bowl from, and I chose naturally-shed moose antler (most deer shed their antler every year, so no animal needs to be harmed!).  Above is a cross sectional view of a nice piece of moose antler, cut through the “palm” of the antler.   Like most deer antler, moose antler has harder outer margins surrounding less dense and porous interiors.  The main difference between antler from different deer species is how much of the outer part is hard, and how much of the interior is porous and soft, although nutrition of the animal can also play a large part in this.

Above is a cross section through the “beam” which is the round part near the animal’s head.  This part usually has much more dense material, and I’ve chosen a slice of this to turn my kagamibuta bowl from.

Above is the slice of moose antler I’ve chosen, and I’ve used common wood glue to glue the slice to a sacrificial piece of hardwood.  You can also see the original damaged ivory bowl, the netsuke lid, and another thin slice from the same part of the antler.  I’ll use this slice for experimental trials later when I’m ready to begin coloring the bowl.  Since antler varies from piece to piece, and from area to area even on the same antler, it’s important to use an experimental piece from near the same location.

More of a side view.

Above is the antler and sacrificial hardwood block mounted in my little Sherline metal-cutting lathe, ready to begin turning.  I’ve used a small four jaw chuck here, and worked diligently to get the center of the antler  centered with the lathe axis.

Here I’ve begun turning the irregular antler into a perfect cylinder.  I’m “sneaking” up on the appropriate outside dimension, carefully measuring with calipers several times until I arrive at the 1.75 inch desired diameter.  Hopefully, all of the outside “skin” of the antler will be gone by then.  I’m a great fan of leaving “natural” parts of the antler skin in place, but since this a replacement part for an ivory bowl, it needs to be smooth and unmarked.

Here’s the blank cylinder at the final outside dimension.  By the way, the part where the lid/plate will go is on the exposed end.  I now need to take a “facing” cut across the end to smooth it out and make sure the end is at perfect right angle to the cylinder.  I’ve used a “trick” to help with seeing the cutting in this blandly white material by coloring it with a pencil, making certain I cut away all of the black parts.

And, above, is the finished and pretty smooth face of the cylinder.  Next, I have to drill an axial hole through the whole thing for the cord hole.


Posted in Netsuke | Tagged , , , | Leave a comment

Blacksmith Caterpillar Knife – Part 4

Since the last post I hardened and tempered the little knife, and spent some time getting the scale and crud from the heat treating process off of it.


Now it’s time to add some gold highlights.  Above, I’ve engraved a small decorative line, and undercut the bottom on each side.  This will allow me to pound some soft, 24k gold wire into the grooves, and the undercuts will let the gold flow into them, trapping the gold.  Above, I’ve pounded gold into about half of the engraved line.


Here’s the other side, finished pounding the gold.  Now, I’ll remove the excess, and smooth the surface.  Once the surface is smooth, I’ll engrave really fine lines into the steel along the edges.


And, above, is the finished gold inlay.  Next, I’ll inlay copper rivets into the three holes in the handle, and “mushroom” over both sides so the copper becomes captive in the steel.


And here are the copper rivets.  I also smoothed and textured them.


And the finished knife, blued, in my hand for scale.


And, above, the kfinished knife in it’s combination display and storage box.

Look for it soon at BladeGallery.com

Thanks for looking!


Posted in Carving, Engraved Knife | Tagged , , , , , | Leave a comment

Blacksmith Caterpillar Knife – Part 3


Now that I’ve removed the knife from it’s holding medium, I notice the caterpillar has a bad case of the “squares.”  I need to round it’s top edges over a little more.


There, that’s better.  Now for the other side.


And, above, is the other side completely carved, rounded and smoothed.

Posted in Carving, Engraved Knife | Tagged , , , , , | Leave a comment

Blacksmith Caterpillar Knife – Part 2


Above is the caterpillar after initial carving with small carbide burrs.  


And here, I’ve used small punches to smooth over all the hills and valleys of the caterpillar’s side.  I’ve also done a preliminary darkening of the steel just to get an idea of how it will look when finished.

Posted in Engraved Knife | Tagged , , , , , | Leave a comment

Blacksmith Caterpillar Knife

Here’s another strange idea I came up with.  This little knife is based upon a class of knives called “Blacksmith Knives” or sometimes “Viking Woman’s Knives.”  These come down to us through antiquity, and were generally just simple (and inexpensive) utility knives roughly forged out by the local blacksmith.  There is some debate about the validity of the “Viking Woman’s Knives” name, although I recently saw a treatise with images of similar knives found in pre-Viking graves.  It’s written in a Nordic language, so I can’t vouch firsthand what it says, and is an image rather than text, so I can’t attempt an Internet translation.  Anyway, that’s my story and I’m sticking to it.


My little version here is hand forged and filed from 1080 carbon steel, and is 3.5 inches long in total (slightly less than 9 cm).  Above, I engraved my pattern of a caterpillar eating it’s way through the steel and have begun to saw out the waste areas with a jeweler’s saw.  This is pretty hard steel, even in a normalize state, and is a bit thicker than 1/8 of an inch (3.5 mm).


Continuing on with the sawing, I’ve removed a little half-moon shaped piece of metal at the front end of the caterpillar.


Continuing down the back.  I’ve used at least three blades at this point.  It is very difficult to hold the knife steady during sawing, since there are really no flat areas on the bottom side.  I learned something here – since this is all on the top and easily accessed later, next time I won’t bother to follow the little hills and valleys.  I’ll just cut a smooth curve across the hilltops ignoring the valleys.  It would be far easier to just engrave and carve them in later, and would make the sawing a lot easier.


Above, I’ve finished all the sawing and am ready to begin carving and sculpting.  All told, I used more than a dozen 5/0 and 2/0 jeweler’s saw blades.  Whew!

Posted in Carving, Engraved Knife | Tagged , , , , , | 2 Comments

Yet More Fun with Titanium

Below is a 1/8 inch thick grade 2 titanium pendant, Celtic Raven Stealing the Moon, a little less than 2 inches tall.

And, above, a pair of hairsticks with a fusion of Viking and Celtic-style engravings.  On the left is  a Celtic Heron, and on the right is a Viking-ish dragon, both engraved in grade 2 titanium, with silver rivets.  The hairsticks are 1095 carbon steel.

Thanks for looking!

Available soon at BladeGallery.com

Posted in Jewelry, Uncategorized | Tagged , , , , | Leave a comment

More Fun with Titanium

Here’s a small Praying Mantis pendant in 1/8 inch thick Grade 2 titanium.  It was a delight to engrave, unlike the AL6V4 titanium I tried earlier.


Above is my take on a “knapped” Ishi arrow point, also hand carved from 1/8 inch thick grade 2 titanium. copper tubing and a silver rivet.  These finely worked “Ishi” points are named after the last “wild” Native American who appeared out of the wilderness in the early 1900’s and lived out his last days in a museum in Berkeley, California, often making these style points for museum patrons.  Ishi points are something like the Holy Grail of pressure flint knapping.  If a knapper can make one of these long, ultra thin points with expanded notches, then he or she can knap any style of point.  Lately I’ve been doing my “knapping” in metal.  I break a lot fewer points that way 😉

Available soon at BladeGallery.com

Posted in Jewelry, Pendant, Uncategorized | Tagged , , , , , | Leave a comment

Steel and Gold Dragonfly Ensemble

Well, the earrings were popular enough with the ladies that I decided to add a pendant and complete the ensemble.
Everything together.  The pendant is 2 inches tall, and is constructed of 1075 blackened carbon steel, 24k gold, and Sterling silver.  Silver “figure eight” bail and chain.


And a view of the back of the pendant and earrings.  I soldered on a Sterling silver backing so the steel wouldn’t be against the skin.

Sorry, sold at BladeGallery.com

Posted in Jewelry, Pendant | Tagged , , , | Leave a comment