Ants Miseretto part 18

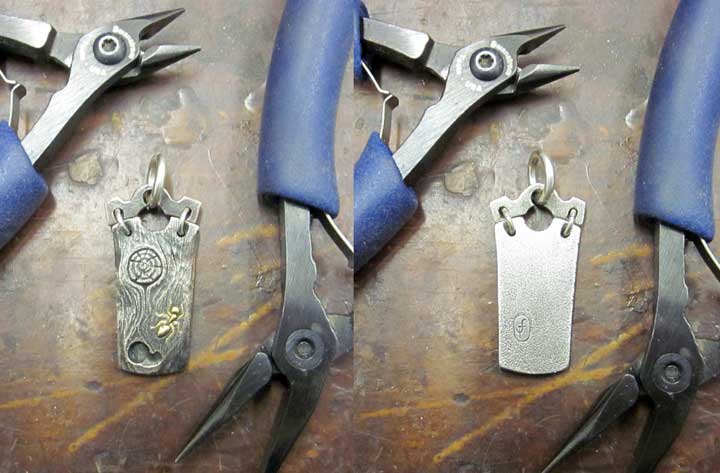
Working on the other side of the handle now.  This will be carved bark and a partially hidden centipede.

Above, I engraved the outlines of the bark surface on the shibuichi scale.  You can still see some of the laser printer transfer of my pattern on the centipede, whick I haven’t cut yet.  That area I have to sink down into the metal so the centiped can hide beneath the bark.


Here I’ve begun cutting down the surface for the centipede using flat and round gravers.


And here’s a quick and dirty patina to see the progress and kill the shine.


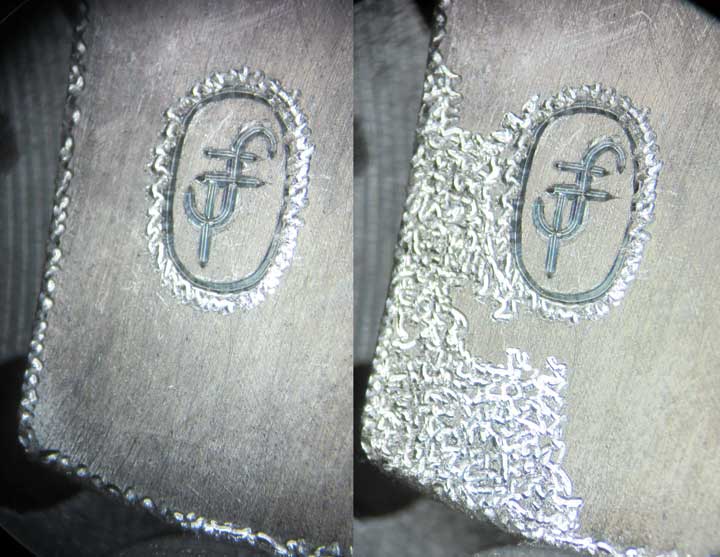
Above, I’m using a “hisage,” a Japanese-style scraper to smooth the surface so I can replace the transferred pattern of the centipede.  The “business end” of the scraper is on the right, and the cutting surface is “up.”  I need it fairly smooth and flat so the transfer will work well.

For more information on “hisage” you can visit these links:  http://followingtheironbrush.org/viewtopic.php?f=9&t=1018
http://followingtheironbrush.org/viewtopic.php?f=47&t=1231&p=11482
http://followingtheironbrush.org/viewtopic.php?f=9&t=1472&p=13943

And here is the smooth surface with a patina, ready to reapply the pattern transfer.


Above is the laser printer transfer reapplied.  I used a white permanent marker to make a surface that I can draw on and also provide a nice contrast for the black pattern transfer.


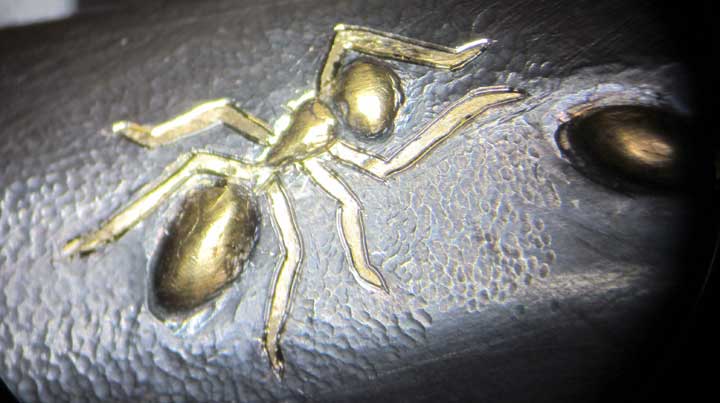
Here, I’ve engraved the outlines of the centipede and begun carving the front end, just to get an idea of what it might look like.  I don’t want to get too far ahead of myself, though.  I need to carve the bark surface first, to avoid damage to the centipede during the carving process.

Posted in Carving, Engraved Knife, Misericordia | Tagged , , , , , | Leave a comment

Ants Miseretto part 17

I’m back to working on the Ants Miseretto after a hiatus.  I’ve been wracking my brains trying to figure out what should go on the other side handle scale, and I’ve finally decided.

Above, I’ve drawn on a knothole and the beginning of some wood texture, being cognizant of where the gold ants are.  I used a white permanent marker to create a surface I could draw on, since the slick shibuichi surface doesn’t lend itself well to that.


Here I’ve begun “sketching” in the lines I drew with a graver, and begun carving the wood texture with a carbide ball burr.  You can see the fresh shibuichi where I carved the surface patina away, and below that I gave the fresh metal a quick and dirty patina to see how it is progressing.


Above I’ve continued refining the carving and the engraving.  It’s beginning to look a little like wormy, rotten wood now.


And, here, I’ve used a punch (with a frosted texture on the business end) extensively to refine the surface and remove some of that fresh cut look.


And here it is ready for the ants to move into with the ant hole carved at the front of the handle scale.  I also added lots of little splits in the wood with a narrow tipped graver.

I’ll look at this for a couple of days to see if it is finished, or if I feel that it needs something else.

Posted in Carving, Engraved Knife, Misericordia | Tagged , , , , , | Leave a comment

Ants Miseretto part 16

Now to inlay the gold wire for the legs.

Above, I’ve used an opaque white Sharpie™ permanent felt tip marker to make a background for my drawing, and have drawn in the legs for the first ant.


Using a small 90 degree graver, I’ve cut the legs to the depth and width I want.  The legs are especially important because they provide the “character, emotion and expression” for the ants, along with the orientation and relationship of the body segments.


Above, I’ve added undercuts on both sides of the channels I engraved for the legs.  I’ve used a small, symmetrical flat chisel and just punched them in.  I leave a little gap between each undercut, to help keep the wire from “crawling” along the channel as I inlay it.  I’m using a brass punch with roughened face to do the pounding in of the 24 karat gold wire.  I roughen the brass punch by tapping it vertically down on a fine grit diamond graver sharpening lap (wheel).


Here’s the gold inlaid into the legs.  I’ve punched it down pretty well with the brass punch, and have sort of levelled it off by additional punching.  This takes the excess round wire and expands it into gold leaf, which can easily be removed with a small scraper.


Above are the legs after scraping and a quick and dirty patina.

In order to add additional contrast between the legs and the background, I’ve gone back and engraved VERY fine lines alongside the gold inlays.  Later, when I ink the piece, these will add greatly to the appearance.


Here they are, pretty much finished.  Now to carve the remaining surfaces.

Posted in Engraved Knife, Misericordia | Tagged , , , , , | Leave a comment

Ants Miseretto part 15

Inlaying the 24 karat gold wire – I folded the wire to fit into the rear part of the inlay pocket, then annealed the wire.


Above is the entire ant, with three folded wire inlays.


All three ants with filled inlay pockets.


I’ve used the ant punches to do the preliminary sculpting of the ants, carefully trying to align them with the (invisible) cavity edges.


Here’s a magnified version after using the punches.


Above is an ant after trimming the excess gold around the edges, followed by burnishing with steel wool.


Here is an ant after a quick patination of the shibuichi.


And an overview.  For a more detailed discussion of the inlay process, look here:  

Next, inlay the legs – that will be 18 total.  Yikes!…

Posted in Engraved Knife, Misericordia | Tagged , , , , , | Leave a comment

Ants Miseretto part 14

I’m back in the saddle again!
I’ve installed the dagger in my engraver’s vise and used my three “ant punches” to lightly punch three ants in the shibuichi handle scale.


Here’s a closer view, just lightly punched.  I wouldn’t be doing this if the handle scales were steel or titanium, that would probably ruin my punches.


Above, I’ve begun cutting the inlay pocket using my Lindsay Palm Control Airgraver and a small 90 degree graver.


Here I’ve excavated the pocket with the 90 degree graver and small carbide burs.  I’m striving to keep the bottom as flat as I can.


 Above are all three pockets excavated, both an overall view and a  close up.


I decided to try something new here by using a punch in my airgraver and punching the bottom of the inlay pocket flat.  I’m hoping to work harden the area locally so as to proved a better ground for the next step, cutting a forest of small burs in the bottom to help trap the inlaid gold.


Here are the tiny little lines cut into the bottom of the inlay pocket to make the forest of little burs.  I’ve also punched undercuts around the bottom edges of the inlay pocket.  If you look closely, you can see where the metal has been displaced upwards around the upper edges.  You can see more about this particular process here:  
Tomorrow, I’ll begin inlaying the gold…

Posted in Engraved Knife, Misericordia | Tagged , , , , , | Leave a comment

Experimenting with Titanium part 3

Finally finished.  I sculpted the other moth using a flat graver and a fairly large hardened steel punch.  I did finally go with stippling the background with a sharp, four sided punch, but initially had some problems with the steel stipple tip I used.  It would work for a few stipples, then immediately dull, turned into a smooth tipped sculpting punch by the tough titanium.  I solved the problem by turning a small carbide bur into a stippling punch.  That worked like a charm!  Now I need to order some chains.

Posted in Carving, Engraved Knife, Jewelry | Tagged , , , , | 1 Comment

Experimenting with Titanium part 2


Moving along, I did a little more today.  Above, I’ve removed all of the background.


Here, I’ve finished sculpting the right hand moth.


And another quick and dirty inking.  Rather than the scribble texture, I may try stippling the background.  We’ll see….

Posted in Carving, Engraved Knife, Jewelry | Tagged , , , , | Leave a comment

Experimenting with Titanium

I have been curious about engraving 6ALV4 Titanium.  A lot of high end knives are available using this titanium alloy for the handle scales.  It has a bad reputation among engravers, so I thought I would experiment with some and see how bad it really is.

I sliced off a small piece, about two inches long, and came up with this design for a small pendant.  Then into the studio to begin.


Above is the titanium fixed to a hardwood block with pitch, the design transferred and the beginnings of the engraving.  I began with my Lindsay Palm Control Classic, with the tungsten piston for max power.  It would cut, but certainly not deeply.  Since this is to be a fully sculpted design, that simply wasn’t going to cut it (pun intended…).  So, I tried my new Nitro G20 airgraver – which worked just fine.  It is a lot more powerful than my Lindsay Classic airgraver.  However, during the course of the engraving, I did break the graver point several times, something I haven’t done in some time.  The 6ALV4 isn’t exactly a “dream” to cut.  It’s not only fairly hard, but “tough” (resistant?) as well.


Here’s the moth outlines cut, and some of the background relieved.  The 6ALV4 titanium doesn’t cut as well as mild steel or 410 or 416 stainless steel with carbide burrs and my NSK micromotor grinder either, but it is doable.


Here I’m beginning to sculpt the left wings with the NSK micromotor.


I used the Nitro G20 airgraver and a rough tipped punch to further sculpt the wings, above.  I also textured the background with my signature “scribble” texture.


And here is the result so far, with a preliminary inking.  More tomorrow…

Posted in Carving, Engraved Knife, Jewelry | Tagged , , , , | Leave a comment

New Engraving Tool

I’ve been gone for the past month for family reasons, so had to suspend my work until now.  Just before I left, I received my new Lindsay Nitro G20 AirGraver, and had just enough time to play with for a few hours before leaving.


Here’s  a close-up of it, courtesy of Steve Lindsay’s web site:  http://www.airgraver.com/Hand_Engraving_Tools_Overview.htm  This AirGraver has considerably more power available then the excellent Lindsay Classic Palm Control AirGraver I already have.  I’ll be using the Nitro G20 for heavier engraving and metal carving, as well as heavier sculpting by forging shapes with punches.  I also have a notion to eventually use it for wood carving as well, although I’ll have to figure out how to forge some carving gouges and veiners.

Of course, that means another set of gauges and controls to be added to my Lindsay Classic Palm Control AirGraver setup.  Above, you can see the major pieces involved in this plumber’s dilemma, along with my Lindsay Classic Palm Control (lower left) and the new Nitro G20 (lower right).  The G20 has a foot control, and I’m happy to see that.  I find stippling and sculpting with punches a pain (literally) with the Palm Control, since I have to hold it in an uncomfortable manner in order to activate it in sculpting mode.  The foot control on the Nitro looks like it will eliminate that problem.


Here is my solution to the Kobayashi Maru no-win plumber’s nightmare scenario… I used brass plumbing fittings available from my local Ace hardware store, and some of the supplied Lindsay pneumatic tubing.  Since I couldn’t find small enough fittings locally to fit the pneumatic tubing, I had a small stroke of brilliance and used a drill bit to drill out the inner diameter of the tubing to fit.  Since my compressor can’t make more than 90 psi, this should be fine.  A little hardwood and a Forstner drill bit, and, Eureka!  It works.  Palm Control on the left, Nitro on the right, both immediately available and downstream of the coalescing oil filter.

Now to get back to work.


Posted in Engraved Knife | 8 Comments

Ants Miseretto part 13 – Risk Reduction


Finishing up the pendant by adding my signature to the silver backing, and beginning texturing.  On the left you can see the beginnings (outlining) of my “scribble” texture, and on the right, starting to fill in – it’s a pain, but the results are worth it.


And here is the pendant fully assembled, both front and back.


And, last but not least, the glamour shot.  Now that I’ve fully broken the code on the ants, it’s on to the miseretto dagger itself.

Posted in Carving, Jewelry | Tagged , , , , , , | 2 Comments