


Here are all the parts, shaped and smoothed.

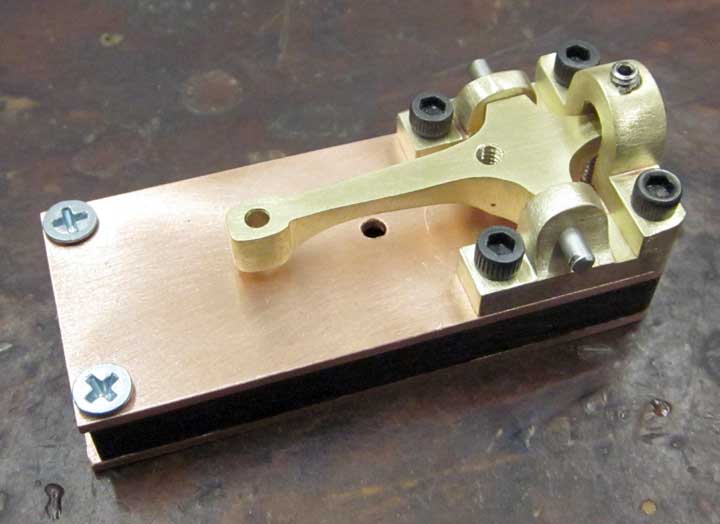
And everything assembled and adjusted from the front side.


And from the back.


I needed a spring for the telegraph key – turns out a ballpoint pen spring was perfect.
Here are all the parts, shaped and smoothed.
And everything assembled and adjusted from the front side.
And from the back.
I needed a spring for the telegraph key – turns out a ballpoint pen spring was perfect.

Tapped the bottom plate with 4-40 threads for four socket cap screws and two phillips heads.

Above is everything fastened together to test the fit.

Starting to refine the forms of the brass parts, above is a side view of the telegraph key itself, marked to remove metal.

Top view of the telegraph key.


Above are two images of the finished telegraph key, along with the tools I used for removing and shaping the metal. The hole in the center of the key has been drilled and tapped for a 4-40 socket cap screw as well.

Above, I marked the spots I’ll be drilling using a Sharpie and a set of dividers. If you look closely you can see the little cross marks in the red areas.

Here, I’ve used my NSK micromotor grinder and a tiny carbide burr to carve an indention into the metal. This will give the drill bit a place to start and keep it from skating around and drilling in another spot nearby.

Above is my drilling setup in my Sherline mini-mill. I superglued all the parts in place temporarily so I can drill holes through all the pieces at the same time, ensuring they all line up well. I only had to stop drilling and reglue once, when I let the glue get too hot.
I’ll use a single edge razor blade as a wedge to break the pieces apart once I’m finished drilling. This ability is handy for temporary fixes, but shows you why I don’t use superglue for anything else. It’s a lousy long term adhesive.

Another view of the drilling. Notice I have the parts sitting on a sacrificial block of hardwood to keep from drilling through the mill vise. I drilled using two drill bit sizes, the first time using a bit of proper size for the 4-40 tap to cut the threads. The second bit size is clearance sized for 4-40 screw threads. I took the bottom plate off, then re-drilled the rest of the parts using the larger bit so my screws would fit through.
Next, I have to put screw threads in the bottom plate.

Glued up the pieces temporarily with small drops of superglue, and sanded everything nice, square and flush using my disk sander.

Above, using a file to clean up the end parts so the cross piece will sit level.


I used an old machinist’s trick by marking the parts to be filed with a (red at the moment, it hides the blood) Sharpie permanent marker, so I can see where I still need to do some more filing.

And above here, all the parts superglued on.
Next, I need to measure and mark the hole locations, and then drill them.
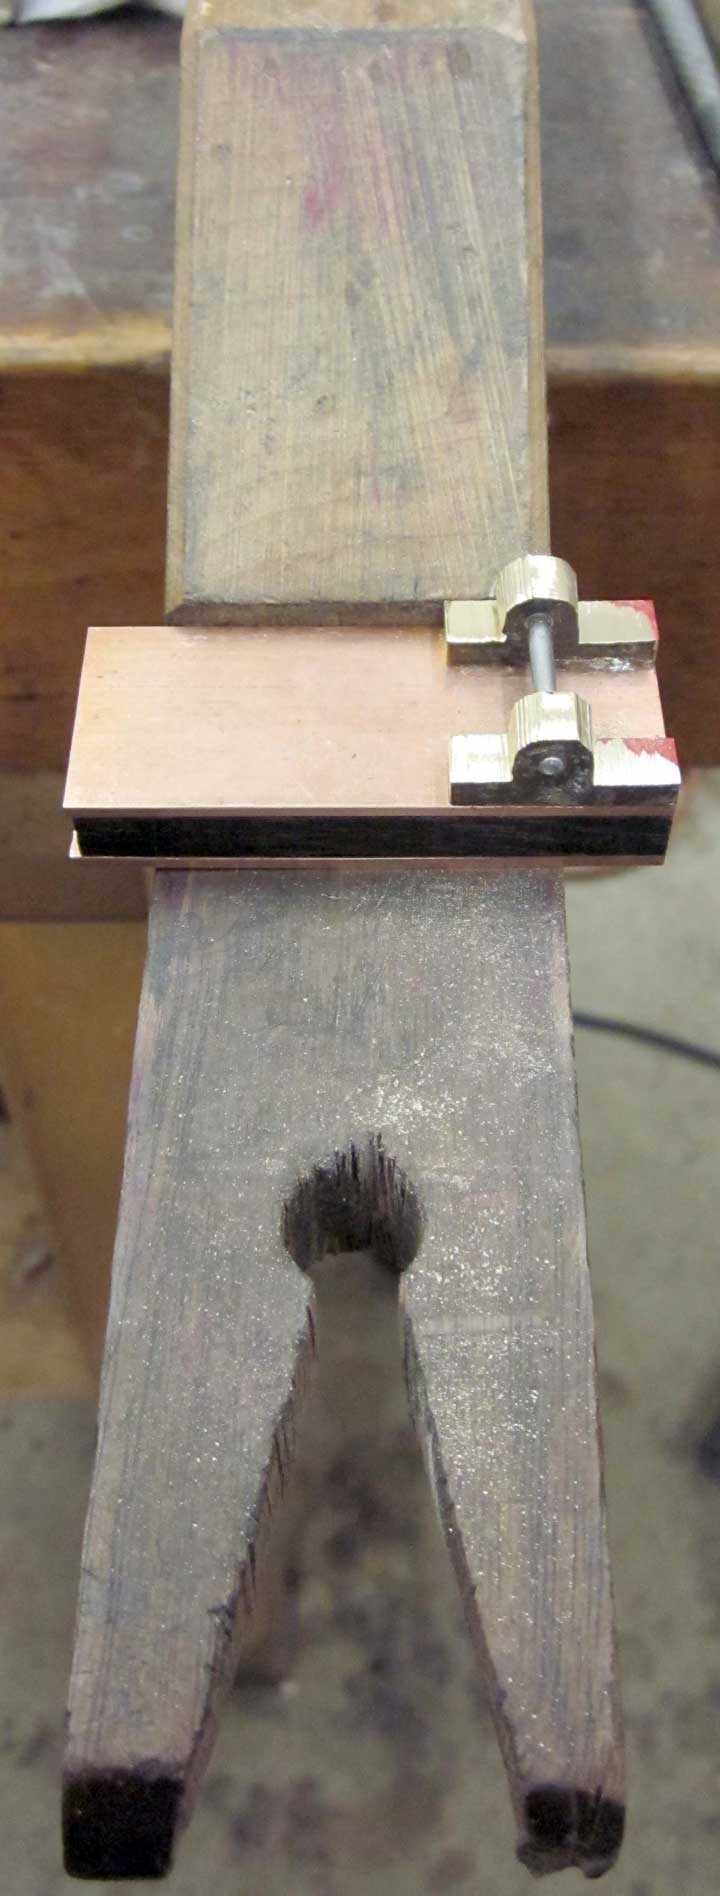
Since I finished up the “Puget Sound Dagger” I finally found time to start on my daughter’s Christmas present. Since Christmas is over, I can show it to you!
It’s going to be a “steampunk” (Victorian-styled with lots of brass stuff) thumb drive for use at school. This one will be like an old time telegraph key. She has to take computer projects back and forth from school to home and vice-versa.

Here’s the plan:


And, above, all the major parts roughed out. I used 1/16 inch thick copper sheet and 3/16 inch thick brass, ziricote wood, and thn copper sheet (taped onto a sacrificial piece of wood to aid in jeweler’s saw piercing, shown above).
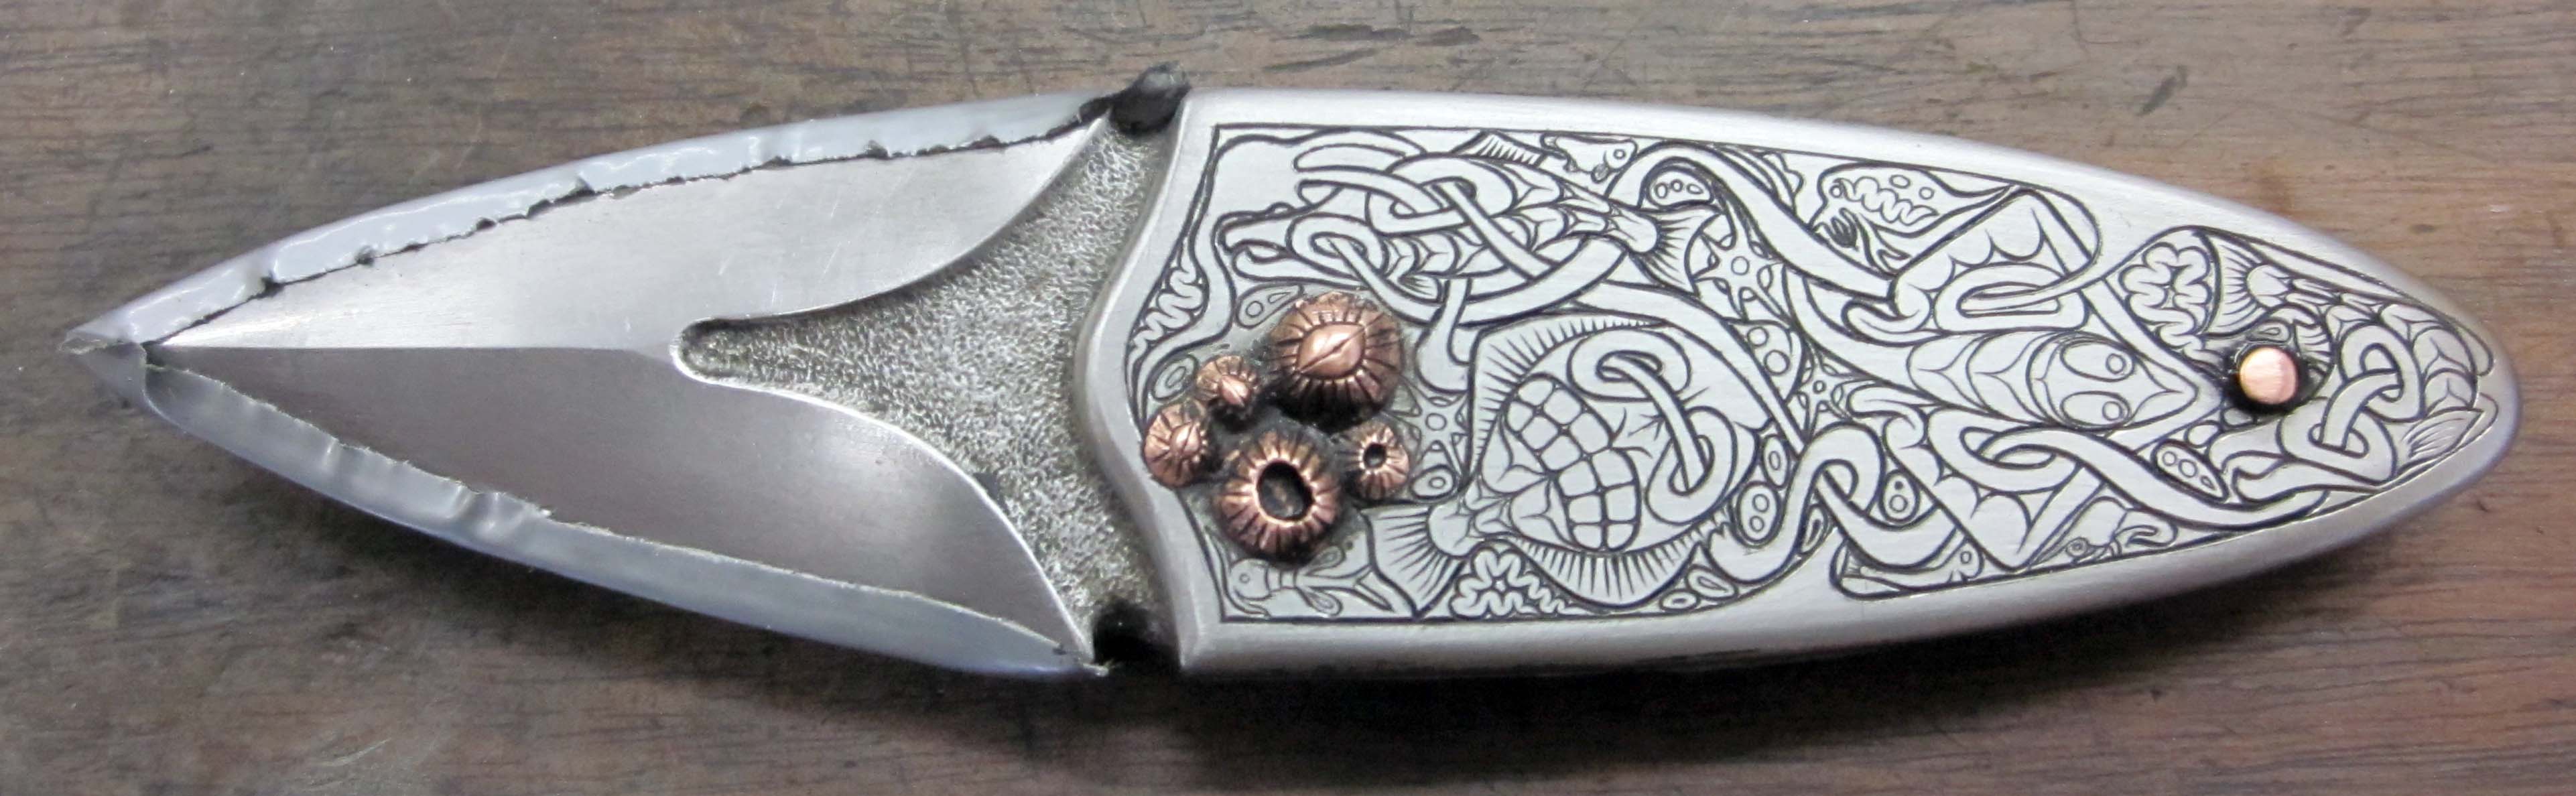
The BladeGallery folks really take excellent photos. Here are the final pictures, courtesy of BladeGallery.com:


More background removal. And I thought the front side background removal was tedious. Look at all of those tiny little nooks and crannies!
 Here the background is removed.
 And everything inked. At long last, this side is finished!

 And, finally, closeups of both sides – next to make a display box, quality control inspection, and the final inking.
Tomorrow, I’ll make a display box and do a bit of quality control, then it will be ready to send across the water to my Internet vendor, BladeGallery.

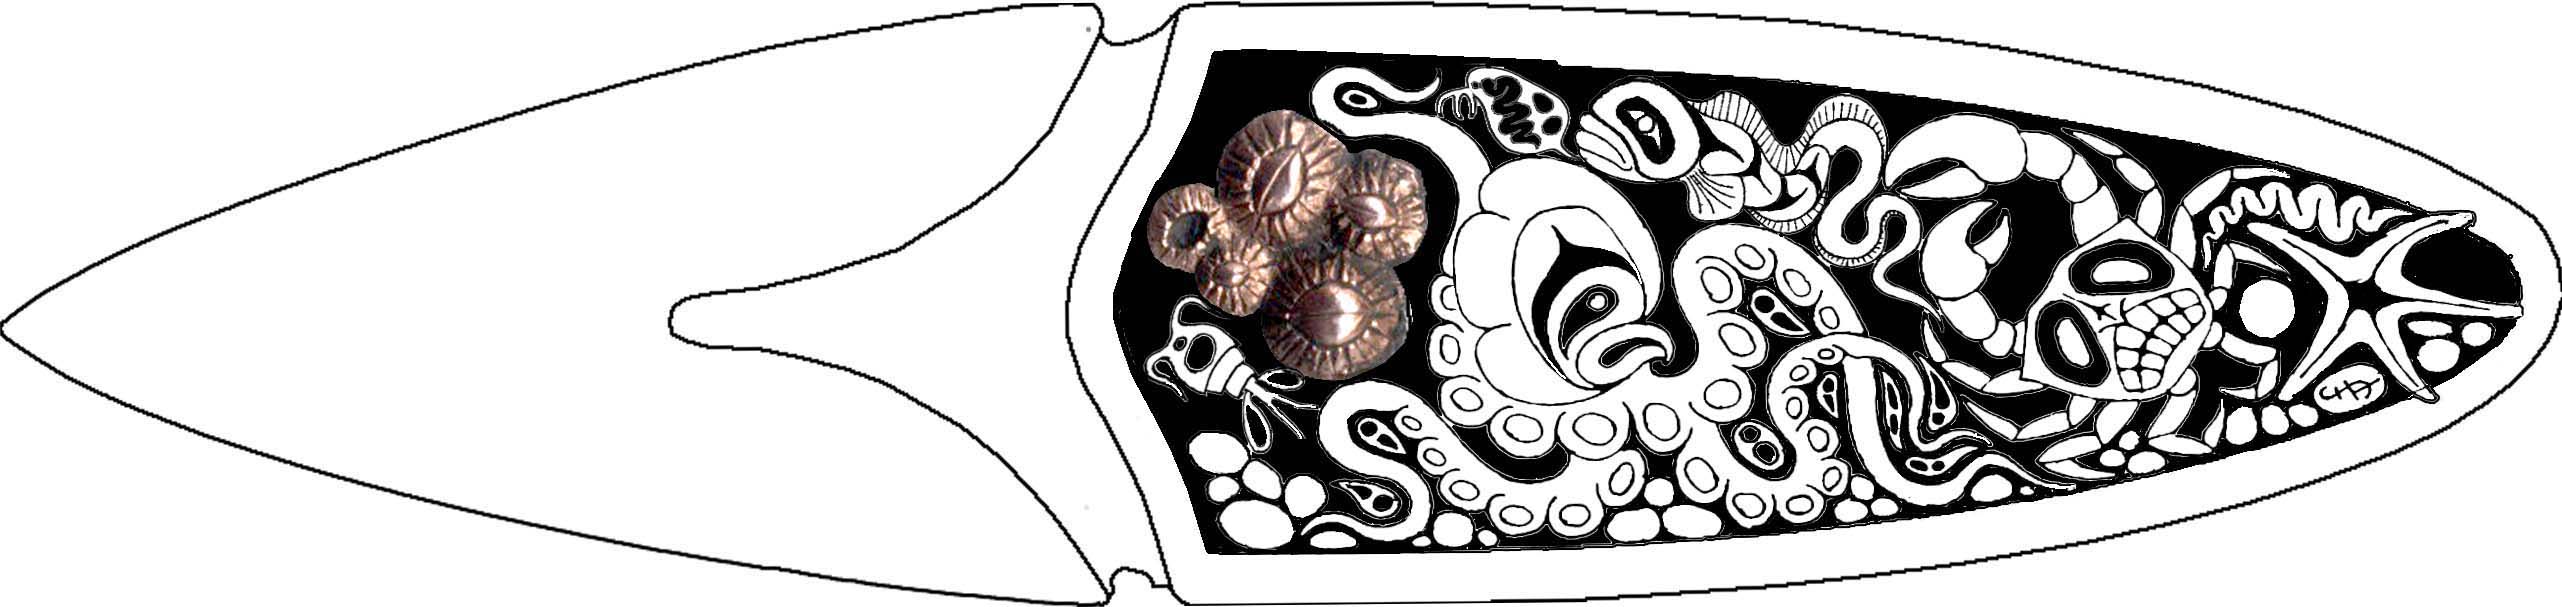
Here’s the design for the other side of the knife, finally. A real pain, it took two days to get this right, drawing and redrawing everything… In case you haven’t noticed, it’s the design aspects of this that are the very hardest to accomplish. Everything else is simply a skill; enough practice and commitment and you can make those happen. But the design part; that requires 1% inspiration, 99% perspiration, and about 10% luck…
 Above, I cut the lines and then added all the little plankton critters in between the major elements, just as I did on the other side.
 And here are the lines inked in.
I spent the day removing the background, a fairly tedious operation, but so worth it. This really makes the whole piece come alive.
I generally use an NSK micromotor grinder (35,000 rpm) and tiny carbide burrs to remove the metal from between the engraved elements, to a depth of about 1/2 millimeter.
 Here, I’ve removed the background. Pretty tedious removing the background around all those tiny little plankton critters.

And, finally, everything re-inked. This side is finished; now I have to make the design for the other side.

I finally finished the design to be engraved on one side of the knife. I’ll be putting in more secondary elements than are shown in this design once these lines are cut – the little doodads will need to shoehorned into the spaces left – easier to do that on the fly than to try and include them in the main plan.
I found a really excellent black and white illustrator on the web, Daniel Mitsui, and I’m really impressed with his work, and especially the detailed backgrounds. I’ve incorporated some of his ideas into the in-between spaces in my design – they seem really appropriate for the design. Thanks for the inspiration, Daniel! Here’s a lnk to Daniel’s web site, hope you enjoy it as much as I did! http://www.danielmitsui.com/

Here I’ve finished the line engraving on the left hand side. This is how the line engraving looks before inking. For those who might be interested, I used a Lindsay Universal graver, with 50 degree face, in my Lindsay Palm Control pneumatic engraver.

Here are the lines inked in with Rustoleum. Next I have to fill in all the empty spaces with all the little plankton doodads.

I’ve added in all the secondary and tertiary elements, and then inked the new additions.