

And, finally, the noggin and button are finished. Here it is as the entire ensemble.
Thanks for looking!
And, finally, the noggin and button are finished. Here it is as the entire ensemble.
Thanks for looking!
I’ve been working this morning to remove the background of the engraved copper disk.

I used my NSK micromotor grinder and several sizes of very small carbide burrs to carve away the background, leaving a pleasing texture behind.

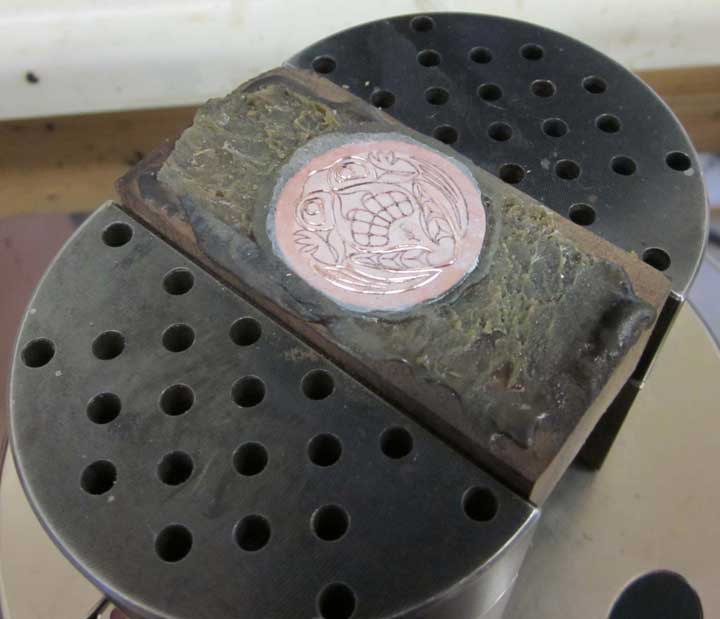
I fastened the antler crown with the epoxied engraving in my engraver’s vise, using the same hardwood block I used during turning in my lathe. You can see the engraving with the background cut away here.

Here’s the bottom of the antler crown after I popped it off of the walnut sacrificial block.

And here I’ve begun carving away the flat part on the bottom, this time using my Foredom and a very large and aggressive carbide burr.

And, here’s the bottom after carving and sanding it smooth, and dyeing it with some brown leather dye to get rid of that garish white color. I want this to look old and a bit the worse for wear when I’m finished.

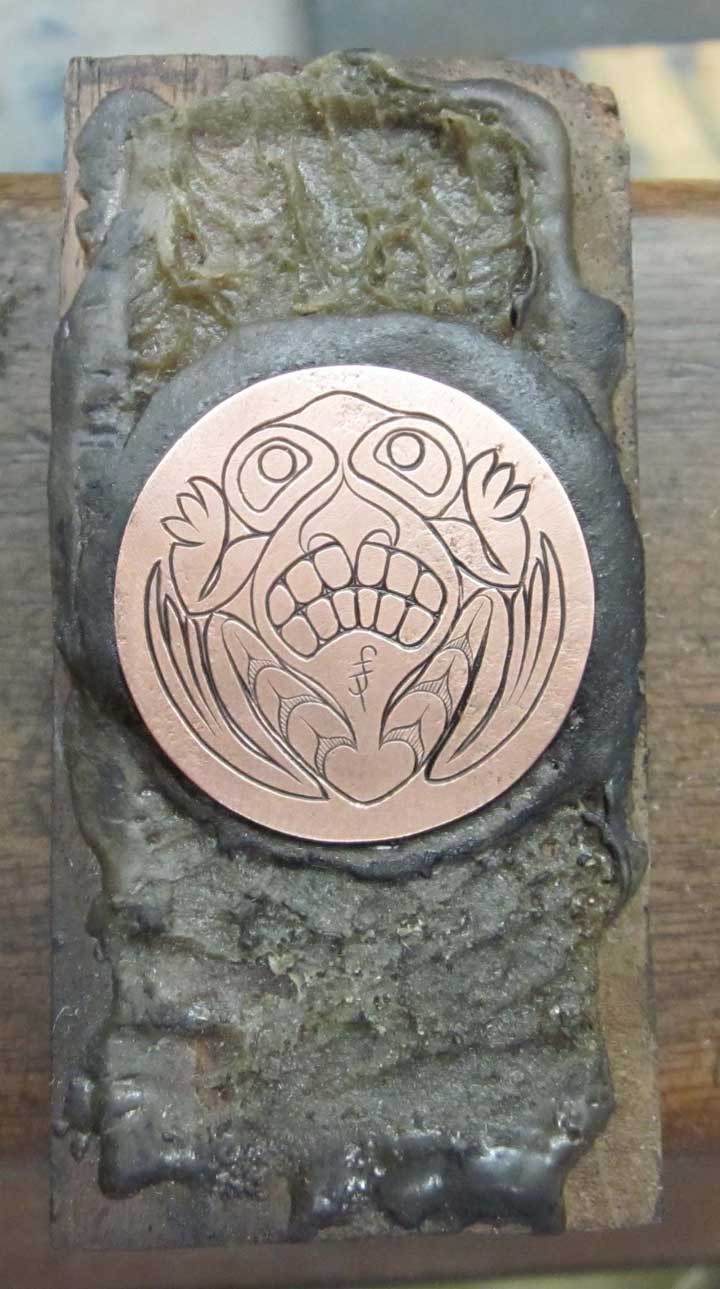
And, finally, the engraved copper frog after inking in the cuts and background areas.

And the back with the carved cord holes. I think we’ll call this done, except for a coat of linseed oil in a couple of days when the ink is fully cured, and of course, stringing the button and the burl noggin together.
When last we saw our hero, he was getting ready to begin engraving.

Above, I’ve stuck the copper disk on a small block of walnut with pitch (Northwest Pitchworks, in Bellingham WA). Here, it is clamped in my engraver’s vise. I also transferred my design – in this case, I covered the surface of the copper with Sharpie brand opaque white marker, and transferred my Northwest Native American-style frog design. I printed the design on my HP laser printer (flipped to be a mirror image), placed the paper with the toner face down on the metal, and then placed a paper towel LIGHTLY dampened with lacquer thinner (could also be acetone) on top of the paper pattern. This dissolves the toner, some of which will transfer onto the metal.

Here you can see some of the lines engraved into the design.

We’ve been snowed in for a couple of days. Snow is something we see pretty seldom here in the Pacific Northwest, and when it happens pretty much everything is paralyzed. This is the view out of my studio as I’m engraving. It’s really pretty, especially since I’m nice and warm and snug…

And here is the disk with all the lines engraved.

And with the lines inked in just to see what it’s going to look like.

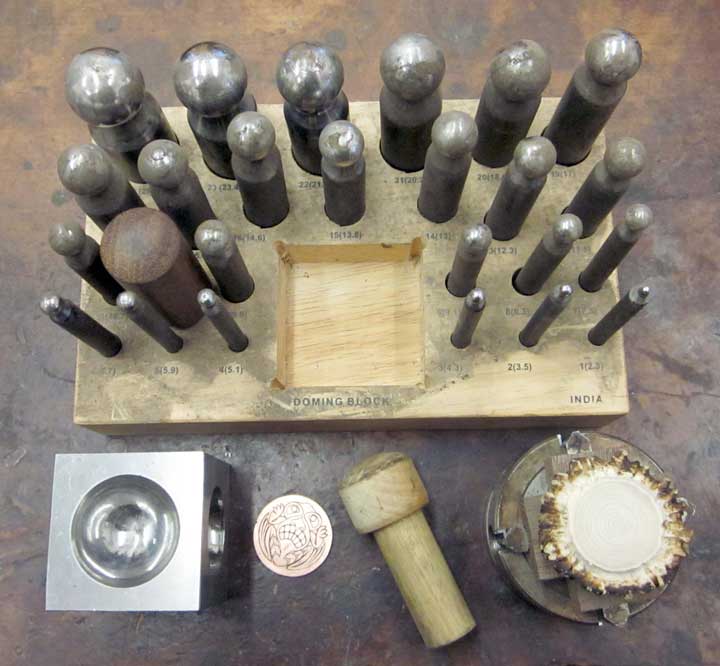
I’m ready to dome the copper, using my dapping block set, above. I’ve engraved the lines on the flat disk before doming because it’s much easier to engrave on a flat surface than a curved one.

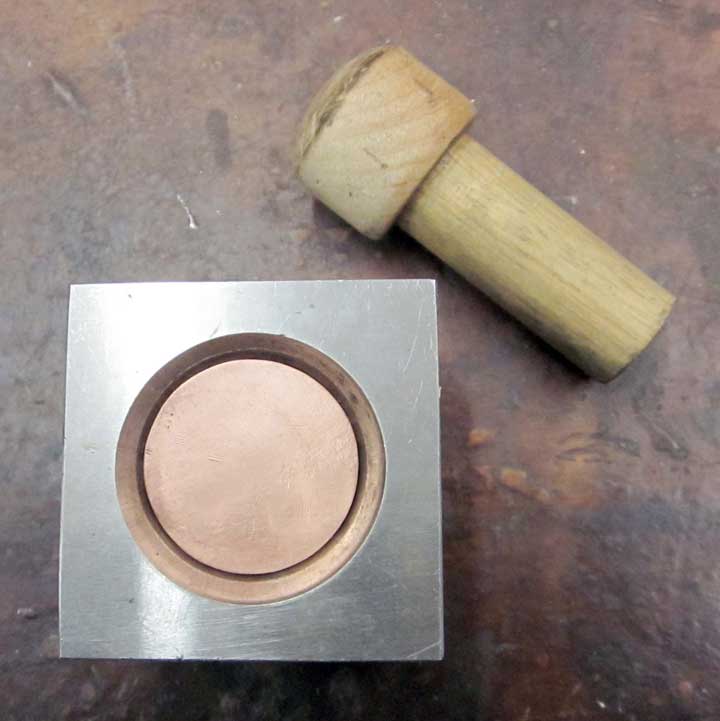
Here is the disk installed in the dappping block. Don’t forget to put the design side DOWN. Don’t ask me how I know this… Since my dapping block is an inexpensive Harbor Freight set and doesn’t have the largest sized of dapping punches, I made one out of hardwood.

And here is the frog all domed up. I punched it several times, starting in the largest hole, and then working my way down to the size I wanted to finish up with.

Here’s the dome on the antler crown – I guessed the size just right. Now I have to return the antler crown to the lathe, and bore a pocket to set the base of the dome into. I also sanded the base of the dome flush and flat with a disk sanding plate.

Here’s the pocket bored into the antler, and a hollow carved beneath to remove some of the weight from the button. Now to epoxy the dome into place.

Here’s my gluing setup. The thing you see sitting on top of the dome is a little jeweler’s soldering trick. It’s just a block of wood, with a thick bent copper wire with tapered tip. By placing a small block of lead on top of this contraption, you can place a weight to hold down a piece of metal to be soldered onto another. This keeps the soldering area clear for heating with a torch but holds everything in place. Works pretty well for gluing as well. I’m finished until this is cured tomorrow.
Well, since I made the fancy Gentleman’s Noggin, I now need a high-end chunky button to go along with it. These chunky buttons were designed to allow someone to hang the noggin from their belt, but still be handy to take it off for use. It struck me that this function is identical to the function of a Japanese netsuke, which I used to carve. (To find out what a netsuke is, follow this link: What is a Netsuke?)

I started with an antler crown (the crinkly part of the antler next to the deer’s head). I cut it off of the naturally shed antler, and sanded both side flat and parallel. Since I plan on engraving a metal plate to attach to this antler crown, I need to be able to cut a nice round depressiion to fit it. I’ll do this with my little Sherline metal (and antler!) cutting lathe. To be able to mount this wild-shaped chunk in the lathe, I glued it to a sacrificial block of hardwood with some thick gap-filling alphacyanoacrylate glue (“superglue”).

Here is the crown glued to the hardwood block, and the centroid of the crown marked in pencil.

And, here is the crown mounted in a 4-jaw chuck in the lathe. I turned the flat part you see here down as close to the crinkly part of the crown as I could. Later, I’ll use the lathe to cut a shallow socket to mount my engraved metal plate.

Leaving the crown in the 4-jaw chuck, I measured and marked an appropriate sized circle on a piece of copper sheet

Here’s the copper round cut out and carefully sanded to size, ready to be engraved.
After making the new crook knife, I needed a good test for it. Scrounging around in my wood stash, I found a small block of big leaf maple burl, which has been seasoning for, oh, about 20 years now. It was hard as the dickens, but the crook knife did an excellent job.


It developed a small crack along the way (that’s the nature of burl wood), so I used some silver wire and made staples to hold it shut (along with glue, of course!). I’ve been including “artificed” repairs in much of my work lately, since I like the look, and probably would have done this even if there hadn’t been a real crack…
I also fell back into my bad old netsuke carving habits and put in an antler liner in the cord holes. This is turning into a very high-end noggin. I guess we’ll call it a “gentleman’s” noggin.
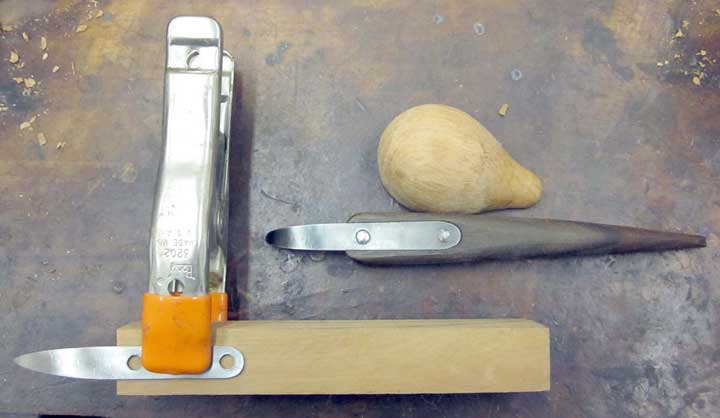
After testing my crook knife, I liked it so well I decided to make another, with less “crook” to it. In the Pacific Northwest, this one is called a “planer” crook knife, since it is used to produce a nice texture on flat or convex curved surfaces (not used so much on the inside of bowls).

Here’s the paper pattern glued onto a sheet of 1075 high carbon steel (the white paper on the lower left corner). This sheet is 1/16 of an inch thick.

Above is the blade blank cut out of the sheet.

With my micromotor grinder and a small carbide burr, I’ve carved two little divots in the center of the blade where I’m going to drill the holes to fasten the blade to the handle. These little divots will help keep the drillbit from wandering and drilling off center.

I’ve drilled 1/8 inch diameter pilot holes. I’m going to “sneak up” on the size holes I want. Hich carbon steel is a problematic material to drill holes in – if I start with too large of a drill bit, I run the risk of work hardening the steel before the bit cuts through. This will locally harden the metal and cause the drilling to stall out, causing the drilling to stop, and damage the drill bit as well. I never have problem with 1/8 inch diameter bits, so I’ll start with that, and drill several times with the next size up until I finally reach the 1/4 inch diameter I want.

Here are the 1/4 inch diameter holes. They’ll fit the screw posts seen above the blade.

Now it’s time to begin shaping the blade. I’ve cleaned up all the sides, and now I’m going to use an angle grinder to put in the initial flats in the business end. I’ve clamped it in my vise horizontally. There’s always an “easy” side of the blade, and a hard side. The top edge of the blade is the “easy” side in this case.

Here the flat ground in the top side.

Now for the “hard” side. I’ve installed the blade in a vertical position in the vise, and I’ll grind in the flat on the right side of the blade – this is the awkward side for me.

Here’s the blade with both flats roughly ground in. This is the top side of the blade, and the blade will curve “up” as it sits here when I’ve finished. I’ll hammer the curve in later.

Now I’m going to use a file to do the fine finishing in shaping the blade. This is my filing setup. I use a woodworking clamp held in my woodworking bench, with a long thin piece of wood underneath to keep the blade from bending during filing.

Here’s a closeup of the business end of my filing rig.

Here I’m draw-filing the left hand side of the blade. Remember when I said there are easy sides and hard sides? In filing, this is what I find to be the “hard” side. The red color is what I call the “Sharpie Trick.” I color the metal with a dark colored (red in this case, it helps hide the blood!) Sharpie permanent felt marker, then file. You can see here the places where the color is left after filing – those areas are still below the surrounding surface, indicating I need to do more filing. I’ll re-apply the Sharpie, file, and repeat several times.

Here I’ve finished preliminary filing with a Nicholson Bastard file. You can see the file marks (I re-colored with the Sharpie, and filed again). This is a medium file, and leaves a fairly coarse finish. I’ll use an almost worn out finer cut file for the final finish.

Here’s the final finish on this side (the worn fine cut file).

I finished up the other side, paying special attention to getting both sides even, and meeting in the center of the blade.

Here’s the back side of the blade, just left flat.

Now to start on the handle, here drawn in side profile. I’ve got a nice piece of Yew wood for this handle.

I cut out the area around the prospective handle. I’ll leave it square and flat like this until I’ve finished drilling the holes to hole the blade in, and cutting the bottom channel the blade will rest in.

Here’s the blade ready to heat treat. Above, I’ve dipped the blade several time into a solution of boric acid and alcohol, burning off the alcohol each time, leaving the boric acid behind. This is an old jeweller’s trick – the boric acid will melt, forming a kind of glass that will help keep the blade from losing carbon when exposed to oxygen when I heat it up to an orange heat. This blade is so thin, and I have to leave the cutting edges so sharp that decarbonization is a real problem if I overheat the blade. I can’t leave the blade a little thicker as I normally do, since once I’ve hammered the blade into a curve, it will be really difficult to do much grinding on it after heat treatment, and it will be way too hard to file.

And here is the blade after hardening it in warm vegetable oil. Here’s the procedure I use for heat treating a blade: I put a railroad spike in the forge and start heating it. When it is at a nice glowing orange, I’ll dump it into a coffee can of vegetable oil (to heat the oil). Remember to keep a fireproof lid on hand just in case things get a little excited – the red hot spike will flame the oil a bit, and there is a possibility of catching the oil on fire if it gets too hot. The lid will smother the flames!
In the meantime, I’ve held the blade in the flame emerging from the propane gas forge, watching it carefully to a low red heat, and then tapping it with a small ball peen hammer on the horn of my anvil to put in the amount of curve I want. This will take just a few light taps. Then, I’ll “normalize” the blade at least once to refine the grain in the steel. Normalizing is heating the blade up to “critical” temperature, in this case a low orange color (and non-magnetic – the point where the hot part of the blade will not stick to a magnet), then allowing it to cool slowly down to black heat in still air. If I’ve done a fair amount of forging, on a blade, then I’ll repeat this process at least three times. Once is probably fine here, since I’ve not really done any forging on it with the hammer.
After normalizing, I’ll heat it back up to the dull orange color (and non-magnetic) critical temperature, then QUICKLY quench it in the warm vegetable oil. This will make the blade as hard as glass. I check that with a file (it should skate off the metal, not cutting into it at all). This is WAY too hard to use as a knife, since it is also as brittle as glass. the blade can shatter if I bump it hard, drop it to the concrete floor, and sometimes just for spite sitting around. To fix that, I IMMEDIATELY popped it into an oven at 425 degrees F for several hours to “temper” the blade. Tempering will draw back some of the hardness, and reduce the brittleness of the blade. I adjust the temperature of the tempering cycle, depending on the use I intend for the blade – for instance, on the first crook knife, I tempered it at 450 degrees F, since I wanted it less hard, but more “springy” considering it has much more “crook.”


Above is the completed blade, cleaned up after the hardening and tempering cycles.

I’ve clamped the blade into position for marking on the bottom of the handle. I traced around the blade, and will be removing wood for a channel to set the blade in.

And here’s the handle marked, and ready to cut.


OK, I’m cheating again with my Sherline mini milling machine. I could have done the same thing with knife and small chisel. I just don’t believe in suffering just to build character, especially when I have a milling machine just sitting there, all lonely and unloved…


Above, I’ve used a knife to trim everything up for a nice close fit, and set the blade into position, ready for drilling.

Using a 1/4 inch diameter drill bit, I used the blade as a drilling jig. This keeps everything lined up, guaranteeing a good fit.

Another little trick I use is to insert the screw post into the first hole as a locating pin, making certain the second hole will be drilled accurately.

I left the handle nice and square up until this time to make milling and drilling easier. Now, I’ve cut the top profile of the handle with a bandsaw. It’s important to think the order of these operations through, or you will work yourself into a corner…

Next, I cut the two sides off. Still easy to do, because the bottom of the handle is stille nice and flat.

Lastly, I cut the bottom of the handle to shape. This is the trickiest cut, since there isn’t a flat spot, and there is risk of the handle twisting during cutting, and the cut isn’t square to the handle…but, here it doesn’t really matter if the cut isn’t really accurate, I’ll just adjust during the final shaping of the handle.

I installed the blade and the screw posts. Notice the front screw post is too long, and will have to be trimmed below the surface of the wood. I did discover something I hadn’t anticipated – the threads in the screw post don’t go very deep, so when I trimmed the screw post shorter, the top screw bottomed out before it should have, so I had to trim the screw shorter as well. I’ll avoid this problem next time by buying a shorter screw post to start with.


Above, I’ve test assembled the blade and screw posts. Everything fits just fine…

I used a little cold gun blue to darken the blade, this will help with rust prevention, and I like the color better.

Above, I clamped the handle in various positions in my filing rig, minus the stiffening board, for shaping. I did it all with a couple of small spokeshaves.

Here’s the handle shaped and ready to put together, along with the two little spokeshaves. These inexpensive spokeshaves are some of my favorite tools. They are available from LeeValley.com.


And, finally, there are both of the crook knives, finished with some Watco oil finish (mostly linseed oil). I still need to sharpen the new one, then I’ll see how it works.


Wanting to play around with forging some bronze, I researched how to make it on the Web. I decided (mistakenly, as it turns out) to make a high-tin alloy called “bell metal.” This is 20% tin and 80% copper, and was used to make bells (hence the name!). Regular bronze is more like 8% tin, and supposedly cold-forges well.
Well, melting the metal and casting the ingot went just fine. But, it turns out bell metal is really hard, and doesn’t forge. So, forging was out, stock removal was in…on to Plan B.
Rather than let this pretty metal go to waste, I decided to make one of my “knapped” blades.

Here’s the finished blade, ground with a sanding drum in my Foredom flex shaft grinder, and patinated.

Since the blade went well, I played with it for several weeks wondering what to do with it, and decided it needed a snakewood handle. Snakewood is a VERY expensive wood from Central America. Despite its wild grain look, it is actually very straight grained and splits easily, so is a challenge to work. Above is the finished handle, with rawhide wrap and fossil ivory signature reserve.

And, the other side. The whole knife is slightly over 5 inches long.
This knife will be available at BladeGallery.com in the near future.
Click here to see Tom’s available knives page at BladeGallery

Disassembled and ready to engrave the top copper plate.


Here are the lines engraved in the top copper plate.


The background removed, and a quick inking to see how it will look.


Added the fine shading lines, then inked; ready to assemble.

Gluing the USB drive electronics into the body. I used seven shims I cut from 3×5 card to level everything out. The top several shims are shorter to fit around the 16 gigabyte memory chip.

Gluing the memory card in with epoxy.


Made a little storage box for it out of walnut.


A lot of work. The whole flash drive thing is less than 3 inches long.

I turned a keypad from mild steel on the lathe, and soldered it in place with paste solder.

Used Birchwood Casey Super Blue (cold gun blue) to darken the brass and steel of the telegraph key. I also soldered the piano wire steel pivot pin as well.

Above, the telegraph key after polishing away some of the blackening.

And, here everything in place. Next, I’ll engrave the top copper plate.