Ants Miseretto part 1

Well, now that I have several sheets of shibuichi in hand, I turned my attention to making a knife.  First (and this is always the most difficult part!) I had to decide on a design.  The subject I chose was ants, so I’m going to inlay tiny ants in 24 karat gold in the shibuichi scales.  Lots more to decide later, but this gives me a target to shoot at, so I had to come up with an appropriate looking knife to go along with what will (hopefully) result in an elegant presentation.


So, I struggled with the above type designs for several days, but nothing was really grabbing my imagination.  Starting to panic – I needed to get something going, but nothing was really working for me.


Then, the idea. I’ve always liked the long, graceful Italian stiletto design, and have made several thin medieval-style misericordia in the past (see the image above).  I haven’t done one of these lately, and they proved to be popular, so, bingo!, an idea that would probably go well with the ants theme.

Misericordia were medieval stabbing weapons, supposedly intended to provide “mercy” (misericordia is “pity” or “mercy” in Latin) to seriously wounded foes on the battlefield. Typical blades are diamond or triangular in cross section, without sharpened edges. Not intended for cutting, they could slip in between the cracks of armor.  I’m a little skeptical about the “mercy” part, but I wasn’t there back in the “bad ole days,” so what do I really know about it?  Since this knife is intended to be small and elegant, maybe I’ll call this one a “miseretto.”  Yeah, that’s it…we’ll call it a miseretto.


Of course, it was just an idea.  Not quite ready for prime time, so it was back to the drawing board (literally!).  I sketched around for a while and came up with a basic design, then scaled it so I could get both handle scales out of a single sheet of the shibuichi, then played around with scaling the blade and the handle for a pleasing aspect.  A few of the attempts above.  The one I decided on (with my wife’s “guidance”) is the design on the right.


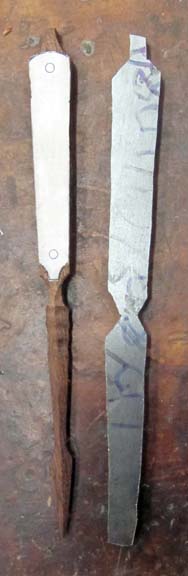
But, still a little uncertain, I decided on a wooden macquette to help with the decision process.  The wooden blank cutout is on the left, and the design rubber cemented onto a piece of 1080 carbon steel on the right.


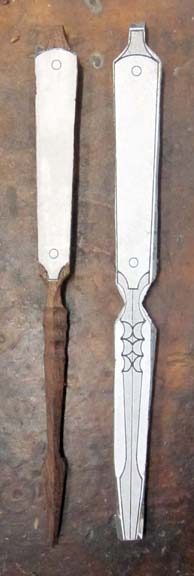
Above is the wooden mockup carved from a piece of walnut the same thickness as my carbon steel, and the wooden blade shaped with a knife.


And here, above, with the decorative “scoops” added with a sanding drum.  Looking pretty good, so on to the steel.


The steel blank cut out, next to the wooden mockup.


And, the other side.  Next, I’ll have to shape the blade.  I think I’ll upset the blade from the sides to add a little thickness, and maybe forge the basic taper into the blade, then start with the angle grinder, followed by files.  I’m feeling better, now that I’m finally rolling again…

Posted in Engraved Knife, Misericordia | Tagged , , , , | Leave a comment

Making Shibuichi part 2

I spent today rolling out my three shibuichi ingots into useable sheet.


Here’s a picture of my Durston rolling mill.


Above, I’m pickling the cast ingots in Sparex pickle. “Pickling” dissolves the dark oxides formed when the molten metal hits oxygen in the atmosphere. I use a small crockpot to keep the liquid hot, so it works faster. Three to four minutes per pickling cycle ought to do it.


Here’s the small 20% shibuichi ingot after pickling, and a quick brushing of the surface. Sorry for the lousy focus…my bad.

Here is the ingot after the first round of rolling, and after I annealed it. Annealing is heating the shibuichi to glowing red – this softens the hardened metal. Shibuichi “work hardens” quite easily when being rolled (gets hard and brittle), and if I don’t anneal it pretty often, it will crack and ruin all my hard work. I’ll pickle the ingot again, followed by brushing to remove the dark oxides.


Here’s the ingot emerging from the rolling mill. Notice how nice and smooth the rough cast surface is now.


And above, the ingot has had several rounds of rolling, annealing,and pickling. Notice the crack developing at the top. Hopefully this crack won’t get too much worse as I continue rolling, lengthening and thinning the shibuichi. I’ll just have to take the crack into consideration when designing. I can probably get two to three small pendants from this piece.


And here is the finished 20% shibuichi sheet. Note the arrow to remind myself of the crack…


Above, here is a magically computer-edited series of one of the other ingots. The red rectangle is a tracing of the original ingot, and each of the others is after a round of rolling, annealing,and pickling. Notice how each time lengthens the shibuichi sheet (thinning the sheet as it goes). Since the rolling mill tends to bend the sheet as it exits, I also forge the sheet flat on my anvil after most of the rounds of rolling. That explains the textured surface you can see on the three sheets on the right.


I noticed something interesting happening with the shibuichi I haven’t noticed before. The sheet on the right is how shibuichi appears after freshly brushing the surface. The sheet on the left is noticeably silver colored after pickling – I think this is “depletion gilding”. Depletion gilding is a jewelry technique where you can build up a pure silver surface in a silver alloy containing copper, by repeatedly burning the copper at the surface into an oxide layer, then pickling, which dissolves away the copper oxides, but leaves the silver. Just a cool thing I’ve never seen before, probably because I didn’t know enough to notice it!


And, here are all three shibuichi sheets, completed and ready to use.

Posted in Engraved Knife | Tagged , , , | 5 Comments

Making Shibuichi part 1

Since I’ve spent the last week working on my web site format change, my wife is making me get serious about starting a new knife, so I have to make some shibuichi ingots for the knife handle scales. Shibuichi is an ancient Japanese precious bronze art alloy, typically made of 75% copper and 25% silver. It comes out as kind of a hard pinky bronze, which will patinate to a dark grayish color. Although it is a somewhat expensive alloy, it engraves and carves really nicely. I probably used an ounce of silver in the ingots I made today (about $35 worth).


Here I’m weighing out the copper scraps for a single ingot on my little electronic scale. Once I have the amount of copper I want, I’ll figure out how much silver I need to add (in the white lid at the bottom of the photo).


Above is the equipment I’m using to create the shibuichi alloy, melt it and cast it into a small, thin ingot. From the left is my oxy/acetylene torch, here just burning acetylene (no oxygen) – very smoky, and used like this to put a layer of soot on my ingot mold, the little black assembly at the top of the image. The soot will keep the shibuichi from soldering itself to the mold. Also in the picture is a small melting crucible, a container of borax flux for cleaning the scuzz off the melted metal, and the flint striker to light the torch.


Here you can see the crucible and assembled ingot mold. In this melt I’m going to use up a little extra bit of shibuichi and some scrap. Since shibuichi is so expensive, I collect all my scrap for re-use. This ingot I’ll probably use for a couple of small pendants. I cast my own shibuichi because it’s the only way I can get the thicknesses I need for knife scales, and commercially available thin sheet shibuichi costs about $30 per square inch. This much commercial shibuichi in 16 guage thickness would probably cost about $100.


Above, I’ve cast the ingot and opened the ingot mold. The shibuichi is the copper colored rectangle in the sooty mold at the top.


And here are the three ingots I cast today, two 25% silver shibuichi ingots, and one about 20% from the scraps I had on hand, since some of the scraps were 15% shibuichi and I estimated…

I’ll eventually put the ingots I cast today through a rolling mill to lengthen them and make them the proper thickness for my knife scales.

Posted in Engraved Knife | Tagged , , , | 4 Comments

Cherry Blossom and Dragonfly Tsuba Pendant part 6

Finally finishing this one up.


Above, have cut the ribs in the dragonfly wings, and begun the texture on the wings.


Above, the wings are finished.


Above, everything finished, and patina applied.


Above, finished with the carving, patina applied, and inked. Only have to affix the chain, and it’s ready to go!


Here are the final images of the Cherry Blossom and Dragonfly Tsuba Pendant, complete with chain and jump ring. The last image shows it in my hand for a sense of scale.

Soon available for purchase at BladeGallery.com 

Posted in Carving | Tagged , , , , , | 4 Comments

Cherry Blossom and Dragonfly Tsuba Pendant part 5


More cherry flowers, at 4 o’clock.


Above, with a quick patina.


And here, starting to round out the dragonfly parts, just rough carved so far with carbide burrs.


OK, above is the dragonfly body carved.  Now to work on the wings – I have to decide how to make the wings look right.


Above is a test I did in copper – the wing on the lower left is one method, and the others are different. I mulled it over while vegetating in front of the TV last night. I think I’ve decided on a hybrid between the two.

Posted in Carving | Tagged , , , , , | Leave a comment

Cherry Blossom and Dragonfly Tsuba Pendant part 4


Above, I’ve used a punch to smooth the flower and adjust the texture of the big branch at left.


Here above, I’ve been working more on the flowers and branches, carving out the cavities in the flowers with a tiny carbide ball burr.


Here, I used a blunt, rounded punch to further refine the sculpting of the bottom flowers and leaves.


And above, here’s the finished flowers with a quick patina.  Will this never end?

Posted in Carving | Tagged , , , , , | Leave a comment

Cherry Blossom and Dragonfly Tsuba Pendant part 3

Above, removing more out of the center area, and texturing it as I cut it away.


Here, starting to round the branches (at 9 o’clock on the pendant), and relieving the rear wings of the dragonfly.


Continuing on with the branches, and carving on the flower at 8 o’clock.


Above, carving on the branch at left, and sculpting the first flower. Also carving on the dragonfly tail and the nearby small cherry branch.


Here it is with a quick patina on the metal.

Posted in Carving | Tagged , , , , , , , | 1 Comment

Cherry Blossom and Dragonfly Tsuba Pendant part 2


Here’s the pendant with most of the areas sawed out with a jeweler’s saw and tiny, tiny blade.

After a lot of filing to begin smoothing the saw cuts (thanks to my lousy sawing skills), I began cutting away the center section.


In this image I’ve engraved a lot of parallel lines in order to lower this surface down.


And here I’ve begun cutting down to the bottom of those trenches with a flat graver.


Above, I’ve begun to smooth out the center area.


Here, I’ve textured the center area, with a small, blunt steel punch.  Mounted on a sword, this area would be hidden by ovals of another metal, often copper,  but I feel like I have to do something different, since there won’t be any of these ovals on this pendant.


And here it is with a quick and dirty patina, to start evaluating how this will appear when finished.  Since shibuichi is a copper based alloy, it will eventually darken, so hopefully this is somelthing like it will eventually look.  I think it’s looking good so far…But, lots more to go on this!

Posted in Carving | Tagged , , , , , , , | Leave a comment

Cherry Blossom and Dragonfly Tsuba Pendant part 1


Here’s my next project attempt! It’s a tsuba (Japanese sword guard) pendant with cherry branches, cherry blossoms and a dragonfly. The first image is a Photoshopped version of two antique tsuba, and the second image is my pattern I drew from that.

I cast a small shibuichi ingot (precious Japanese art bronze, 25% silver, 75%copper) and forged it out into a plate, then soldered a .999 Fine silver backing on it so the copper alloy won’t be against the new owner’s skin.


The image above is of the silver back of the raw pendant after cutting it out of the (sort of!) square sheet, and ready to begin engraving and carving. Wish me luck – this is a first for me……


Above are the outlines cut (engraved) into the shibuichi.


This image has the lines darkened, for better visibility.

Next, I have to use a tiny jeweler’s saw to cut out all of the negative spaces. That will probably take all of tomorrow.

Posted in Carving | Tagged , , , , , , , | 2 Comments

Engraved Spyderco Cricket “Surprise” Knife

I started a new engraved knife – Mary Alice won’t let the wicked rest… This one is a Spyderco Cricket knife with a skulls and ribbons design.  These little Spyderco stainless steel knives are a dream to engrave, and are very well made, with nice smooth actions.


Above is the pattern I’ve adapted to this shape of knife.


Above, I’ve transferred the design to the knife, ready to start cutting the outlines.


Above, I’ve been cutting the lines. This picture shows the knife in my engraver’s vise.


Another view of the same.


Above, busy carving out the background after the lines were cut.


Here the background is finished.


And, finally, inked in. Next I’ll have to shade it to make it look like it’s 3D.


Above, working on shading all of the over and unders and the details on the skulls.


And here it’s inked and finished!  Excellent photo courtesy of BladeGallery.com

This knife is currently available for purchase at BladeGallery.com.


Posted in Engraved Knife | Tagged , , | Leave a comment