Centipede Tactical Lanyard Bead (and Others…)

Spent the last two days making titanium blanks for a pair of earrings and a couple tactical beads.

Centipede_Tactical_Lanyard_Bead_0It’s a lot easier if someone else makes the knife or jewelry blanks, but no joy here…

Centipede_Tactical_Lanyard_Bead_1 
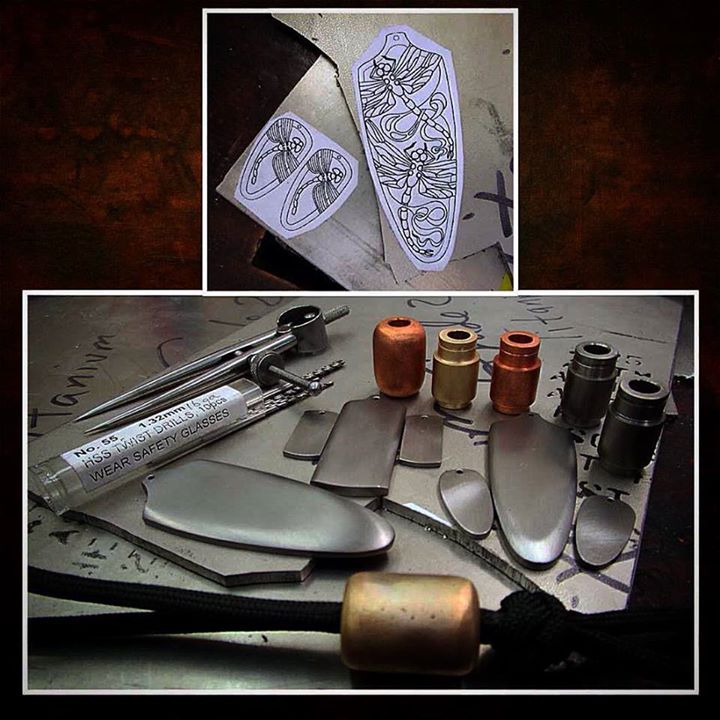
Starting a new project – a tactical bead in titanium. I blatantly stole the bead shape from sergeknives.com and I’m carving a wraparound centipede with 24 karat gold legs.

Centipede_Tactical_Lanyard_Bead_2 After yesterday’s shameless commercial (I offer no apology!)

, we’ll continue with the centipede tactical bead…putting in all the gold inlays (28 of them), and reminding myself why I need to steer clear of this terrible titanium 6Al4V. Remind me next time I get this crazy idea…but, I have ordered some Grade 2 Ti, so not to worry!

I’ve removed all the background – next will be punch sculpting the body, followed by stippling the background, and we’ll be done!

Here’s a short video of the Centipede Bead:  Sorry, you’ll have to click the link to make it play…Centipede_Tactical_Lanyard_Bead_2
Finished, except for a little cleanup (tomorrow!). Hand engraved and carved titanium centipede, with 28 pure gold inlays, 7/8 of an inch tall.

Centipede_Tactical_Lanyard_Bead_3 OK

buy levitra cheap

, I had a cute idea (even if I do say so myself) to turn a tactical lanyard bead into a pendant…a simple turned hanger (this one is copper) and a couple of jump rings, and voila! It’s nondestructive, so if you want it to be a lanyard bead again, just remove the jump ring and it all comes apart…

Centipede_Tactical_Lanyard_Bead_4 
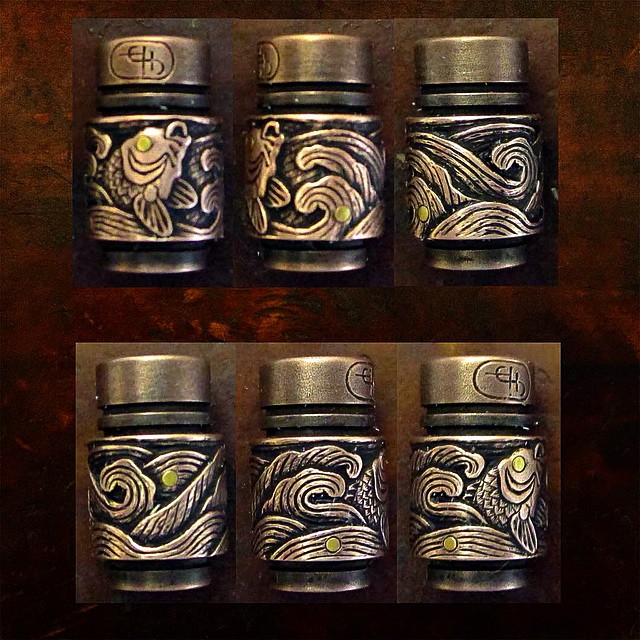
Spent the last two days turning six lanyard beads for tactical knives in Grade 2 titanium, copper and bronze. Here you can see the various stages of manufacture, including drilling the titanium. The titanium drilling took longer than the rest of the operations combined! I’ll be engraving these over the next several months.

Centipede_Tactical_Lanyard_Bead_5 After engraving the centipede tactical lanyard bead in this $@:*+{: terrible 6Al4V titanium, I wimped out and just “knapped” the second one, did a little minor engraving and stippling between the flutes, and heat treated it to a nice dark gold color.

Centipede_Tactical_Lanyard_Bead_6 Making a copper pendant “dangler” at a client’s request for the faceted tactical lanyard bead. This one is designed for a ball chain.

Centipede_Tactical_Lanyard_Bead_7I’ve spent most of the last week working to create enough blank canvases to carry me through the next several months. Not my favorite part of the action, but eventually I run out of them so it’s back to the grind…literally!

Thanks for Looking!

Tom Sterling

http://www.facebook.com/TomSterlingHandEngraving#
http://instagram.com/tom_sterling_hand_engraving


Posted in Carving, Jewelry, Pendant, Tactical Lanyard Bead | Tagged , , , , , | Leave a comment

Gold and Titanium Dragonfly Earrings

Deb_Dragonfly_Earrings_Posting_1
I started on a pair of titanium earrings for a friend. These will have 24 karat gold inlaid dragonfly bodies, and are about 0.75 inches square.

Deb_Dragonfly_Earrings_Posting_2
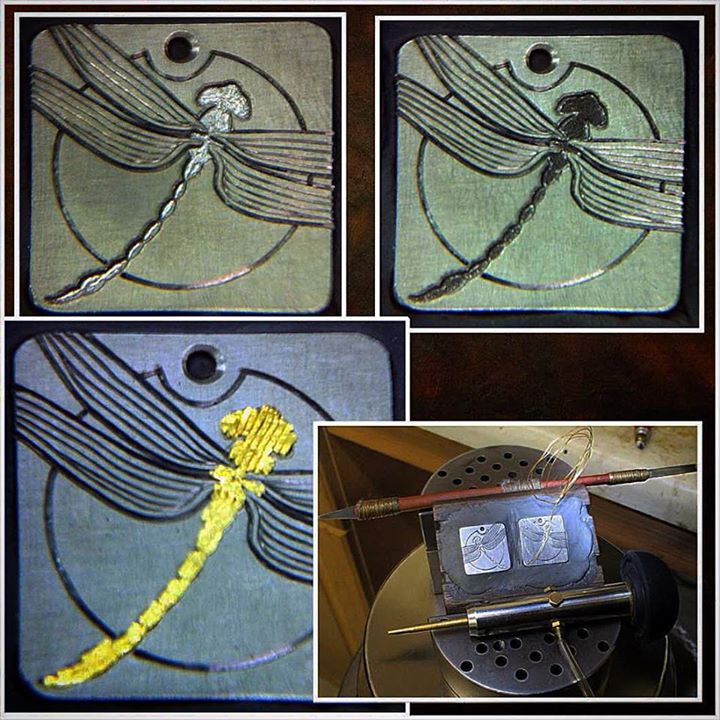
The first few steps to inlay the gold wire in the dragonfly earrings. You can see the first gold wire tacked in place down the length of the dragonfly (lower right image) along with the double ended knife I use to trim the wire.

Deb_Dragonfly_Earrings_Posting_3 Scraping the excess gold using the small scraper (bottom images) followed by the carbide burnisher (upper right).

Deb_Dragonfly_Earrings_Posting_4 Stoning the gold with a Gesswein EDM stone (600 grit) to smooth the surface. I leave the gold at 600 grit because I like the look of the raw gold.

Deb_Dragonfly_Earrings_Posting_5
These earrings provided a nice way to show my process of background removal that will eventually make the design pop.

Deb_Dragonfly_Earrings_Posting_6Finished! Here I’ve added in all the body and wing details

kupbezrecepty.com

, and done the final inking in the lower image. Thanks for looking and all your great support!

Thanks for Looking!

Tom Sterling

http://www.facebook.com/TomSterlingHandEngraving#
http://instagram.com/tom_sterling_hand_engraving

Posted in Jewelry | Tagged , , , , | Leave a comment

Knapped Chalcedony Stone Dagger and Tulipwood Presentation Box

Tulipwood_Presentation_Box_Posting_1Some of you will remember the recent upper left image – my daughter laid claim to the chalcedony stone blade at the red arrow tip, and demanded a knife like the one laying on top (it’s not her birthday or Xmas). So, I carved a moose antler handle, and antiqued it. Then I used an ancient Native American fixative (called e-pox-y) to permanently affix the blade. Then my better half insisted I make a tulipwood presentation box for the stone knife. Keeping my girls happy… I’ll show the box making tomorrow…

You can find more information about making this style of presentation box in the Resources Section at this link:  http://sterlingsculptures.com/wp/?page_id=882

Tulipwood_Presentation_Box_Posting_2
Here’s the start of the presentation box. You need thin wood

buy kamagra 100mg

, I resaw standard lumber (cut in half along the thickness) and then plane thinner. Superglue and spray accelerator speeds things up.

Tulipwood_Presentation_Box_Posting_3
The next steps in assembling the presentation box. I ended up with the pivot block a little too close to the box bottom

, and had to correct by carving a bevel on the box bottom so the lid could fold back far enough…I’m calling that “graceful degradation.”

Tulipwood_Presentation_Box_Posting_4The final steps – trimming everything up and sanding smooth, with a linseed oil finish. I chose to round over the edges of this presentation box in a retro-1980s style that seems to work well with a stone knife.

Thanks for Looking!

Tom Sterling

http://www.facebook.com/TomSterlingHandEngraving#
http://instagram.com/tom_sterling_hand_engraving

Posted in Knapped Knife | Tagged , , , , | Leave a comment

Engraving William Henry Koi and Waves Bolster Knife Scales

William Henry B12 Koi and Waves Knife Work-in-ProgressTutorial
William_Henry_B12_Koi_Waves_110William_Henry_B12_Koi_Waves_109William_Henry_B12_Koi_Waves_111

The images above are of the finished knife, and courtesy of the good folks at http://www.williamhenry.com.

William_Henry_B12_Koi_Waves_Web_1
A new project – a Japanese-style Koi and Waves for the good folks at William Henry Knives. This is a four bolster B12 model, and will have three colors of inlaid gold – 14 karat green and red, and 24 karat yellow gold. Here are several stages of inlaying the green gold foam…

William_Henry_B12_Koi_Waves_Web_2 Beginning the sculpting process. A long way to go yet…

William_Henry_B12_Koi_Waves_Web_3 Sculpting the koi and inlaying 14 karat red gold in some of the fish scales. Red gold is a major pain to inlay and very risky – it work-hardens instantly, so if your first hit goes awry, it’s all over…but the color is so fantastic

antibiotika-online.com

, it’s worth it!

William_Henry_B12_Koi_Waves_Web_4 All the gold inlays are in – 3 colors of gold in 11 inlays…probably one other day to go on this, then 3 more bolsters. No rest for the wicked!

William_Henry_B12_Koi_Waves_Web_5 Finished detailing the koi. All that’s left on this bolster is to detail the green gold foam (three more bolsters though). Just couldn’t push on to the finish today. Whew!

William_Henry_B12_Koi_Waves_Web_6 Finished the front bolster. The small view is (hopefully…) about life size (computer or tablet). 11 inlays, in 3 colors of gold. Next to start on the rear bolster, then another complete side after that!

William_Henry_B12_Koi_Waves_Web_7 There’s been a small delay since the last step.  I have been working on a design for the rear bolster of the Koi and Waves William Henry Knife. In the upper left is a test piece I made – in person, the heron and rising sun is spectacular (yay me!) and the large wave on the left is a total FAIL. Hence the redesign on the actual bolster below. If you wonder why engraving is expensive, here’s a great example. It’s not the cutting, it’s the agonizing hours spent designing, followed by redesign, and redesigning again…and tiny, awkward areas increase the difficulty tenfold…

William_Henry_B12_Koi_Waves_Web_8 The main steps installing green and 24 karat yellow gold inlays in the rear bolster. The yellow is wonderful to work with, not so wonderful the 14 karat green gold…

William_Henry_B12_Koi_Waves_Web_9 Side A of the William Henry Koi and Waves completed. Here’s the lovely cream and blue fossil mammoth scale installed. I’ve got Side B mounted and ready to add the heron to the Side B rear bolster since I’m already trained up on the design. Then on to the front bolster…

William_Henry_B12_Koi_Waves_Web_10 The Side B rear bolster inlays are in – that’s a 600 grit diemaker’s stone in a pencil holder that I use to stone the inlays flush with the steel.

William_Henry_B12_Koi_Waves_Web_11 OK, I’ll be taking a small break to go play at our local annual Knap-In (stone tool making), so I’ve been ordered to get back to work by my better half and finish this bolster before I can go…so, gold inlays are in, stoned and trimmed, and now I’m removing background. You can see the tiny carbide burs I use to carve out the background.

William_Henry_B12_Koi_Waves_Web_12 Well, the big Knap-In is over, so it’s back to the grind… We’re on the home stretch with the last Side B bolster of the William Henry “Koi and Waves.” Note that Side B doesn’t have a blade lock button hole, so that changes the design a little bit. Also, an added difficulty of a lock button clearance pocket on the backside, so I have to be careful over the resulting thin area not to cut through! Tomorrow, the green gold foam inlays…

William_Henry_B12_Koi_Waves_Web_13 Finished the green gold foam inlays – top left then clockwise: pocket excavated and undercut, bottom stippled, 3 green gold wires installed, more wires, all wires installed, gold heavily punched into the pocket, stoned flat.

William_Henry_B12_Koi_Waves_Web_14 Sculpting the waves and koi. Top left is the flat koi, bottom left is fully sculpted to round. Tomorrow, the remaining 6 gold inlays go in. Two of them are red gold – awful stuff to inlay!

William_Henry_B12_Koi_Waves_Web_15The Fates have been conspiring to keep me away from this.  The electricity is finally back on after three days and 2 and 1/2 nights of storm outage…tired of the dark, missing my studio (not enough light), and looking forward to a hot shower as soon as the water is hot…

Between Knap-Ins, our 3 day power outage and attending the West Coast Engraver’s Confabulation last weekend, I’m really behind the power curve on this one… Here I’m adding in 24 karat gold wire inlay in the koi’s left pectoral fin.

William_Henry_B12_Koi_Waves_Web_16 All the gold inlays are in place, now I just need to trim around the inlays, a little carving cleanup, and add in wave force lines. A day and a half and this one will be ready to ship!

William_Henry_B12_Koi_Waves_Web_17 All the gold inlays are installed and the distance waves are completed. All that’s left is detailing the gold and inking!

William_Henry_B12_Koi_Waves_Web_18Finished, with a couple of in-work views! They’re off to the good folks at William Henry Knives tomorrow.

William_Henry_B12_Koi_Waves_110William_Henry_B12_Koi_Waves_109William_Henry_B12_Koi_Waves_111
The images above are of the finished knife, and courtesy of the good folks at http://www.williamhenry.com.

Thanks for Looking!

Tom Sterling

http://www.facebook.com/TomSterlingHandEngraving#
http://instagram.com/tom_sterling_hand_engraving


Posted in Carving, Engraved Knife, William Henry knife | Tagged , , , , | Leave a comment

Hummingbird Skull with Silver Helmet Pendant

Silver_Helmet_Hummingbird_Skull_1
Starting a new press-formed hummingbird skull

buy-kamagra-oral-jellies.com

, this time with a twist. Here are several pressings, and carefully forging away the wrinkles in the copper sheet caused by the pressing.

Silver_Helmet_Hummingbird_Skull_2
Here’s the beginning of the twist – I’m upcycling a failed silver pressing (it cracked!) to become a helmet. Trimming it from the sheet and pressing it on top of the copper bird makes a very tight fit, then silver soldered permanently in place. The remaining little helmet crack over the beak will become one of my (in)famous repairs…

Silver_Helmet_Hummingbird_Skull_3 Imbedding the skull in pitch to chase and sharpen details, followed by rough carving the eye holes.

Silver_Helmet_Hummingbird_Skull_4
Freeing the skull from the copper sheet and beginning to prepare the titanium backplate…

Silver_Helmet_Hummingbird_Skull_5
Adding copper staples to repair the helmet axe damage (over the beak) and making tiny copper rivets with a miniature blacksmith’s nail header. Did I mention this is an inch and a half long?

Silver_Helmet_Hummingbird_Skull_6
Finished the skull and helmet, and starting engraving the skeletal wings and feathers. Another day or so to go…

Silver_Helmet_Hummingbird_Skull_7
Sculpting the titanium skeletal wings in Japanese-style shishiaibori (below the surface in-the-round) and detailing the feathers. One side finished

, one to go…

Silver_Helmet_Hummingbird_Skull_8
Finished! That ended up being a lot of engraving…feathers eat up a lot of time! Shown with a 20 inch leather cord.

Thanks for Looking!

Tom Sterling

http://www.facebook.com/TomSterlingHandEngraving#
http://instagram.com/tom_sterling_hand_engraving
http://sterlingsculptures.com/wp/

Posted in Carving, Jewelry, Pendant, Press Forming, Steampunk | Tagged , , , , , , , | Leave a comment

Steampunk Anglerfish Dogtag – Available for Purchase Now!

Steampunk_Anglerfish_Dogtag_Standard_1 Steampunk_Anglerfish_Dogtag_Gold_1Titanium Dogtag with deep laser engraved Clockwork Steampunk Anglerfish now on the Available for Purchase page. Without gold is $125. With gold is $195.

Thanks for Looking!

2pharmaceuticals.com

Posted in Uncategorized | Leave a comment

Experimental Banknote Scroll and Sculpted Centipede

William_Henry_Scroll_Centipede_1
I’ve been working to learn “scrolls” lately – here’s a practice for a William Henry knife. In the second image

, I’m beginning to excavate for the spots where gold will be inlaid.

William_Henry_Scroll_Centipede_2
Since this will be a hybrid between my usual sculpting and standard scroll technique, I’m not certain how this will turn out – hence, the practicing…

William_Henry_Scroll_Centipede_3
Sculpting the hidden centipede, and inlaying gold in the legs and antennae.

William_Henry_Scroll_Centipede_4
Laying in lots more gold. I hope this ends up working… The cutting isn’t the difficulty, it’s the scroll designing that is kicking my butt!

William_Henry_Scroll_Centipede_5
Finished up the three steps of background removal today, first with a graver, 2nd with carbide bur, and third by stippling the background. Tomorrow, shading….

William_Henry_Scroll_Centipede_6
The scroll experiment is finished! Not too bad

buy kamagra 100mg

, although I’m not completely pleased with the design. But, it appears I can mix sculpted bugs with banknote engraving and get away with it!

Thanks for looking!

Tom Sterling

http://www.facebook.com/TomSterlingHandEngraving#
http://instagram.com/tom_sterling_hand_engraving
http://sterlingsculptures.com/wp/

Posted in Carving, Engraved Knife | Tagged , , , | Leave a comment

Engraving a Serge Panchenko Gen3 Dogtag Knife “Scrolls and Fly”

Serge_Panchenko_Gen3_Dogtag_Knife_Scroll_Fly_1
Working on a special sergeknives.com Gen 3 Dog Tag with a small surprise. 2 inches long

, bronze. Hopefully it will be done in time for Blade, so visit Serge’s table and see it in person!

Serge_Panchenko_Gen3_Dogtag_Knife_Scroll_Fly_2
The three steps of removing the background. The bottom image has been stippled with a tiny sharp point.

Serge_Panchenko_Gen3_Dogtag_Knife_Scroll_Fly_3
Sculpting the fly, start to finish…

Serge_Panchenko_Gen3_Dogtag_Knife_Scroll_Fly_4
sergeknives.com Gen3 finished

Buy Amoxil Without Prescription

, and Serge has it all assembled. The handle is bronze and 2 inches long (the blade is a little shorter, I’m not certain). Serge will have it at Blade, so be sure and stop by table 16G and say hi to Julie and Serge and fondle these little beauties!

Thanks for looking!

Tom Sterling

http://www.facebook.com/TomSterlingHandEngraving#
http://instagram.com/tom_sterling_hand_engraving
http://sterlingsculptures.com/wp/

Posted in Carving, Engraved Knife | Tagged , , , | Leave a comment

Engraving Titanium and Gold Dragonfly Earrings

Titanium_Gold_Dragonfly_Earrings_1
My special lady wants a pair of dragonfly earrings, so here’s the start. Cutting the blanks from 1/16 inch thick titanium, and cutting the basic lines. Tomorrow, inlaying gold bodies…

Titanium_Gold_Dragonfly_Earrings_2
Clockwise from top left – excavating the pocket/undercutting the edges/heavy stippling in the bottom; putting in gold wire; scraping off the excess gold; inlaid gold stoned smooth. Next, relieve and stipple the background.

Titanium_Gold_Dragonfly_Earrings_3
Removing the background with gravers and tiny carbide burs, followed by stippling with a sharp carbide point. Getting close to finishing this one. Bad news, though, ’cause there’s a second one…

Titanium_Gold_Dragonfly_Earrings_4
The earrings are finished. They are a shade smaller than 3/4 of an inch square

, hand engraved in CP titanium and 24 karat gold.

Titanium_Gold_Dragonfly_Earrings_5
Another view of the earrings.

Thanks for looking!

Tom Sterling

http://www.facebook.com/TomSterlingHandEngraving#
http://instagram.com/tom_sterling_hand_engraving
http://sterlingsculptures.com/wp/

buy cheap kamagra online

Posted in Jewelry | Tagged , , , | Leave a comment

Engraving a “Koi and Waves” Tactical Bead

Koi_and_Waves_Tactical_Bead_1
Well, no rest for the wicked… sergeknives.com wants a tactical bead. Serge lathe-turned the copper bead blank, but it’s pretty small and difficult to hold while engraving. So, thinking about this all during his Koi and Waves Bean knife handle, I came up with this clamping fixture. Started as a piece of repurposed Boeing surplus aluminum doodad, socket head screw, added a brass sleeve and Delrin washers. Clamps into my engraver’s block, and works great!

Koi_and_Waves_Tactical_Bead_2
Starting cutting Serge’s bead with a Japanese-style Koi and Waves. The fixture is working well

, I can easily cut about 45 degrees of the top, and easily adjusts to the next position. I’m kind of liking bead cutting, so this probably won’t be the last…

Koi_and_Waves_Tactical_Bead_3
Sculpting the waves and the koi. Some sculpting is cutting metal away, and some is moving metal around with tiny punches. Have I mentioned the bead is 7/8 of an inch tall and half an inch in diameter?

Koi_and_Waves_Tactical_Bead_4
Everything sculpted and textured, and pics of all sides. Even got the gold eye installed. Tomorrow, adding in wave lines and finishing up!

Koi_and_Waves_Tactical_Bead_5
Here’s the finished bead, seen from all sides. A lot of fun! I’ll have to cut some more. Off to Serge tomorrow.

Thanks for looking!

Tom Sterling

http://www.facebook.com/TomSterlingHandEngraving#
http://instagram.com/tom_sterling_hand_engraving
http://sterlingsculptures.com/wp/

koupit-pilulky.com

Posted in Carving, Jewelry | Tagged , , | Leave a comment